Tuesday, December 25, 2007

Merry Christmas!


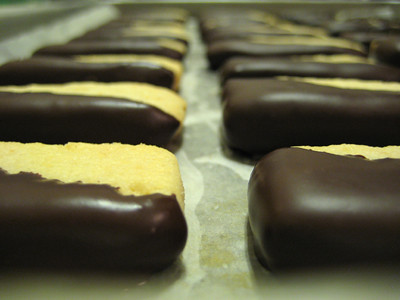
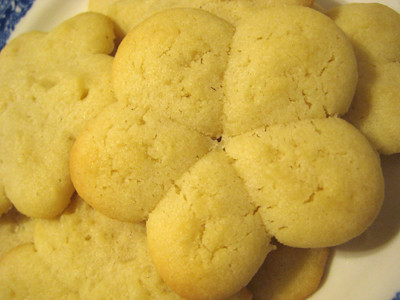
I mentioned in a previous post about how great chocolate dipped macadamia nut shortbread cookies are. My dad loves them (we gave him a box last year for Christmas). There are several companies that make them, but the best are from Big Island Candies. Unfortunately, shipping them from Hawaii to the mainland can cost you a pretty penny so this year I decided I would try to replicate these cookies for my dad. They didn't turn out exactly the same, but I actually think they taste better :)

When I made these almond crescent cookies recently, I thought to myself that it would be great to experiment with the recipe and substitute different types of nuts. When I saw that the ones from Big Island Candies were actually macadamia nut shortbread and not just regular shortbread, I knew I could probably get pretty close to copying the cookie by using macadamia nuts instead of almonds in that recipe. Next time, I may try making a true shortbread cookie, which is one part sugar, two parts butter, and three parts flour. For now, though, I am content to munch on these!


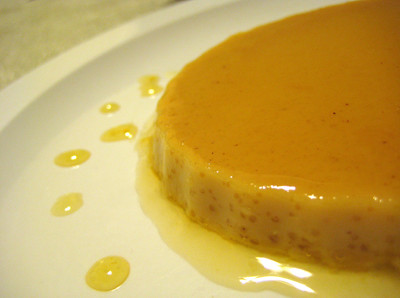
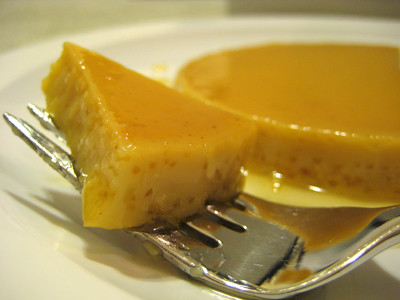
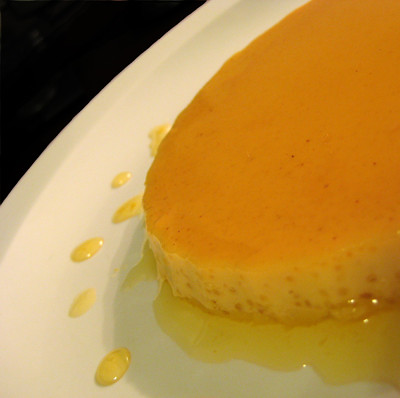
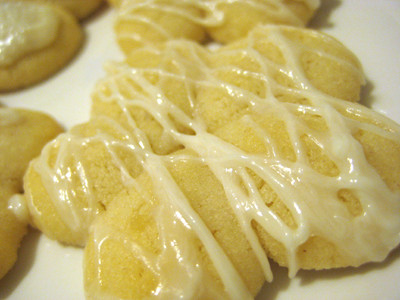
I'm sure that at this point, everyone has stuffed themselves full of prime rib, ham, turkey, mashed potatoes, casseroles, and all sorts of holiday goodies. However, my Christmas gift to all of my blog readers are these delectable chocolate dipped cookies. So here's to wishing everyone a very Merry Christmas! Hope that everyone has a great time with family and friends!

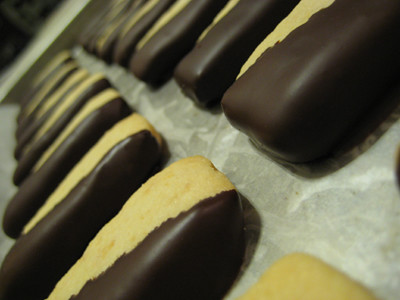
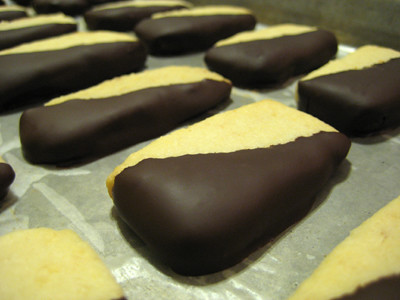
Chocolate Dipped Macadamia Nut Shortbread
adapted from Simply Recipes


1 cup of butter, room temperature
2/3 cup of sugar
1 teaspoon of vanilla extract
2 1/2 cups of flour
1 cup of ground macadamia nuts (I got about 1-1/4 cup from 6 oz of whole nuts)
2 cups semi-sweet chocolate chips
2 tsp shortening (i.e. Crisco)

Preheat oven to 350°F.

In a food processor, pulse the macadamia nuts until they are finely ground. Be careful not to over grind them. Set aside.

Cream the butter and the sugar together until light and fluffy. Add the vanilla extract and mix.

Add the flour and ground macadamia nuts. Mix thoroughly.

Roll the dough onto a lightly floured surface until it is about 1/4" thickness. Using a dull instrument like a butter knife, make horizontal and vertical cuts into the dough, creating rectangles that are approximately 1/2" wide by 2" tall. Carefully transfer onto parchment paper and bake at 350°F for 15-20 minutes or until a light golden brown. Freeze the cookies for approximately 1 hour (or longer) to prepare them for dipping. This will prevent them from crumbling/breaking during the dipping process.

After the cookies have been frozen, melt the chocolate chips in a double boiler. If you do not have one, melt them in your microwave on high heat for 1 minute, at 30 seconds intervals, stirring well between each interval. If the chocolate is not completely melted, continue heating it in your microwave in 10 second intervals, stirring well between each interval, and being careful not to burn the chocolate. Hold the cookies at one corner and dip them into the melted chocolate at a diagonal, then let the chocolate harden.

Friday, December 21, 2007

Holiday Recipe Exchange


This holiday season I decided to participate in a Recipe Exchange on the What's Cooking? Board. The rules are simple. Each of us submitted a recipe and in turn we were given another recipe to make. We were allowed to make any necessary changes to the recipe (as to dietary restrictions, etc) but the original recipe needed to be included with notations as to those items changed. The deadline to post is December 22nd.

I was given a flan recipe to create. Flan is basically a custard topped with a caramel sauce. Sugar syrup is cooked until it reaches the caramel stage, then it is poured into a dish before adding the custard. After it is cooked, the flan is inverted onto a serving plate. The caramelized sugar leaves behind a nice layer of caramel sauce.

I was a little unsure about making this, as I have pretty high standards for flan. My mom makes the best flan, and is always getting requests for this dessert. So I grew up seeing her make this time and time again... and while I was often in the kitchen helping her out when I was growing up, I actually never made this with her. I think I was fairly successful in baking this; I did not get any cracks in my flan and was able to invert it onto a plate in one piece. However, the texture was not what I was used to. My mom's flan is very light; it almost melts in your mouth. This flan is very dense. I'm not sure if the texture came out a little differently because I used ramekins instead of one large square pan, if I over-baked it, or if it's the recipe itself. It's probably just personal preference, but after having my mom's flan for years, it's hard to find another flan that is better :)


There were a few things missing from the recipe, including the original source. I've put question marks below in those places where there is missing information. The most important thing missing from the recipe was the amount of vanilla extract. I emailed Katie who is coordinating the recipe exchange to get the missing details... she emailed the person who submitted the recipe and still has not received a reply. So, I will update this recipe when I find out, but when I made it, I just eye-balled the amount of vanilla I put in it :) After December 22nd, be sure to visit Katie's blog, Good Things Catered, to see the round up with all the goodies that were baked up.

Flan
from ?


6 eggs
1 can of evaporated milk
1 can of condensed milk
pinch of salt
dash of cinnamon
? tablespoons of vanilla

Ingredients for caramel sauce:
2 cups of sugar
1 cup of water

Preheat oven to 350F. Place a large baking pan (large enough to fit a 9" square pan in) in the oven and fill 1/3 of it with water. This is called a water bath.

Next is the sauce. The sauce has to be prepared first since it takes much more time to make than the actual flan batter.

Combine the two cups of sugar and one cup of water in small non-stick sauce pan; add sugar first then pour water over the sugar. Do not stir. Cook on high heat until the sauce reaches a dark caramel color. Be careful not to over cook it or it will be ruined.

While the sauce is cooking combine ingredients for flan and mix well and set aside.

When sauce is done pour into 9" square pan and spread evenly on bottom and sides. Let it set for a moment or your batter will get all mixed in it.

Once it sets for about ? minutes, pour in the flan batter. Place in the large baking pan filled with water.

The water should reach the halfway mark of the smaller pan. If it doesn't, add more water, if it's too much take some out.

Bake for about 40 minutes or until inserted knife is clean when removed.

Place on a large dish and turn upside down. The flan should be brown on the bottom and the sauce should be dripping along the edges.

Chill for 2 hours, and enjoy.

*Note if when you turn the flan over it seems stuck to the pan just separate the edges of the flan from the pan and it should plop right out. Also you'll see some caramel sauce is still stuck to the pan - this is normal. As long as some of it is melted and dripping on the flan you are good.

Tuesday, December 18, 2007

Basil Zucchini


I was looking for a way to use up some zucchini and basil, when I came across this simple recipe for Basil Zucchini. This was a great way for us to incorporate more veggies into our diets. I love anything with fresh basil, and this dish is no exception. If I was a more creative cook, I might have come up with this on my own; but I'm more of a baker and still very much a beginner cook who needs recipes. So, for those who are still in the same boat as me, I hope you enjoy this 'recipe' too :)

Basil Zucchini
from Bon Appétit

1 teaspoon olive oil
3 small zucchini, thinly sliced
2 tablespoons chopped fresh basil
1 garlic clove, minced

Heat oil in heavy medium nonstick skillet. Add zucchini, 1 tablespoon basil and garlic and stir-fry until zucchini is just tender, about 5 minutes. Season to taste with salt and pepper. Remove from heat. Sprinkle with remaining basil.

Yield: 2 servings.

Friday, December 14, 2007

'Tis the Season...

...for holiday baking! This year I decided to bake up a host of holiday delights for my friends and co-workers. I spent all last weekend baking, and put together holiday gift packages chock full of goodies for everyone. My husband got to take an assortment of leftovers to school with him, and this is just some of what they got to sample:


Talk about a baking marathon! I don't think I have ever spent that much time in the kitchen before, but I enjoyed it because it was a true labor of love :) So, if you are looking for ideas this holiday season, check out my next 15 posts! With German, Jewish, and Middle Eastern treats in addition to some traditional holiday classics like peppermint bark and molasses cookies, you're guaranteed to find something you can enjoy with your friends and family this holiday season!

Note: This post prefaces the next (or last) 15 posts; since these are all being updated to my blog on the same day, instead of placing this post at the bottom (or beginning) of the 15 posts, I am placing it at the end so that it will be the first thing you read when you visit my blog.

All the Reindeer Loved Him


I was inspired to make these cookies by one of the recent issues of Southern Living. I thought they were so cute I had to make them. They are obviously more fragile than most cookies due to the pretzel 'antlers,' so these aren't really cookies that can be shipped. They're perfect if you want something cute for a holiday party, though.

Instead of using store bought sugar cookie dough, I made sugar cookies from scratch. It seems like everyone has "the best" sugar cookie recipe in their blog, so I wasn't sure which one I should use. I used this recipe from Allrecipes last year and enjoyed it, but this year I wanted to try another recipe. I considered using this recipe from Blonde Ambition in the Kitchen (actually a recipe from Joelen's Culinary Adventures), but ended up using a recipe from Peabody's blog instead. Her recipe yielded a nice and soft, melt-in-your-mouth, sugar cookie. I wish I could compare it to the recipe from Allrecipes, but it has been so long since I made those that I have no basis for comparison. I halved her recipe and believe it would be more than enough for any occasion; I didn't keep track, but I think I got approximately 4 dozen 2-1/2" cookies out of it. You could definitely make the full recipe and freeze any leftover dough for later use (for great tips on freezing your dough, visit Our Sweet Life). (By halving the recipe, I needed half an egg - I did so by lightly beating an egg in a small bowl, transferring it to a small measuring cup and then adding half the volume to the bowl.)


I have to admit that I became extremely frustrated when making these cookies. Not because the sugar cookies were hard to work with, but because I had the hardest time making the antlers! My pretzels kept breaking in the wrong places and I would end up with pieces that looked nothing like antlers. I found that the best way to do this was to first score the pretzels with a knife at the desired points before breaking apart the pretzel. It didn't always work, but I had much better success using that method.

Don't be too shy about pinching the sugar cookie dough to form the muzzle, as it will spread out while baking. I also couldn't find cinnamon candies at my local grocery store, so I had to use smaller red cake decors instead. I didn't think of it at the time, but I might substitute red M&M's next time, as I don't care much for cinnamon candies.

I decided to submit these cookies for the "Eat Christmas Cookies" blog event, hosted by Susan of Food Blogga. Click on the logo below to visit her blog and see all the other wonderful cookies being submitted!


Rudolph's Christmas Sugar Cookies
from Southern Living


1 (16.5-oz.) package refrigerated sugar cookie dough (I used the sugar cookie recipe below, instead)
36 pretzel twists
36 semisweet chocolate mini morsels (I used regular-sized chocolate chips)
18 red cinnamon candies (I used red cake decors instead)

Freeze dough 15 minutes.

Roll dough to a 1/4-inch thickness on a floured surface. Cut dough with a 3-inch round cutter, and place 2 inches apart on ungreased baking sheets. Using thumb and forefinger, pinch opposite sides of each slice about two-thirds of the way down to shape face.

Break curved sides away from center of each pretzel twist to form antlers. Press bottom of 1 set of antlers on each side at top of each reindeer face.

Bake at 350° according to package directions or until lightly browned. Remove from oven; press in 2 chocolate mini morsels for eyes and 1 red cinnamon candy for nose. Let cool 1 minute on baking sheets. Remove to wire racks; cool 20 minutes or until completely cool.

Yield: Makes 1 1/2 dozen


Sugar Cookies
from Culinary Concoctions by Peabody


4-1/2 cups powdered sugar
1 lb plus 8 oz unsalted butter, softened
3 eggs
1 tbsp vanilla extract
7-1/2 cups all purpose flour
1 tbsp baking soda
1 tbsp cream of tartar

Preheat oven to 375F.

Cream the powdered sugar and butter for at least 3 minutes. Add the eggs one at a time and scrape down the bowl after each egg. Add vanilla and mix for 2 more minutes.

Mix in the flour, baking soda and cream of tartar while mixer is on slow speed. Mix till you have a smooth dough. Chill for at least 4 hours before rolling out.

Roll out dough and cut using whatever shapes you would like. (I used a glass with a diameter of ~2-1/2")

Yield: Approximately 8 Dozen Cookies?

Oreo Truffles


I heard about these oreo truffles last year, and knew I wanted to make them the moment I saw the recipe. Unfortunately, I never got around to it. Now that it is the holiday season, everyone is talking about them again on the What's Cooking? board. I had already decided to make the cookie dough truffles for my holiday gift packages, but figured no one would mind if I included a second type of truffle as well :)


This is another one of those super simple recipes that is sure to impress. As with the cookie dough truffles, I found the best way to dip these was to use a fork. Place the prepared ball on a fork and immerse it in the chocolate; tap the fork against the edges of the bowl lightly to remove the excess chocolate. Invert the truffle onto a baking sheet - more likely than not, the top of the truffle will be slightly exposed since it was the side that was stuck to the fork. Drizzle some melted chocolate over the top and smooth it over. I topped half of my truffles with the oreo cookie crumbs and the other half I drizzled with white chocolate (approx. 1/2 cup white chocolate chips with 1/2 tsp shortening).


Easy Oreo Truffles
from Kraft Foods


1 pkg. (1 lb. 2 oz.) Oreo Chocolate Sandwich Cookies, finely crushed, divided
1 pkg. (8 oz.) Cream Cheese, softened
2 pkg. (8 squares each) Baker's Semi-Sweet Baking Chocolate, melted

Mix 3 cups of the cookie crumbs and the cream cheese until well blended (You don't need to measure out the 3 cups... just reserve about 1 tablespoon of cookie crumbs for the topping. When I only used 3 cups for the truffles, I ended up with leftover crumb topping). Shape into 42 (1-inch) balls. (I used my cookie scoop to measure, then rolled them into balls)

Dip balls in melted chocolate (I placed mine in the freezer for 15 minutes before dipping); place on waxed paper-covered baking sheet. (Any leftover melted chocolate can be stored in tightly covered container at room temperature and saved for another use.) Sprinkle with remaining cookie crumbs (other ideas include a drizzle of white chocolate or chopped Andes mints).

Refrigerate 1 hour or until firm. Store any leftover truffles in tightly covered container in refrigerator.

Yield: 42 Truffles.

My Cookie Press Adventure


One of my co-workers was kind enough to give me his Pampered Chef Cookie Press recently, just in time for the holidays. He said that he had only used it once since getting it, and never had much success with it. I was so excited to make cookies with my new (to me) cookie press! So I went in search of cookies I could make with my new kitchen toy...


I found this recipe for Spritz cookies on the Land O'Lakes website. Prior to getting this cookie press, I had no idea what spritz cookies were! Spritz is actually short for Spritzgebäck. They are German Christmas cookies that typically contain eggs, butter, sugar, and flour. So they are essentially shortbread cookies with eggs. There are several different variations with this recipe, and I decided to make the Eggnog Glazed Spritz.


I have to admit that I was at the verge of returning the cookie press after my first few attempts! I placed the cookie press on my baking sheet, pressed the trigger, and voila! Oh wait... no cookie on my baking sheet, just moosh at the bottom of my cookie press. Okay, maybe that was just because it was my first attempt. I wiped away the extruded dough and tried again. Pressed the trigger, lifted, and... nothing. I did this until I had extruded nearly all the dough inside the cookie press, and I was beginning to understand why my co-worker did not want this cookie press. I was ready to give up (or throw the cookie press out the window!). What was I doing wrong, I asked myself? I checked the recipe which states: If dough is too soft, cover and refrigerate, 30 to 45 minutes. So I put my dough in the refrigerator. As my dough is chilling, I decide to check the Pampered Chef website to see if they have instructions on how to use the cookie press. Great. Their website states: Do not chill dough prior to using in the Cookie Press. So then I had no idea what I was doing wrong! I decided to compromise and chill the dough for about 15-20 minutes before trying again. This time I decided to use a different disk to see if I would have better luck with another design. It was a miracle! The cookies started coming out, one by one, just like they were supposed to! On my first try! :) I didn't have such luck with all of the disks, but I was just happy that I was able to successfully create a full batch of cookies with my dough. If anyone has tips on how I might improve my next cookie press experience, please leave me a comment! :)

Best Ever Spritz
from Land O'Lakes


2/3 cup sugar
1 cup unsalted butter, softened
1 egg
1/2 teaspoon salt
2 teaspoons vanilla
2-1/4 cups all-purpose flour

Heat oven to 400°F. Combine all ingredients except flour in large bowl. Beat at medium speed until creamy. Reduce speed to low; add flour. Beat until well mixed. If desired, prepare dough as directed by variations below. (If dough is too soft, cover and refrigerate, 30 to 45 minutes.)

Place dough into cookie press fitted with template. Form desired shapes, 1 inch apart, onto ungreased cookie sheets.

Bake for 6 to 8 minutes or until edges are lightly browned.

Yield: 5 Dozen Cookies.


Variations:

Chocolate Chip Spritz: Add 1/4 cup coarsely grated semi-sweet chocolate.

Eggnog-Glazed Spritz: Add 1 teaspoon ground nutmeg. Glaze: Stir together 1 cup powdered sugar, 1/4 cup unsalted butter, softened, 2 tablespoons water and 1/4 teaspoon rum extract in small bowl until smooth. Drizzle over warm cookies.

Lebkuchen Spice Spritz: Add 1 teaspoon ground cinnamon, 1 teaspoon ground nutmeg, 1/2 teaspoon ground allspice and 1/4 teaspoon ground cloves. Glaze: Stir together 1 cup powdered sugar, 2 tablespoons milk and 1/2 teaspoon vanilla in small bowl until smooth. Drizzle over warm cookies.

Mint Kisses: Add 1/4 teaspoon peppermint extract. Immediately after removing cookies from oven place 1 chocolate candy kiss on each cookie.

Shimmery Cookies


This is another great recipe from Land O'Lakes. The cranberry and orange combination is perfect for the holidays. The orange sugar that these cookies are rolled in gives them a great texture and flavor (not to mention a little sparkle!). I also love how the orange zest dots these cookies like confetti. These are both beautiful and flavorful; perfect for a holiday party or gift package.

Cranberry Orange Cookies
from Land O'Lakes


Orange Sugar Ingredients:
1/3 cup sugar
1 teaspoon freshly grated orange peel

Cookie Ingredients:
1 cup sugar
3/4 cup unsalted butter, softened
1 egg
2 cups all-purpose flour
1-1/2 teaspoons baking powder
1/4 teaspoon baking soda
1/2 cup sweetened dried cranberries, chopped
1/2 cup chopped macademia nuts (I omitted these - didn't have any on hand)
1 tablespoon freshly grated orange peel


Heat oven to 350°F. Combine all orange sugar ingredients in small bowl; stir until well mixed. Set aside.

Combine 1 cup sugar, butter and egg in large bowl; beat at medium speed until creamy. Reduce speed to low; add flour, baking powder and baking soda. Beat until well mixed. Add all remaining ingredients. Continue beating just until mixed.

Shape dough into 1-inch balls; roll balls in orange sugar. Place 2 inches apart onto ungreased cookie sheets. Flatten with bottom of glass to 1 1/2-inch circles.

Bake for 7 to 11 minutes or until edges are lightly browned. (DO NOT OVERBAKE.) Cool 1 minute; remove from cookie sheets.

Yield: 5 Dozen Cookies.


Recipe Tips:
- To prevent cranberries from sticking to knife when chopping; spray knife with no-stick cooking spray.

- To prevent hands from getting too sugary, shape dough into enough balls to fill one cookie sheet, then roll balls in orange sugar.

Ho Ho Ho!


No holiday gift package would be complete without Santa Cookies :) I got this idea from our old neighbor in North Carolina, Kristen. She surprised us last year with a plate of Santa Cookies. They are basically sugar cookies dressed up as Santa Clause. I thought the idea was so cute, I decided to make them myself for this year's holiday gifts. The ingredient quantities for this recipe are all approximate, as I didn't really measure out what I was using.


For the sugar cookies, I used a recipe from Peabody. I halved her recipe and had enough to make both these and the Rudolph cookies. For the buttercream frosting, I used a recipe from Joelen's Culinary Adventures. Santa's nose is supposed to be a red cinnamon candy, but I wasn't able to find them at my local grocery store so I used small red cake decors instead. You could also use red M&M's if you'd like.


I decided to submit these cookies for the "Eat Christmas Cookies" blog event, hosted by Susan of Food Blogga. Click on the logo below to visit her blog and see all the other wonderful cookies being submitted!


Santa Claus Sugar Cookies
from Kristen (original source unknown)

24 homemade sugar cookies (see recipe below) or store-bought refrigerated sugar cookie dough
2 ounces of red sugar crystals
frosting (see recipe below)
24 mini marshmallows (approx. 1/3 cup)
2 cups of shredded coconut
48 chocolate chips (approx. 1/8 cup)
24 red cinnamon candies or red M&M's

Bake the sugar cookies as directed.

Place the sugar crystals in a shallow bowl. Frost the top 1/3rd of the sugar cookie and roll it in the sugar crystals to make the first part of Santa's hat.

Pipe the frosting in a zig zag pattern along the bottom edge of Santa's hat to create the white fur trim for Santa's hat. If you do not have a piping bag, you can use a ziploc bag with the corner cut out; or you can simply use the edge of your knife to make a smooth frosted edge. Place a marshmallow on one side of the cookie to represent the ball at the tip of the hat.

Frost the bottom third of the sugar cookie in a crescent shape. The cookies look better if you frost a little more than one third of the bottom but less than one half of the cookie. Place the shredded coconut in a shallow bowl and either roll the bottom of the cookie in the shredded coconut, or sprinkle the coconut over the bottom half.

Put a small amount of frosting on the back of each chocolate chip and cinnamon candy and place them on the cookies to represent Santa's eyes and nose.

Yield: 24 Cookies.


Sugar Cookies
from Culinary Concoctions by Peabody


4-1/2 cups powdered sugar
1 lb plus 8 oz unsalted butter, softened
3 eggs
1 tbsp vanilla extract
7-1/2 cups all purpose flour
1 tbsp baking soda
1 tbsp cream of tartar

Preheat oven to 375F.

Cream the powdered sugar and butter for at least 3 minutes. Add the eggs one at a time and scrape down the bowl after each egg. Add vanilla and mix for 2 more minutes.

Mix in the flour, baking soda and cream of tartar while mixer is on slow speed. Mix till you have a smooth dough. Chill for at least 4 hours before rolling out.

Roll out dough and cut using whatever shapes you would like. (I used a glass with a diameter of ~2-1/2")

Yield: Approximately 8 Dozen Cookies?


Frosting
from Joelen's Culinary Adventures

1 teaspoon real vanilla
1 stick of real butter
4 cups powdered sugar
1 tablespoon cream or whole milk

Cream butter, milk and vanilla together. Slowly add powdered sugar to butter until desired consistency.

Frosted Lemon Cookies


This is a cookie that I have been making for years. It was the first recipe I had ever made from the Land O'Lakes website - I never even knew they had a website full of recipes! I'm not sure why, but my cookies never turn out looking like the ones in their picture. Mine are always much flatter. I've tried refrigerating the dough first before baking, but they still flattened out. Regardless, they still taste great :)

This recipe calls for cream of tartar. Cream of tartar is actually a powder that forms as a byproduct of wine making. The crystals that form in wine casks during the fermentation process are purified to produce this acidic powder. It can be used to stabilize egg whites, prevent sugar syrups from crystallizing, reduce discoloration of boiled vegetables, and is sometimes found as the leavening agent in baking powder.

I love this recipe because it is so simple. You just throw all the ingredients together in the bowl, mix thoroughly, and then you're ready to bake! I prefer to drizzle the lemon frosting on my cookies instead of frosting them like they are on the Land O'Lakes website. I find that the lemon flavor is a little overwhelming if it's all concentrated together.

Frosted Lemon Cookies
from Land O'Lakes


Cookie Ingredients:
2-1/2 cups all-purpose flour
1-1/2 cups sugar
1 cup unsalted Butter, softened
2 eggs
1 tablespoon freshly grated lemon peel
1 tablespoon lemon juice
1-1/2 teaspoons cream of tartar
1 teaspoon baking soda
1/4 teaspoon salt

Glaze Ingredients:
2-1/2 cups powdered sugar
1/4 cup lemon juice

Heat oven to 400°F. Combine all cookie ingredients in large bowl. Beat at low speed, scraping bowl often, until well mixed.

Drop dough by rounded teaspoonfuls, 2 inches apart, onto ungreased cookie sheets. Bake for 6 to 8 minutes or until edges are lightly browned.

Meanwhile, combine all glaze ingredients in small bowl; stir until smooth. Frost warm cookies with glaze. Sprinkle with additional lemon peel, if desired.

Yield: 5 dozen cookies.

Rugelach


I was watching the Food Network when I saw the Barefoot Contessa make rugelach. Rugelach are Jewish pastries. They typically consist of a cream cheese dough with various fillings such as walnuts, cinnamon, raisins, raspberry preserves, apricot preserves, or chocolate.


These reminded me of pastries that my mother-in-law makes that I love. The ones that she bakes are sour cream dough filled with apricot preserves. I haven't had the chance to get the recipe from her and these looked fairly simple, so I thought I would give it a try. I love these! They were probably one of the favorite things I made during my baking frenzy :)


The recipe calls for the dough to be divided into quarters. I made one batch just like Ina did on her show - I rolled the dough out into a circle and then cut it into 12 pieces and then rolled them into little crescents. I really didn't care much for their appearance that way, so the last three batches I made, I rolled the dough into rectangles and cut it into strips. I think they look much better this way (not to mention that it's much easier to keep the filling inside them by doing so).

Rugelach
from Barefoot Contessa


8 ounces cream cheese, at room temperature
1/2-pound unsalted butter, at room temperature
1/4 cup granulated sugar plus 9 tablespoons
1/4 teaspoon kosher salt
1 teaspoon pure vanilla extract
2 cups all-purpose flour
1/4 cup light brown sugar, packed
1 1/2 teaspoons ground cinnamon
3/4 cup raisins
1 cup walnuts, finely chopped (I omitted these)
1/2 cup apricot preserves, pureed in a food processor (I used half apricot, half peach)
1 egg beaten with 1 tablespoon milk, for egg wash

Cream the cheese and butter in the bowl of an electric mixer fitted with the paddle attachment until light. Add 1/4 cup granulated sugar, the salt, and vanilla. With the mixer on low speed, add the flour and mix until just combined. Dump the dough out onto a well-floured board and roll it into a ball. Cut the ball in quarters, wrap each piece in plastic, and refrigerate for 1 hour.

To make the filling, combine 6 tablespoons of granulated sugar, the brown sugar, 1/2 teaspoon cinnamon, the raisins, and walnuts.


On a well-floured board, roll each ball of dough into a 9-inch circle. Spread the dough with 2 tablespoons apricot preserves (it seems really thin when you are spreading it out, but it's just the right amount) and sprinkle with 1/2 cup of the filling. Press the filling lightly into the dough. Cut the circle into 12 equal wedges--cutting the whole circle in quarters, then each quarter into thirds. Starting with the wide edge, roll up each wedge. (I rolled my dough into 12 x 4.5" rectangles and cut them into twelve 1" wide strips.) Place the cookies, points tucked under, on a baking sheet lined with parchment paper. Chill for 30 minutes.

Preheat the oven to 350 degrees F.

Brush each cookie with the egg wash. Combine 3 tablespoons granulated sugar and 1 teaspoon cinnamon and sprinkle on the cookies. Bake for 15 to 20 minutes, until lightly browned. Remove to a wire rack and let cool.

Cookie Dough Truffles


I grew up helping my mom out in the kitchen. I loved baking with her. However, most people are surprised to hear that I did not grow up eating cookie dough out of the bowl... and to this day I never snack on the dough as I am baking. I do, however, love cookie dough ice cream and cookie dough blizzards! So when I saw this recipe, I knew it would be great for my holiday gift packages, because who doesn't love cookie dough?! :)


I got this recipe from Cara of Cara's Cravings; I believe the original recipe is from RecipeZaar. I found it very difficult to work with the dough; it was extremely sticky. What I ended up doing was using my cookie dough scoop to form rough shapes on a cookie sheet. Then I placed them in the freezer for approximately 15 minutes. After chilling them, I was then able to roll them into balls. After rolling them out, I placed them back in the freezer for 15 minutes before dipping.


I found the best way to dip these was to use a fork. Place the rolled dough on a fork and immerse it in the chocolate; tap the fork against the edges of the bowl lightly to remove the excess chocolate. Invert the truffle onto a baking sheet - more likely than not, the top of the truffle will be slightly exposed since it was the side that was stuck to the fork. Drizzle some melted chocolate over the top and smooth it over.

Everyone loved these. I even had someone ask my husband if they could "order" some from me! I will definitely be making them again in the near future.

These aren't really cookies, but they do make wonderful additions to any holiday tins, so I decided to submit these for the "Eat Christmas Cookies" blog event, hosted by Susan of Food Blogga. Click on the logo below to visit her blog and see all the other wonderful cookies being submitted!


Cookie Dough Truffles
from RecipeZaar


1/2 cup butter, softened
3/4 cup packed brown sugar
2 cups all-purpose flour
1 (14 ounce) can sweetened condensed milk
1 teaspoon vanilla extract
1/2 cup miniature semisweet chocolate chips
1/2 cup chopped walnuts (I omitted these)
1-1/2 lbs semi-sweet chocolate candy coating, chopped (I used the same chocolate recipe for these as I did the chocolate covered pretzels)

In a mixing bowl, cream the butter and brown sugar until light and fluffy. Add the flour, milk and vanilla; mix well. Stir in the chocolate chips and walnuts. (I found the dough too sticky using the recipe as written. Don't use the whole can of condensed milk. Use 12 ounces (all but 1/4 cup), then add in 1/3 cup confectioner's sugar.)

Shape into 1 inch balls; place on waxed paper-lined baking sheets. Loosely cover and refrigerate for 1-2 or until firm.

In a microwave safe bowl, melt candy coating, stirring often until smooth. Dip balls in coating; place on waxed paper-lined baking sheets. Refrigerate until firm, about 15 minutes.

If desired, remelt remaining candy coating and drizzle over candies. (I drizzled white chocolate over mine - approx. 1/2 cup chips with 1/2 tsp shortening.) Store in the refrigerator.