Saturday, February 28, 2009

Flourless Chocolate Cake with Coffee Ice Cream (Daring Bakers)


The February 2009 challenge is hosted by Wendy of WMPE's blog and Dharm of Dad ~ Baker & Chef. We have chosen a Chocolate Valentino cake by Chef Wan; a Vanilla Ice Cream recipe from Dharm and a Vanilla Ice Cream recipe from Wendy as the challenge.

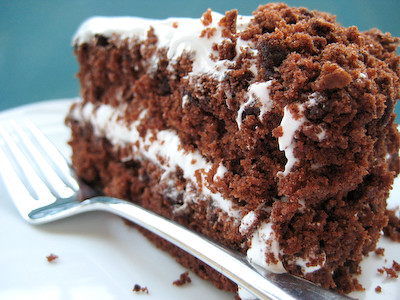
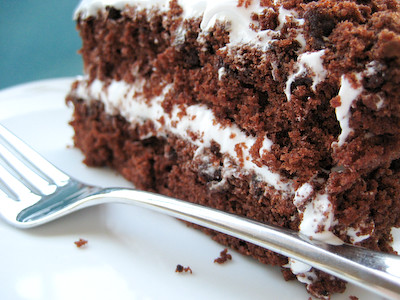
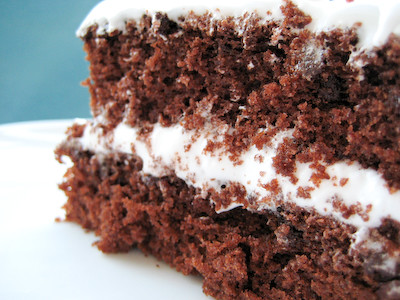
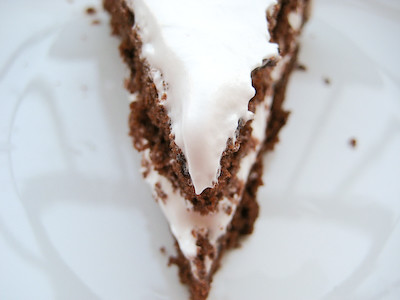
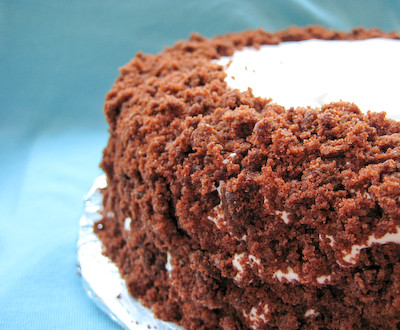
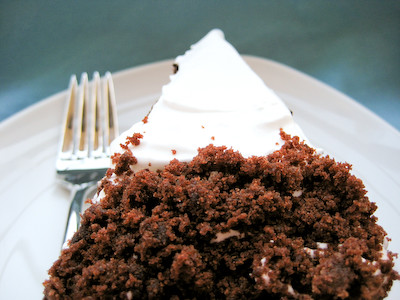
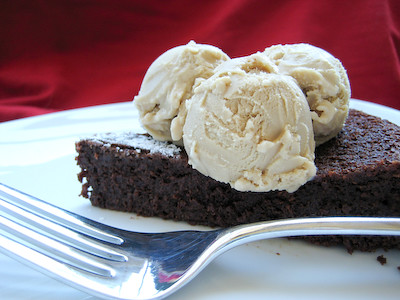
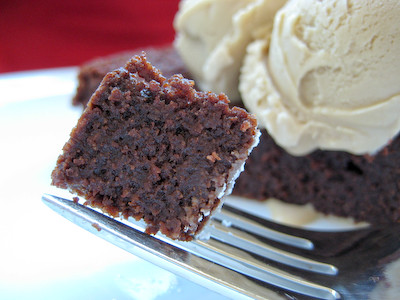
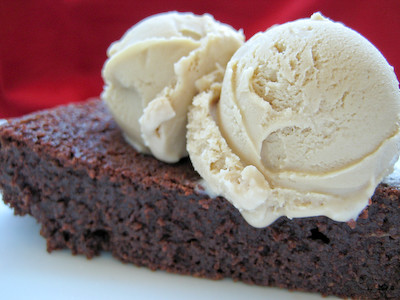
February was another busy for me and I was a bit relieved to see that, like January's Daring Bakers Challenge, February's was simple too. We were to make a flourless chocolate cake and serve it with homemade ice cream. It was optional for us to use a heart shaped pan. I went with a traditional 9-inch round cake pan, but because it's called a Chocolate Valentino, I decorated the top of my cake with a powdered sugar heart :)


I checked my cake after 25 minutes of baking, as instructed in the recipe, and was shocked to find that it was already 170F! Oops! Apparently the 140F must just be a minimum temperature, because my cake turned out just fine. It was still intensely moist, dense, fudgey, and chocolately. I suppose it reached 140F quicker because I baked it in a dark pan. Next time I will start checking the temperature after 20 minutes.


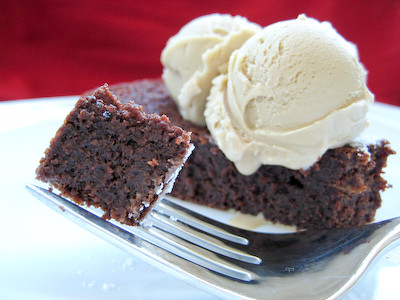
I served this cake with some coffee ice cream, using a recipe from The Perfect Scoop. It was the perfect complement to this cake. In fact, I found the cake to be too sweet on its own, but great with the ice cream.

A big thanks to Wendy and Dharm, for choosing this month's challenge. I made the cake for my husband's birthday today (I procrastinated this month, what can I say?!) and he loved it. Make sure you visit the Daring Bakers Blogroll to see how others enjoyed this seriously decadent chocolate treat!


* Recipes notes:
- Use your favorite chocolate – the finished cake will taste exactly like the chocolate you use. Be creative with your chocolate, if you like a sweeter cake use milk chocolate or a combination of the semisweet and milk chocolate. If you like bittersweet chocolate use that and add sweetness by mixing the semi sweet with bittersweet.
- You may use any shape pan that gives you an area of 50” - 6x8 or 7x7. An 8” spring form pan works with great results as do smaller pans or ramekins. I used a 9" round cake pan and it seemed to work well.
- This cake that will sink a little as it cools but will still hold its shape.
-The top forms a light crust kind of like a brownie, but I inverted my cake after unmolding it for a smoother finish/presentation.

Chocolate Valentino
from Sweet Treats by Chef Wan

Preparation Time: 20 minutes
Baking Time: 25 minutes

16 ounces (1 pound) (454 grams) of semisweet chocolate, roughly chopped
½ cup (1 stick) plus 2 tablespoons (146 grams total) of unsalted butter
5 large eggs separated


Put chocolate and butter in a heatproof bowl and set over a pan of simmering water (the bottom of the bowl should not touch the water) and melt, stirring often.

While your chocolate butter mixture is cooling. Butter your pan and line with a parchment circle then butter the parchment.

Separate the egg yolks from the egg whites and put into two medium/large bowls.

Whip the egg whites in a medium/large grease free bowl until stiff peaks are formed (do not over-whip or the cake will be dry).

With the same beater beat the egg yolks together.

Add the egg yolks to the cooled chocolate.

Fold in 1/3 of the egg whites into the chocolate mixture and follow with remaining 2/3rds. Fold until no white remains without deflating the batter.

Pour batter into prepared pan, the batter should fill the pan 3/4 of the way full, and bake at 375F/190C

Bake for 25 minutes until an instant read thermometer reads 140F/60C.
Note – If you do not have an instant read thermometer, the top of the cake will look similar to a brownie and a cake tester will appear wet.

Cool cake on a rack for 10 minutes then unmold.

Coffee Ice Cream Recipe
from The Perfect Scoop by David Lebovitz

1 1/2 cups whole milk
3/4 cup sugar
1 1/2 cups whole coffee beans (decaf unless you want the caffeine in your ice cream)
Pinch of salt
1 1/2 cups heavy cream
5 large egg yolks
1/4 teaspoon vanilla extract
1/4 teaspoon finely ground coffee (press grinds through a fine mesh sieve)


Heat the milk, sugar, whole coffee beans, salt, and 1/2 cup of the cream in a medium saucepan until it is quite warm and steamy, but not boiling. Once the mixture is warm, cover, remove from the heat, and let steep at room temperature for 1 hour.

Pour the remaining 1 cup of cream into a medium size metal bowl, set on ice over a larger bowl. Set a mesh strainer on top of the bowls. Set aside.

Reheat the milk and coffee mixture, on medium heat, until again hot and steamy (not boiling!). In a separate bowl, whisk the egg yolks together. Slowly pour the heated milk and coffee mixture into the egg yolks, whisking constantly so that the egg yolks are tempered by the warm milk, but not cooked by it. Scrape the warmed egg yolks back into the saucepan.

Stir the mixture constantly over medium heat with a heatproof, flat-bottomed spatula, scraping the bottom as you stir, until the mixture thickens and coats the spatula so that you can run your finger across the coating and have the coating not run. This can take about 10 minutes.

Pour the custard through the strainer and stir it into the cream. Press on the coffee beans in the strainer to extract as much of the coffee flavor as possible. Then discard the beans. Mix in the vanilla and finely ground coffee, and stir until cool.

Chill the mixture thoroughly in the refrigerator, then freeze it in your ice cream maker according to the manufacturer's instructions.

Yield: One quart.

Tuesday, February 24, 2009

Caramel Crunch Bars (TWD)


This week's Tuesdays with Dorie (TWD) recipe was chosen by Whitney of What's left on the table?: Caramel Crunch Bars. I've had my eye on these for quite some time now, and was glad to see that they were finally picked!


It's a caramel-sweet brown sugar cookie/shortbread, slathered in a layer of chocolate, and then sprinkled with toffee bits! I love anything caramel or toffee so I couldn't wait to try these. Those who live outside of the U.S. may have trouble finding Heath toffee bits, but if you can't find them, you can simply make your own toffee and crush them into bits.


I decided to take this opportunity to try the Jembrana chocolate I won from Amano through Blake Makes. The Jembrana chocolate is made with cacao beans harvested from Bali. It has a deep chocolate flavor, a gentle nuttiness, and a very subtle coffee undertone. Chocolate purists will probably insist that you enjoy this chocolate by itself, but this was the perfect choice for Dorie's Caramel Crunch Bars, which actually contain a small amount of coffee in them. If you are a chocolate lover and haven't tried Amano chocolates yet, I encourage you to give them a try. They are one of the few American based chocolate makers that focuses on producing a super premium, high quality chocolate.


It seems that these bars were received with mixed emotions in our TWD group. I totally loved them, even had a hard time eating just one. Just imagine a chocolate chip cookie dipped in chocolate and then toffee bits - that's what these tasted like! :) Even better, they're easier to make than cookies, because you bake it all in one pan then cut it into bars. Ten minutes of prep time and it was ready to go in the oven!


Thanks Whitney, for choosing the Caramel Crunch Bars. I will definitely be making these again! If you would like the recipe, you can find it here. Make sure you visit the TWD Blog Roll to see what everyone else thought of these crunchy treats!


* Recipes notes
- I used semisweet chocolate chips, finely chopped, in this recipe but mini chocolate chips would be great (and convenient) to use here.
- Several bakers found these bars to be a bit on the thin side, but I found them to be just right. If you want a thicker bar, use a 9x9-inch square pan instead of a 13x9-inch pan.
- Be very careful not to overmix the dough.
- These will keep, covered, for about 4 days. Wrapped airtight, they can be frozen up to 2 months.
- For more tips, click here.


Tuesday, February 17, 2009

Sweet Treats in Paris and Devil's Food White-Out Cake (TWD)


I'm back! I had a whirlwind of a week, visiting France and England last week. I had the opportunity to visit Paris, Montpellier and Aigues-Mortes (at the southern coast of France), London, and Leicestershire (north of London). If you're here to read about the Devil's Food White-Out Cake, just scroll down a bit. If you're curious to hear more about my trip first, then read on...


It was freezing there - quite literally! Here were are, all bundled up in the 32°F weather. (At least the skies are clear here - it was pouring rain the following day.)

Look at these spectacular views we captured from the top of the Eiffel Tower! (I'm proud to say we climbed 600+ steps to get to the second platform of the tower before taking the lift to the top!)


Of course my favorite part of the trip was Paris and all the good eats there. Eating fresh baked bread, hot out of the oven... brie... mmmm... I could spend forever just eating in Paris! Unfortunately, we only had two very short days to spend there... but trust me, I spent a good deal of it seeking out some really good eats and sweet treats!

With such a short period of time in Paris, I knew I had to prioritize. Who better than Dorie to point me in the right direction, then?! Armed with a detailed list of some of Dorie's favorite places, I hit the ground running when we arrived there. I really wish that we had had more time in Paris to visit more of the places on Dorie's list, but since we didn't, I focused most of my attention on the sweet treats.

The first place we went to was Dalloyau. I actually stumbled upon this shop and was pleasantly surprised to find it as we were walking towards the Champs-Élysées. I instantly recognized the name from Dorie's list.


We got two different tarts here - a pear tart and an apricot tart. My husband had the apricot tart so I can't say much about it, but the pear tart was definitely scrumptious. The tart crust was just the perfect combination of buttery and flaky; the pears had a really nice, fresh flavor. While it was delicious, I'd have to say that I like Dorie's French Pear Tart slightly more. The almond filling in Dorie's tart was very memorable and sets it apart from other traditional fruit tarts.


Of course I also had to try some macarons there. Did you know that they make about 55 tons of macarons per year there?! That's a lot of egg whites!! They had a nice selection there; my favorite flavors were Cognac/champagne and mandarin orange. These macarons were good, but there wasn't quite enough filling in them for my taste.


Our next stop was Patrick Roger's Boutique. Dorie says that he's one of the finest chocolatiers in Paris. Here, we sampled chocolate that was bursting with flavor - I had a piece that was lemongrass with basil. I would have never thought that adding herbs to chocolate would be good, but I loved it. While we were there, I was able to pick up a nice assortment of chocolates for my mom for her birthday.

Our next destination was just a few minutes' walk away. Of course we could not leave Paris without visiting the boutique of Dorie's dear friend Pierre Hermé. After making and tasting the Most Extraordinary Lemon Cream Tart (a recipe Dorie got from Pierre), I was beside myself to visit his boutique. Oh the choices! I really wish we could have afforded to try more things there, but alas - my husband would have killed me ;)

I got the most darling little orange cheesecake tart that tasted every bit as good as it looked.


My husband went with a simple slice of cheesecake topped with some sort of orange or citrusy top layer. I didn't get to sample it, but my husband wasn't a big fan of it. I'm pretty sure it was fabulous, and like to think that his palate just isn't sophisticated enough to enjoy the creations of an icon such as Pierre Hermé ;)


Of course I could not leave there without getting an assortment of macarons as well. I tried the Chocolate & Caramel, Coffee, Passion Fruit and Milk Chocolate, Fleur de Sel Caramel, Chocolate, Rose, and Chestnut & Matcha Green Tea. I've seen other flavors mentioned, but did not find them while I was there. The Chestnut & Matcha Green Tea macaron was extremel soft and delicate, but one of my favorite flavors. The Passion Fruit and Milk Chocolate macaron was my second favorite.


The macarons at Pierre Hermé were noticeably larger than the ones I had from Dalloyau, though it doesn't really matter because you are charged by weight. Pierre's macarons were slightly better - I definitely noticed that there was a considerably larger amount of filling in them than the ones from from Dalloyau (at least three times more). Personally, I would have preferred something in between - with a moderate amount of filling but not quite so much. If you really like your macarons with lots of filling, then you'll want to get them from Pierre. If you prefer to savor the flavor and texture of the crisp outer shells, then you might be better off getting them from Dalloyau. (In case you're wondering - because I was curious about this too - but macarons will keep in the refrigerator for about 4 days.)

We visited a few other small pastry shops, but that more or less sums up the highlights from our trip to Paris in a nutshell! I have to say that I would not have even know what many of the sweets in these shops were, had it not been for my participation in the food blogging community. While I was there, I saw opéra cakes, kugelhopf, financiers, brioche, etc. If you had asked me what those all were before I started this blog, I wouldn't have had a clue. It's amazing how much I have learned...

So anyway, we'll now return to our regularly scheduled Tuesdays with Dorie post!

This week's Tuesdays with Dorie (TWD) recipe was chosen by Stephanie of Confessions of a City Eater: Devil's Food White-Out Cake. This cake is on the cover of the book, and I think pretty much of all us wanted to make this cake as soon as we saw it.


It's a moist, chocolate cake studded with chocolate chunks, cushioned between fluffy marshmallow frosting. What's not to love? :)


You're supposed to bake the cakes in two 8-inch round pans, divide each cake into two layers, and then create a 3-layer cake. The fourth layer is crumbled up and pressed into the frosting around the outside of the cake.


I used two 9-inch round cake pans, and had some slight doming on each cake. So once I leveled off each cake, I didn't think they were thick enough to slice each layer horizontally in half. Instead, I created a two-layer cake and used the cake I sliced off each dome for the crumbles.


The frosting is different from any other I've made before. You basically whip some egg whites up and then slowly pour in boiling sugar syrup until you end up with a beautiful, white fluff. By itself (if you're the type of person inclined to dip your finger into the frosting after it's made), the frosting actually has an odd taste to it. Slightly sour with a weird after taste to it. In combination with the cake, however, you no longer taste it.


This is a great cake for chocolate lovers. If you serve it chilled, the cake is very dense and almost fudgey, like a brownie. I brought it to work and it was very well received. I'm not much of a cake decorator, so I enjoyed the fact that this cake doesn't have to look perfect :)


Thanks Stephanie, for choosing this scrumptious recipe. It's a wonderful chocolate cake and it is definitely something that I will make again. If you would like the recipe, you can find it here. Make sure you visit the TWD Blog Roll to see how everyone else enjoyed this chocolately treat.

And before ending this post, I'd like to send a huge thank you to Dorie for sharing some of her favorites places in Paris with us.

* Recipes notes:
- I used two 9-inch round cake pans and created a 2-layer instead of 3-layer cake. Consider doubling the frosting recipe if you go the 3-layer route.
- The cake alone can be frozen for up to 2 months, but once it is frosted, it can be stored in the refrigerator for only 2 days.
- For more tips, click here.

Tuesday, February 10, 2009

Tuesday with Dorie in Paris

This week's Tuesdays with Dorie (TWD) recipe was chosen by Shari of Whisk: a food blog: Floating Islands. It's a classic French dessert consisting of soft poached meringue puffs floating in a smooth crème anglaise. I've never seen or heard of this particular dessert before, but I have been wanting to try it ever since I got the cookbook.

Unfortunately, I was unable to make the recipe this week because I am out of the country! While I am unable to participate in Tuesdays with Dorie this week, I will be spending Tuesday with Dorie (in spirit - I know she would love to be here right now) as I wander through the streets of Paris visiting some of Dorie's favorite places - among them, Pierre Hermé's pastry shop! I wonder how many macarons I can stuff in my suitcase and bring home? ;)

Thank you Shari, for choosing this recipe - I promise to try it soon after I return. If you would like the recipe, you can find it here. Make sure you visit the TWD Blog Roll to see how everyone else enjoyed this puffy treat. (I'll be back with TWD next week, as we make the Devil's Food White-Out Cake.)

Saturday, February 7, 2009

Korean-Style Filet Mignon


I know that many beef eaters believe that you only ruin a good cut of meat by seasoning it with anything more than salt & pepper, and by putting any kind of sauce on it. I do feel that a good cut of meat will be good with just salt & pepper, but I also think it can still be good prepared in other ways.


I don't cook beef very often (unless it's ground beef); we eat chicken more than anything else in our household. That's partly because we prefer to eat chicken, and partly because I don't really know how to cook beef very well. So I was pleasantly surprised when I made this Tyler Florence recipe and it turned out great.


You'll probably have to make this a few times to get your meat cooked just the way like - to get a feel for how hot your skillet and oven get. The first time I made these they were cooked a bit more than I would like for them to be, but it was still very good.


I would encourage you, if you're reluctant to try cooking your own filet at home, to give this a try. You'll be surprised at how easy it is, not to mention how much money you'll save. With the current state of the economy, many people are opting to stay in instead of dining out. If you're staying in for Valentine's Day this year, this would be a great way to enjoy that romantic dinner for two at home.

Korean-Style Filet Mignon
from Tyler Florence

Korean-style Glaze:
(I halved this recipe and still had plenty - you can save any leftover glaze in the refrigerator for up to 6 months)

1/2 cup turbinado (raw) sugar (I used regular sugar)
1 cup soy sauce
1 tablespoon Sriracha (hot) sauce
2 tablespoons dark sesame oil

2 (5-ounce) filet mignon steaks
Kosher salt and freshly ground black pepper
2 tablespoons extra-virgin olive oil


Preheat oven to 375 degrees F.

Begin by preparing the Korean-style glaze. Combine the glaze ingredients and simmer gently over low heat for approximately 3 minutes, or until the sugar has dissolved.

Season both sides of the filet mignon generously with salt and pepper. In a large heavy, ovenproof skillet, heat the olive oil over medium-high heat until almost smoking. Place the steaks in the hot pan and cook until well seared on 1 side, about 3 minutes. Turn the steaks over; there should be a nice crust on top. Then transfer the pan to the oven. Roast for 10 to 12 minutes until the steaks are cooked medium-rare (add 4 more minutes for medium). With 1 minute to go, brush steaks with the glaze.

When done remove the steaks and brush again with remaining glaze. Transfer to a platter and cover loosely to let rest for 5 minutes and keep warm. (I like to serve the filet with a small bowl of the glaze as a dipping sauce.)

Tuesday, February 3, 2009

World Peace Cookies (TWD)


This week's Tuesdays with Dorie (TWD) recipe was chosen by Jessica of Cookbookhabit: World Peace Cookies. I already made these back in December, so if you would like to read more about my experience with these cookies, click here. In short, I loved them.

Thanks Jessica, for choosing these melt-in-your-mouth cookies. If you would like the recipe, you can find it here. Make sure you visit the TWD Blog Roll to see what all the fuss is about with these cookies.