Sunday, December 23, 2012

Maple Pumpkin Fudge

I love maple fudge and originally went in search of a maple fudge recipe when I stumbled upon this maple pumpkin fudge.  It's the perfect fall/holiday recipe and seems fairly fool proof - I actually let it get a bit too hot (up to 239 degrees) and it still turned out just fine. 

Just imagine pumpkin pie filling with maple syrup in it, in convenient bite size servings... that is what this fudge tastes like! The maple flavor is certainly there; I'd say it's a good blend of maple of pumpkin... but if you want a predominantly maple fudge with pumpkin undertones, then I would suggest adding maple extract for a stronger maple flavor.

So if you're doing some last minute baking in the days leading up to Christmas, try this unique fudge recipe and let me know what you think.  I'd still like to find a good plain old maple fudge recipe, too, so if you've got one, please leave me a link in the comments section below!
 
Maple Pumpkin Fudge
from Sugar Crafter
    1 1/2 cups granulated sugar
    1 1/2 cups packed light brown sugar
    1 1/2 sticks unsalted butter, cut into small pieces
    2/3 cup evaporated milk
    2/3 cup pureed pumpkin
    1 tsp cinnamon
    1/4 tsp nutmeg
    1/8 tsp cloves
    2 cups white chocolate chips (one 12 ounce bag)
    1/2 lb marshmallows or marshmallow crème
    3 Tbsp maple syrup

Line a 12×8″ baking dish with foil, letting it hang over the edges. In a large sauce pan, whisk together the sugars, butter, evaporated milk, pumpkin, and spices.

Bring to a foil over medium heat, stirring constantly. Continue boiling for 10-12 minutes or until the candy thermometer registers 235 degrees Fahrenheit – soft ball stage (soft ball stage occurs when you drop some of the mixture into a bowl of cold water, and it forms a “soft ball” when it cools and is removed from the water).

Stir in the white chocolate chips first, and then the marshmallows or marshmallow crème and maple syrup.

Stir until melted, and then immediately pour into the prepared pan.

Let cool on a wire rack for 2 hours or until completely cooled. To cut, lift the foil from the ends of the dish. Cut the fudge into 1″ squares. Store in the refrigerator or freezer.

In The Pink White Chocolate Cranberry Fudge

Ok, so I wasn't able to finish posting all of my holiday posts yesterday before the kids started needing my attention.  Today I'll finish off the series with some fudge recipes.  What holiday baking list would be complete without fudge? I love fudge.  Every variety of it - chocolate, peanut butter, chocolate with peanut butter, and maple.  This year I tried two new flavors of fudge: White chocolate cranberry and maple pumpkin (the latter will be my next post).  This white chocolate fudge recipe is nice because it doesn't require the use of a candy thermometer.

I actually made this pink white chocolate cranberry fudge the first time in November for my daughter's birthday party.  I needed both pink and purple desserts and stumbled upon this fudge recipe while browsing the web.  I love white chocolate (even though my husband gets on me for it not being "real" chocolate), so I knew I'd love this fudge.  I omitted the nuts because I never put nuts in my baked goods, but the cranberries were a welcome addition.  The original recipe calls for cherries, but I did not have those on hand.  The dried cranberries work well as a substitute, as they are both tart and sweet.  Everyone who tried this at the party loved it, so if you're looking for something a little bit different this holiday season, I'd encourage you to try this fudge.

In The Pink White Chocolate Cranberry (Almond) Fudge
adapted from Imperial Sugar

2 cups Imperial Sugar® Extra Fine Granulated Sugar
2/3 cup heavy cream
1/2 cup butter
3 cups mini marshmallows
2 cups (one 12 ounce bag) white chocolate chips
1 cup dried cranberries, chopped
3-4 drops red food coloring
1/2 cup chopped slivered almonds, toasted (I omitted these)

Line an 8x8x2-inch baking pan with foil (I used a 9x9 inch pan). Butter foil and set aside.

Combine sugar, cream and butter in a heavy 2-quart saucepan. Cook and stir over low heat until blended. Increase heat to medium. Bring to a boil.  Boil for 5 minutes, stirring constantly.

Remove from heat and stir in marshmallows and white chocolate chips. Stir until chocolate is melted. Stir in cranberries, enough food coloring to turn fudge pink (3-4 drops) and nuts, mixing until well blended.

Spoon into prepared pan. Refrigerate until firm. Cut into squares.  Store tightly covered in refrigerator for up to a month.

Saturday, December 22, 2012

Crunchers

Have you tried these crunchers yet? I've seen variations of this recipe, or similar recipes, made with saltine crackers as well.  I've been seeing them on various blogs and on pinterest for a few years now.  Every time I see them, I've said I want to try them but I've never gotten around to it because I never have butterscotch chips on hand in my pantry.  I love the salty and sweet combination (chocolate covered pretzels are among my favorite!) and when you're baking several different things for the holidays, it's nice to have a few recipes that are simple and quick to prepare.

This recipe is basically club crackers with layers of caramel-type filling in between, topped with a chocolate peanut butter layer.  The best part - they can be made in under 15 minutes.

The best way to describe these "crunchers" would be to compare them to peanut butter Twix.  I actually used multi-grain club crackers because I sent my mom out to get them for me and she didn't know what I'd be using them for so she got the multi-grain variety.  They tasted just fine and I suppose the "multi-grain" aspect might make you feel a little less guilty about eating these ;)

My only issue with them is that they are best when kept refrigerated.  After they are taken out of the refrigerator, the chocolate layer on top starts to get very soft and easily smudged.  So, these wouldn't be the best goodies to ship out if you're looking to mail some holiday goodies.  Don't let that stop you from trying these though because for such minimal effort, these are really good!

Crunchers
from Gonna Want Seconds

    80 - Club Crackers
    1 Cup - Butter
    2 Cups - Graham Cracker Crumbs
    1 Cup - Light Brown Sugar, Firmly Packed
    1/2 Cup - Whole Milk (I used 2%)
    1/3 Cup - Sugar
    2/3 Cup - Creamy Peanut Butter
    1/2 Cup - Semi Sweet Chocolate Chips
    1/2 Cup - Butterscotch Chips

Line a 9x13-inch baking pan with foil, leaving an extension of foil on either end.  Line the foil with 1 layer of club crackers, cutting to fit if necessary.

In a heavy bottom large saucepan, melt butter over medium heat. Add graham cracker crumbs, brown sugar, milk and sugar. Bring to a boil and boil for 5 minutes, stirring constantly. Moderate heat and reduce as needed so mixture doesn't stick to the bottom and mixture doesn't boil too hard (this can cause butter to separate). Remove from heat and spread half of butter mixture evenly over crackers. Place another single layer of crackers evenly over butter mixture, cutting to fit if necessary. Spread remaining butter mixture evenly over crackers. Top evenly with remaining crackers.

In a small saucepan, combine peanut butter, chocolate chips, and butterscotch chips. Melt over medium-low heat, stirring constantly. Spread evenly over top of crackers. Cover, and chill for at least 1 hour. Lift foil overhang and remove bars from pan. Cut into bars. Store in the refrigerator.

Pumpkin Gingerdoodle Cookies

One of the first food blogs I ever started following was Peabody's blog, Culinary Concoctions by Peabody.  Everything she makes looks amazing - I truly wish I was one of her friends so I could have the pleasure of eating all of it ;) So, when I went in search of recipes to try this holiday season, I knew that I could surely find something wonderful to make from there.

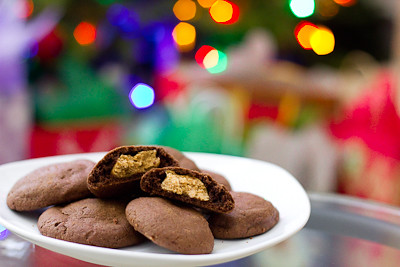
And I was right.  After scrolling through a few posts, I stumbled upon these pumpkin gingerdoodle cookies.  Part pumpkin snickerdoodle and part gingersnap cookie, these cookies combine some of everyone's favorite holiday flavors.  My husband walked into the kitchen and saw me pulling these out of the oven and asked, "Can I have a snickerdoodle?" I informed him they weren't snickerdoodles but pumpkin gingerdoodles and he was happy to try them.  He quickly proclaimed, "These are way better than regular snickerdoodles."

I only had two issues with these cookies.  The first issue was really a non-issue: I had way more pumpkin snickerdoodle dough than gingersnap dough.  So in the end, I made some plain pumpkin snickerdoodle cookies as well (all were eagerly consumed regardless). 

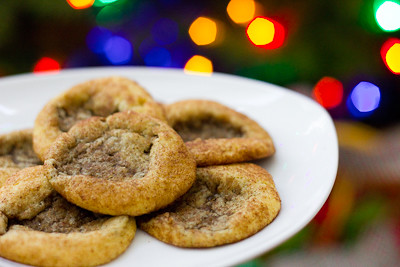
The second issue was in the consistency of the cookies.  The pumpkin snickerdoodle dough puffed up into a wonderful moist, slightly cakey cookie.  The gingersnap dough, on the other hand, puffed up but deflated after I pulled it out of the oven.  So, my cookies looked lopsided when I placed the cookie doughs side by side.  Next I tried a batch with the pumpkin snickerdoodle dough on the bottom and the gingersnap dough on top.  Those turned out okay, but they weren't very aesthetically pleasing.  So finally I made a batch with the gingersnap dough on the bottom and the pumpkin snickerdoodle dough on top and those cookies turned out to the look the best.  I'm not sure how Peabody got her cookies to look the way that she did, but the cookies you see in the photo at the top of this blog post were the best that I could do. 

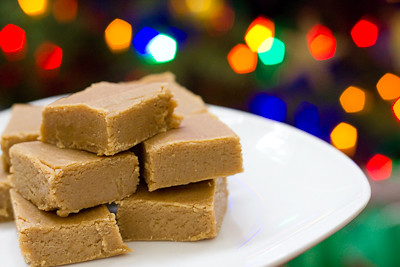
Regardless of how these cookies look, they are amazing.  We couldn't stop eating them in our household and almost didn't have enough to give out to family and friends because we wanted them all to ourselves! So, if you're going to only try one new recipe out this holiday season, I encourage you to make it this one - I promise you won't regret it!

Pumpkin Gingerdoodles
from Culinary Concoctions by Peabody


Pumpkin Snickerdoodle Dough

1 1/2 cups granulated sugar
1 cup unsalted butter
2 eggs
¾ cup pumpkin puree
3 cups all-purpose flour
2 tsp. cream of tartar
1 tsp. baking soda
1/4 tsp. salt

for rolling the cookies in: (I had to double this)
1/4 cup granulated sugar
2 tsp. ground cinnamon

Mix 1 1/2 cups sugar, the butter, pumpkin, and eggs in a stand mixer with paddle attachment.  (It will appear curdled, but don't worry it will all come together in the next step.)

Add in flour, cream of tartar, baking soda and salt and mix on low until fully combined. Set aside.

Gingersnap Dough

3/4 cup butter
1 cup granulated sugar
1/4 cup molasses
1 egg
2 cups all-purpose flour
2 teaspoons baking soda
1/4 teaspoon salt
1 teaspoon cinnamon
1 teaspoon cloves
1 teaspoon ginger

Combine cinnamon and sugar in a small bowl and set aside for rolling dough in.

Cream together butter and sugar. Add molasses and egg and continue beating. Add flour, baking soda, salt, cinnamon, cloves, and ginger and mix until combined, scraping down the sides of the bowl as needed.

Preheat oven to 350°F. Lightly grease baking sheets with no-stick cooking spray and set aside.

(I found that it's best to refrigerate both cookie doughs for at least one hour before assembly and baking.)

Roll a small amount of gingersnap dough into a ball and a small amount of snickerdoodle dough and place them together and gently roll or squeeze together.

Roll in cinnamon sugar.

Place on baking sheets and bake for 9-11 minutes. Remove from oven and allow to cool on baking sheets for 2 minutes before moving to cooling racks.

Magic Middle Peanut Butter Cookies

Wow, has it been a crazy few months. I can't believe that it's been over three months since my last blog post?! I thought that with my daughter starting school in September, I'd have all this extra time to bake and blog again.  However, as many moms out there know - your time without the kids is rare - so I found myself running a million different errands every time she was in school and I was never home to do any baking. I kept thinking to myself that I'd get around to another post "soon" and then before I knew it, I was busy getting ready for my daughter's third birthday party and then a few days later I had my baby girl! Life's been crazy with a newborn and a three year old, to say the least.  For those who have been following my blog for some time and would like to see some pictures of the new little one, you can visit our photographer's blog here. I'm so blessed to be celebrating this holiday with two beautiful little girls that are the light of my life.

And without further ado, I'm hoping to post a flurry of blog posts today to make up for my lack of blogging over the past few months (hopefully the kids will nap long enough for me to get these all up today!).  For those who are still looking for some last minute inspiration for their holiday baking, look no further :) I've got some great recipes that I've tried out this year, and of course there are the tried and true recipes from years past as well.

Let's start off this series of posts with one of my favorite combinations - peanut butter and chocolate.  You really can't go wrong with anything made with these two ingredients! These cookies are impressive yet simple to make.  With chocolate cookies it can be difficult to tell sometimes when the cookies are done baking because they do not turn golden brown like other cookies do.  You'll want to watch these cookies closely - when they just start to barely crack you should take them out of the oven.  They'll continue to bake just a little bit more while they're cooling on your cookie sheet.  If you over bake them, they'll still be good, but a bit on the dry side. 

Magic Middle Peanut Butter Cookies
from Gonna Want Seconds

Cookie:
    1 1/2 Cups - All Purpose Flour
    1/2 Cup - Unsweetened Cocoa Powder
    1/2 Teaspoon - Baking Soda
    1/2 Cup - Sugar
    1/2 Cup - Brown Sugar, Packed
    1/2 Cup - Unsalted Butter, at Room Temperature
    1/4 Cup - Peanut Butter
    1 Teaspoon - Vanilla Extract
    1 - Large Egg

Filling:
    3/4 Cup - Powdered Sugar
    3/4 Cup - Peanut Butter

Preheat oven to 375 degrees.

Make Cookies: In a small  bowl, blend flour, cocoa, and baking soda.

In a large bowl beat white sugar, brown sugar, butter and 1/4 cup peanut butter, until light and fluffy.  Add vanilla and egg, beat until blended.  Stir in flour mixture until blended.  Set aside.

Make the filling: Combine the confectioners sugar and 3/4 cup peanut butter.  Beat well with electric mixer until mixture comes together.

Roll filling into 30 1 inch balls. Form exterior part of cookie by sectioning dough into approximately 1 tablespoon pieces and then shaping the exterior part of cookie around filling balls.  Cover the filling completely.  Place 2 inches apart on an ungreased cookie sheet.  Flatten with a glass dipped in sugar.

Bake at 375 degrees for 7-9 minutes. Allow to cool on cookie sheet for 10 minutes then remove to a cooling rack and cool completely.