Tuesday, July 31, 2012

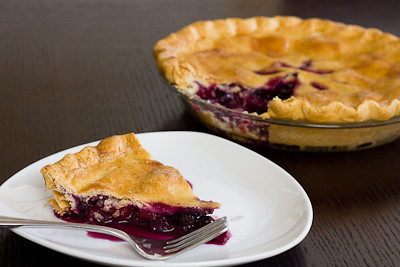
Blueberry Nectarine Pie (TWD)


This week's Tuesdays with Dorie: Baking with Julia recipe was hosted by Hilary of Manchego's Kitchen and Liz of That Skinny Chick Can Bake: Blueberry Nectarine Pie.  This pie is about as summer as you can get.  I love taking advantage of fresh fruits that are in season. 

In this recipe, the blueberries and nectarines get cooked down in a little bit of lime zest and brown sugar and then they're tossed in some fresh lime juice with more fresh blueberries and nectarines.  The lime is what really brings out the flavors in the fruit.  This pie was delicious, and the only thing I'd probably change is to double the fruit next time, as my pie came out a bit thin.
Thanks to Hilary and Liz for hosting; you can find the recipe on their blogs here and here.  Make sure you check here, too, to see what everyone else thought of this fruit-filled summer treat.

* Recipe notes:
- You'll definitely want to use a pie crust shield or cover the edges of your pie with some foil about half way through the baking process to prevent the edges from getting burned.
- I had to bake my pie about an extra 10-15 minutes before the crust was golden and the fruit juices were bubbling.
- I did not bake my pie on a baking sheet; in my experience that only causes the bottom crust to be undercooked.  Instead, I simply laid a piece of foil at the bottom of the oven to catch any juices that might bubble over.

Friday, July 27, 2012

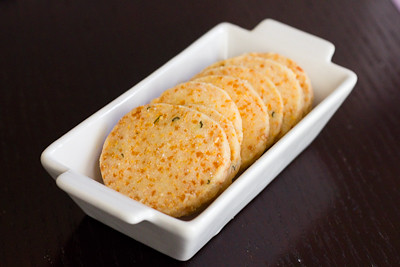
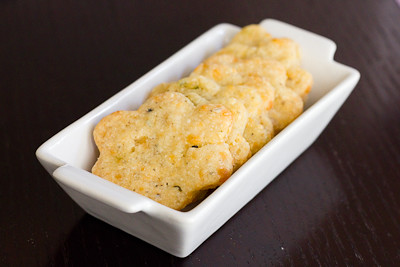
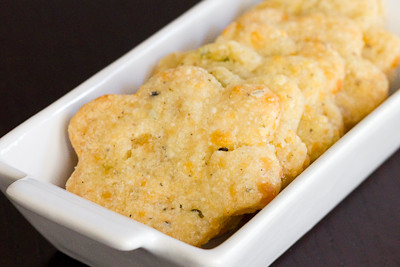
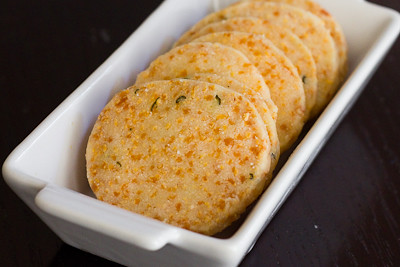
Homemade Crackers: Pepper Jack and Oregano Crackers and Cheddar Rosemary Icebox Crackers (DB)

Our July Daring Bakers' Host was Dana McFarland and she challenged us to make homemade crackers! Dana showed us some techniques for making crackers and encouraged to use our creativity to make each cracker our own by using ingredients we love.

It's been quite some time since I made homemade crackers, so it's hard for me to compare this experience with my previous one.  However, I found that both of these recipes were extremely quick and easy to execute.  The icebox crackers, in particular, were very simple.  Just mix everything together and form the dough into a log and refrigerate; then slice and bake when ready.


My schedule is a bit hectic these days, so I stuck with the recipes as written and didn't take any creative license with them.  The only thing I changed was to omit the walnuts from the cheddar rosemary crackers because I don't care for nuts.

Both types of crackers were very flavorful.  My only complaint would be that the cheddar rosemary crackers were way too salty; so I'll definitely cut back on the salt next time.  These crackers reminded me of a gourmet version of cheezits; the rosemary is such a wonderful addition.

I really enjoyed this challenge because it reminded me of how much I love making my own crackers.  With a toddler to feed, I love that I can make her a snack that doesn't have all the additives and preservatives that are found in store bought crackers.

Thanks Dana, for hosting this month's challenge.  You'll find the recipes below.  Also be sure to check out the Daring Bakers' Blogroll to see what everyone else thought of these savory homemade treats.

Pepper Jack and Oregano Crackers (Roll with pasta rollers or by hand):

Servings: Approximately 80 crackers

Ingredients

1⅔ cups (400 ml) (235 gm) (8¼ oz) all-purpose (plain) flour
2¼ cups (540 ml) (225 gm/8 oz) grated pepper jack cheese, firmly packed
2 teaspoons (10 ml) (1 gm) dried oregano
½ teaspoon (2½ ml) (3 gm) salt
½ teaspoon (2½ ml) (½ gm) black pepper
½ cup (120 ml) (4 fl oz) vegetable oil
½ cup (120 ml) (4 fl oz) water

Spice topping

¼ teaspoon (1¼ ml) (1/8 gm) cayenne
1 teaspoon (5 ml) (3 gm) kosher salt
1 teaspoon (5 ml) (5 gm) sugar

Directions:

1. Combine the spice topping and set aside.
2. Grate the cheese and put in the bowl of a food processor with flour, oregano, salt and pepper and pulse to combine. This can also be done by hand.

3. Add the oil and pulse until the consistency of wet sand is reached.
4. Add enough water for the dough to come together.
5. Form the dough into two disks, wrap with cling film and refrigerate for several hours or overnight.
6. Heat the oven to moderate 325°F/160°C/gas mark 3.
7. Working with a quarter of the dough at a time, either use a rolling pin or roll out in your pasta rollers to 1/8 of an inch (3 mm) thick. If you use pasta rollers, ensure the dough is well floured so as not to stick.
8. Cut the strips into cracker shapes or cut out using a cookie cutter.

9. Transfer to a parchment lined cookies sheet and sprinkle with the spice mixture.
10. Bake for 20-25 minutes until medium golden brown.
11. Store in an airtight container and eat within three days

Cheddar, Rosemary and Walnut Icebox Crackers (form into a log and slice):

Servings: Approximately 48 crackers

Ingredients

½ cup (120 ml) (1 stick) (115 gm/4 oz) butter, well softened
2¼ cups (540 ml) (225 gm/8 oz) grated aged cheddar cheese (the better the cheese, the better the cracker), firmly packed
1 cup plus 3 tablespoons (285 ml) (190 gm/6oz) all-purpose (plain) flour
1 teaspoon (5 ml) (6 gm) salt (I found this to be way too much! try 1/4-1/2 tsp)
1/2 cup (120 ml) (60 gm/2 oz) finely chopped walnuts
1 tablespoon (15 ml) (1¾ gm) finely chopped rosemary

Directions:

1. Combine butter, rosemary and cheese in a stand mixer and beat well (can also be done by hand)

2. Add the flour, salt and nuts and stir to combine
3. Form the dough into two tight logs and wrap with cling film

4. Chill for at least an hour and up to several days. The log can be frozen at this point for several months.
5. Heat the oven to moderate 325°F/160°C/gas mark 3.
6. Slice a log into 5mm (1/5 inch) coins and place on a parchment lined baking sheet
7. Bake about 10 minutes until golden brown
8. Store in an airtight container and eat within three days
9. Try this recipe with different cheeses, nuts (or no nuts), and spices. Get creative!

Storage and Freezing Instructions/Tips:

Generally crackers with less fat and cheese last for weeks in an airtight container and richer crackers only a few days. Dough can be made days ahead, stored in the fridge and baked when needed. The icebox cracker dough can be frozen for several months before thawed, sliced and baked.

Friday, July 20, 2012

Dove Visible Care Body Wash & Spa Certificate Giveaway

I'm a busy working mom.  Sadly, since the birth of my little girl, I've had less and less time to devote to this blog.  I'm thankful to all my readers who still check in on this blog, despite the less frequent updates.  I know the other mothers out there can relate to what I'm talking about.  Sometimes life is so hectic and chaotic, that something as simple as taking a hot shower feels like a day at the spa! It's my own "me time" where I don't have to worry about getting anything else done for anyone else but myself.

I was recently sent a sample of Dove Visible Care Renewing Body Wash to try out at home. It's part of a new line of premium body washes made by Dove that contains the highest concentration of Nutrium Moisture technology of all Dove products.  I was a bit skeptical that you could really see any kind of difference in a short amount of time, but after using it for just a week, I could actually tell that my skin was softer.  I love that I can improve the look and feel of my skin by using a product that is already part of my daily routine - a body wash - instead of adding another step to my regimen because quite frankly, as a busy mom, my skin care regimen is quite minimal these days!

It is available in three varieties: New Dove® VisibleCare Toning Crème Body Wash helps to promote skin’s elasticity and strength, Renewing Body Wash nourishes and replenishes skin, and Softening Body Wash softens skin and dry spots.
 
Not all of us have the time or money to go pamper ourselves at the spa... but this is one small way that you can pamper yourself with more beautiful looking skin in one easy step.  Of course we'd all love some real pampering at the spa, though, right? So, if you'd be interested in entering a sweepstakes to win one of two $500 spa gift cards, follow the instructions below to enter. Even if you don't win, be sure to visit Dove® VisibleCare® to get a coupon for $1 off!

Enter to win one of two $500 Spafinder gift certificates!

NO PURCHASE NECESSARY
COMMENTS TO THIS POST ARE NOT SWEEPSTAKES ENTRIES. PLEASE SEE BELOW FOR ENTRY METHODS FOR THIS SWEEPSTAKES.

You may receive (2) total entries by selecting from the following entry methods:
a) Follow this link, and provide your email address and your response to the Promotion prompt
b) Tweet (public message) about this promotion; including exactly the following unique term in your tweet message: "#SweepstakesEntry"; and then visit this link to provide your email address and the URL to that Tweet.
c) Blog about this promotion, including a disclosure that you are receiving a sweepstakes entry in exchange for writing the blog post, and then visit this link to provide your email address and the URL to that post.

This giveaway is open to US Residents age 18 or older. Winners will be selected via random draw, and will be notified by e-mail. Winners will have 72 hours to claim the prize, or an alternative winner will be selected.

The Official Rules are available here.

This sweepstakes runs from 7/18/2012 - 8/22/2012

Be sure to visit the Dove® VisibleCare™ Crème Body Wash brand page on BlogHer.com where you can read other bloggers’ reviews and find more chances to win!

Thursday, June 28, 2012

Battenberg Cake (DB)


For the June Daring Bakers' challenge, Mandy of What The Fruitcake?! came to our rescue last minute to present us with the Battenberg Cake challenge! She highlighted Mary Berry’s techniques and recipes to allow us to create this unique little cake with ease.

This cake has far grander beginnings than tea with teddy. It was actually created as a wedding cake for royalty.  The first Battenberg cake was made to celebrate the marriage of Queen Victoria’s granddaughter, Princess Victoria, to husband Prince Louis of Battenberg.

It’s traditionally flavored with almond and has the signature Battenberg markings, that is, the yellow and pink squares (said to represent the four princes of Battenberg). The strips of sponge are glued together using jam (normally apricot) and the whole cake is covered in marzipan. Sometimes the edges are crimped and the top is patterned with a knife.

Although there are specialized Battenberg cake tins available, you don’t need one. This cake can be baked in a square baking tin and a divide made with foil to separate the two batters. This recipe really is all about simplicity.

I found the cake to be very simple to make.  The almond flavor was nice and the crumb was moist and perfect.  Instead of marzipan, I attempted to make some chocolate plastique (plastic chocolate).  I was not so successful with this.  Despite kneading my chocolate for quite some time, I just could not get it to come together.  It simply crumbled as soon as I tried to roll it out.  I'm not sure what I did wrong, but this prevented me from wrapping my cake beautifully as others have done.  Instead, I'm going to attempt a marshmallow fondant (for the first time).  That also means that I haven't finished it yet, so pics for this post will come later...


Thanks Mandy, for hosting this month's challenge.  You'll find the recipe below.  Also be sure to check out the Daring Bakers' Blogroll to see what everyone else thought of these beautiful and impressive cakes!

Traditional Battenberg:

Recipe Source: Traditional Battenberg adapted from Mary Berry’s “Baking Bible”

Servings: approx. 8

Ingredients
¾ cup (1½ sticks) 175gm / 6 oz Unsalted Butter, softened & cut in cubes
¾ cup / 175gm / 6 oz Caster Sugar
1¼ cups / 175gm / 6 oz Self-Raising Flour (*To make your own self raising flour: 1 cup Self Raising Flour = 1 cup / 115g All Purpose Flour + 1 ½ tsp Baking Powder + ¼ tsp Salt (omit salt if there is salt in the recipe) sifted together)
3 Large Eggs, room temp
½ cup / 65gm/ 2 1/3 oz Ground Almonds (Can be substituted with ground rice)
3/4 tsp / 3½ gm Baking Powder
½ tsp / 2½ ml Vanilla Extract
1/4 tsp (1¼ ml) Almond Extract
Red Food Colouring, paste, liquid or gel

To Finish
1/3 cup (80 ml) 100gm /3 ½ oz Apricot Jam
1 cup / 225gm / 8 oz Marzipan, natural or yellow


Directions:
1. Preheat oven to moderate 350°F/180°C/160°C Fan Assisted/Gas Mark 4
2. Grease an 8”/20cm square baking tin with butter
3. Line the tin with parchment paper, creating a divide in the middle with the parchment (or foil)
4. OR Prepare Battenberg tin by brushing the tin with melted butter and flouring
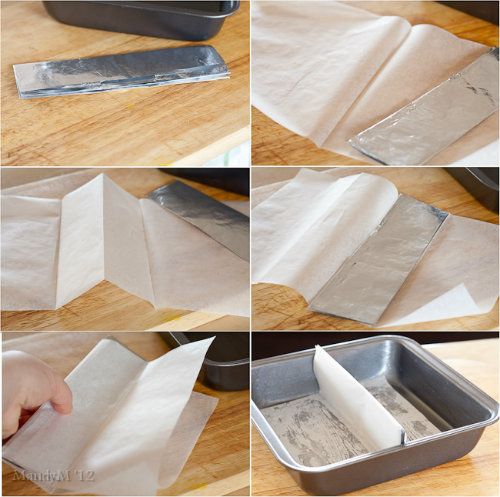

Making the pan divider with parchment paper and foil.

I folded over a sheet of foil several times to help reinforce the divide.
Fold the parchment in half and put the foil into the crease.
Butter the bottom of the cake pan, this will help "glue" the parchment to it.
Make sure the divide is in the middle of the pan and stick the excess parchment onto the bottom.

5. Whisk together the dry ingredients then combine with the wet ingredients in a large bowl and beat together just until the ingredients are combined and the batter is smooth
6. Spoon half the mixture into the one side of the prepared baking tin
7. Add a few drops of red food liquid/gel/paste to the remaining batter, stir until the colour is thoroughly distributed, add more colour if needed
8. Spoon the pink batter into the other half of the prepared baking tin
9. Smooth the surface of the batter with a spatula, making sure batter is in each corner
10. Bake for 25-30mins until the cake is well risen, springs back when lightly touched and a toothpick comes out clean (it should shrink away from the sides of the pan)
11. Leave to cool in the tin for a few minutes before turning out to cool thoroughly on a wire rack
12. Once completely cool, trim the edges of the cake with a long serrated knife
13. Cut each coloured sponge in half lengthways so that you are left with four long strips of sponge
14. Neaten the strips and trim as necessary so that your checkered pattern is as neat and even as possible
15. Gently heat the apricot jam and pass through a small sieve
16. Brush warmed jam onto the strips of cake to stick the cake together in a checkered pattern (one yellow next to one pink. On top of that, one pink next to one yellow)
17. Dust a large flat surface with icing sugar then roll the marzipan in an oblong shape that is wide enough to cover the length of the cake and long enough to completely wrap the cake
18. Brush the top of the cake with apricot jam
19. Place the cake on the marzipan, jam side down
- Tip: Either in the middle or to the one side of the marzipan
20. Brush the remaining three sides with jam
21. Press the marzipan around the cake, making sure the join is either neatly in the one corner, or will be underneath the cake once turned over
- Tip: If you put the sponge to the one side of the marzipan, I found it easiest to "roll" the sponge over and over onto the marzipan instead of lifting the marzipan up onto the sponge
22. Carefully flip the cake over so that the seam is under the cake and score the top of the cake with a knife, you can also crimp the top corners with your fingers to decorate
23. Neaten the ends of the cake and remove excess marzipan by trimming off a small bit of cake on both ends to reveal the pattern

Coffee and Walnut Battenberg:

Servings: Approx. 8
Ingredients
¾ cup (1½ sticks) 175gm / 6 oz Unsalted Butter, softened & cut in cubes
¾ cup / 175gm / 6 oz Caster Sugar
1¼ cups / 175gm / 6 oz Self-Raising Flour (***see end of doc on how to make your own)
3 Large Eggs, room temp
½ cup / 65gm / 2 1/3 oz Ground Almonds (Can be substituted with ground rice)
3/4 tsp / 3½ gm Baking Powder
3 tsp (15 ml) Milk
½ tsp (2½ ml) Vanilla Extract
1½ tsp (7½ ml) 7 gm Instant Coffee Powder or Granules
3 Tbsp / 25gm / 1 oz Walnuts, roughly chopped

To Finish
½ cup (1 stick) 115gm /4 oz Unsalted Butter
2 cups / 225gm /8 oz Powdered (Icing/Confectioners') Sugar
½ tsp / 2 gm Instant Coffee
1½ tsp (7½ ml) Milk or Cream
1 cup / 225gm /8 oz Marzipan, natural or yellow

Directions:
1. Preheat oven to moderate 350°F/180°C/160°C Fan Assisted/Gas Mark 4
2. Grease an 8”/20cm square baking tin with butter
3. Line the tin with parchment paper, creating a divide in the middle with the parchment (or foil)
- Tip: See photos or watch video above for detailed instructions
4. OR Prepare Battenberg tin by brushing the tin with melted butter and flouring
5. Whisk together dry ingredients (except walnuts and coffee) and combine with the wet ingredients in a large bowl (except vanilla and milk) and beat together just until the ingredients are combined and the batter is smooth
6. Spoon half the mixture into a separate bowl and stir in the vanilla, 1½ teaspoons milk and chopped walnuts
7. Spoon the walnut mixture into the one side of the prepared baking tin
8. Dissolve the coffee in the remaining 1½ teaspoon milk and add to the remaining batter, stir until just combined
9. Spoon the coffee batter into the other half of the prepared baking tin
10. Smooth the surface of the batter with a spatula, making sure batter is in each corner
11. Bake for 25-30mins until the cake is well risen, springs back when lightly touched and a
toothpick comes out clean (it should shrink away from the sides of the pan)
12. Leave to cool in the tin for a few minutes before turning out to cool thoroughly on a wire rack
13. Once completely cool, trim the edges of the cake with a long serrated knife
14. Cut each sponge in half lengthways so that you are left with four long strips of sponge
15. Neaten the strips and trim as necessary so that your checkered pattern is as neat and even as possible
16. Combine the buttercream ingredients together and mix until combined
17. Spread a thin layer of buttercream onto the strips of cake to stick the cake together in a checkered pattern (one yellow next to one pink. On top of that, one pink next to one yellow)
- Tip: See photos for detailed instructions
18. Dust a large flat surface with icing sugar then roll the marzipan in an oblong shape that is wide enough to cover the length of the cake and long enough to completely wrap the cake
19. Spread the top of the cake with a thin layer of buttercream
20. Place the cake on the marzipan, buttercream side down
21. Spread buttercream onto the remaining three sides
22. Press the marzipan around the cake, making sure the join is either neatly in the one corner, or will be underneath the cake once turned over
23. Carefully flip the cake over so that the seam is under the cake and score the top of the cake with a knife, you can also crimp the top corners with your fingers to decorate
24. Neaten the ends of the cake and remove excess marzipan by trimming off a small bit of cake on both ends to reveal the pattern

Chocolate Plastique / Modelling Chocolate:

Servings: Approx. 8
Dark Chocolate Plastique
200gm /7 oz Good Quality Dark Chocolate (70% Cocoa content)
¼ cup / 60ml /2 oz Light Corn Syrup / Glucose Syrup / Golden Syrup
Milk Chocolate Plastique
200gm /7 oz Good Quality Milk Chocolate (+-50% Cocoa content)
3 Tbsp / 45ml /1½ oz Light Corn Syrup / Glucose Syrup / Golden Syrup
White Chocolate Plastique
200gm /7 oz Good Quality White Chocolate
2 Tbsp / 30ml /1 oz Light Corn Syrup / Glucose Syrup / Golden Syrup

Directions:
1. Melt the chocolate in a double boiler or in a heatproof bowl over a pot of simmering water, stir occasionally
2. Once completely melted, remove from heat and allow to cool a bit
3. Stir in corn syrup / glucose syrup / golden syrup, it will seize up almost immediately, just keep stirring until mixed and it comes away from the side of the bowl
4. Transfer chocolate into a sealable bag, spread the chocolate out then seal the bag
5. Leave overnight or refrigerate for about 2 hours until completely firm
6. Turn out from the bag and knead on a surface dusted with powdered sugar, at first it will just break , but as you knead, it will warm up and start to become pliable
7. Knead until it's pliable enough to roll out or mould, 5 - 10mins
Storage Instructions/Tips:
- Battenberg will keep for 3-4 days stored at room temperature in an airtight container
- Keep chocolate plastique in an airtight container at room temperature, it will keep for as long as the
expiry date on the chocolate wrapper

Tuesday, June 19, 2012

French Strawberry Cake (TWD)


This week's Tuesdays with Dorie: Baking with Julia recipe was hosted by Sophia of Sophia's Sweets and Allison of Sleep Love Think Dine: French Strawberry Cake.  It's a genoise, or Italian sponge cake, made without any chemical leavening agents.  Instead, the sponge is made by whipping air into the batter and the dry ingredients are folded in.  The batter is extremely delicate, and over mixing will cause it to deflate.  The cake is then split into three layers, and then strawberries and cream are layered into between each cake layer.


I had a few small issues with this cake.  First, I was traveling and did not have an 8-inch cake pan.  I had to use a larger pan, and the resulting cake was too thin to cut into three layers.  So, I ended up baking a second cake and splitting both cakes into two layers instead - resulting a 4-layer cake instead of a 3-layer cake.  Even though I whipped up a full 2 cups of heavy cream (instead of the indicated 1-1/4), I did not have enough cream to pipe around the cake.  Instead, I decided to just decorate my cake with more fresh strawberries.


Thanks to Sophia and Allison for hosting; you can find the recipe on their blogs here and here.  Make sure you check here, too, to see what everyone else thought of wonderful summer treat.

* Recipe notes:
- Be very very careful folding your ingredients together, especially the butter.  If you're not careful all is lost and you shouldn't even bother baking up the deflated batter.
- I'd recommend using at least 2 cups of heavy whipping cream to frost the cake.

Monday, May 28, 2012

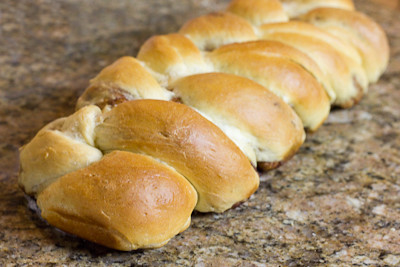
Honey White Challah and Cinnamon & Sugar Challah (DB)


May’s Daring Bakers' was pretty twisted – Ruth from The Crafts of Mommyhood challenged us to make challah! Using recipes from all over, and tips from “A Taste of Challah,” by Tamar Ansh, she encouraged us to bake beautifully braided breads.

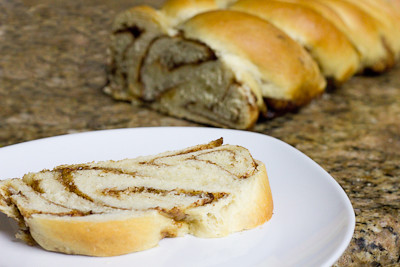
I was eager to try this recipe, and made one honey white loaf and one cinnamon & sugar loaf.  The honey white was good, but the cinnamon & sugar loaf was to die for! The recipe was easy to follow, though I had to add about 1 extra cup of flour before the dough wasn't too sticky to work with.  I was rather concerned as I was adding so much extra flour, but in the end I still had fluffy loaves with a nice crumb.

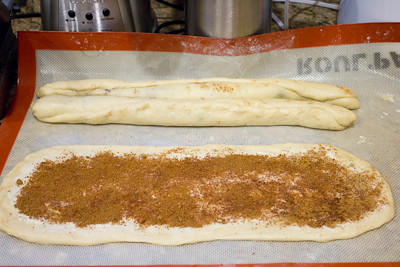
To create the cinnamon and sugar filling, I used 2/3 cup brown sugar (packed) mixed with 1 tablespoon ground cinnamon.  After separating the dough into three equal pieces, I simply rolled each piece into a rectangle and then spread 1.5 tablespoons of softened butter on to each rectangle.  I then spread one-third of the cinnamon and sugar mixture on to each one and then rolled the rectangles up lengthwise. Then I simply braided the three rolls like I did with the regular honey white loaf.

The result was a bread that basically tasted like a delicious cinnamon roll, sans icing.  I realized as I was getting ready to put the bread in the oven that I was out of eggs, so my loaves were without egg washes, but I brushed them with a little bit of milk to add just a little more color to them.  The cinnamon & sugar loaf didn't last very long in our household, and I will definitely be making it again.

Thanks, Ruth, for hosting this month.  If you'd like the recipe, you'll find it posted below, and on Ruth's blog.

Honey White Challah
from Tammy's Recipes

Ingredients
1 ½ cups (360 ml) warm water, separated
1 Tbsp. (15 ml) (15 gm/½ oz sugar
2 Tbsp. (2-2/3 packets) (30 ml) (18 gm) (2/3 oz) dry active yeast
½ cup (120 ml) honey
1 Tbsp. (15 ml) oil (light colored vegetable oil, or olive oil if you prefer)
4 large eggs
1 ½ tsp. 7½ ml) (9 gm) (1/3 oz) salt
5 cups (1200 ml) (700 gm/25 oz) all-purpose (plain) flour, plus more as needed (up to 8 or 9 cups total)
1 egg beaten with 1 tsp. water
Directions:
  1. In mixer bowl/large mixing bowl combine ½ cup warm water, 1 Tbsp. sugar and 2 Tbsp. yeast.  Allow to proof approximately 5 minutes until foamy.
  2. To the yeast mixture add the remaining water, honey, oil, eggs, salt and 5 cups of flour. Knead (by hand or with your mixer’s dough hook) until smooth, adding flour as needed.  Knead for approximately 10 minutes.
  3. Transfer dough to a clean, oiled bowl, turn to coat or add a bit more oil on top.  Cover bowl with a kitchen/tea towel.  Leave to rise in a warm place until doubled, about 1 ½ hours. 
  4. Punch down the dough, divide it into two sections.  Use one half to make each loaf (shaped or braided as desired).
  5. Place loaves on parchment lined or greased baking sheets, cover with a towel, allow to rise 30 minutes.
  6. Preheat oven to 325 degrees.
  7. Brush tops loaves with egg wash.  (Sprinkle with seeds or toppings here if wanted.)
  8. Bake loaves 30-40 minutes until done.
  9. Cool on wire racks.

Wednesday, May 2, 2012

Hungarian Shortbread (TWD)


I'm a day late posting, but this week's Tuesdays with Dorie: Baking with Julia recipe was hosted by Lynette of 1smallkitchen and Cher of The not so exciting adventures of a dabbler…: Hungarian Shortbread.  This shortbread recipe is very similar to most traditional shortbreads - made with flour, sugar, and a lot of butter.  However, instead of rolling out the dough, half of it is grated into the pan and then topped with fruit preserves, and then topped with more grated dough.

The dough recipe was simple, and the results quite delicious.  However, I think I spent a good 30 minutes grating all of the dough! It kept getting too soft to grate so I'd have to put it back in the fridge to chill while I grated the other ball of dough. So, while these were buttery, crumbly, and delicious, I'm afraid I won't be making them again simply because I cannot put myself through another 30 minutes straight of grating again!

Thanks to Lynette and Cher for hosting; you can find the recipe on their blogs here and here.  Make sure you check here, too, to see what everyone else thought of these sweet, buttery treats.

* Recipe notes:
- I used a 13 x 9 inch pyrex pan to bake my shortbread.
- Instead of 8 oz of fruit preserves, I used 16 oz.  This seemed to be a good amount.  I think 8 oz would result in a layer of fruit preserves that was too thin.  I would recommend using at least 12 oz.
- I had to bake my shortbread for an extra 15 minutes before it was golden brown on top.  Some bakers noted that the bottom layer seemed undercooked but I did not have this problem since I baked mine longer.