The December
Daring Bakers Challenge is typically holiday related. This month's challenge is brought to us by the adventurous Hilda from
Saffron and Blueberry and Marion from
Il en Faut Peu Pour Etre Heureux. They have chosen a French Yule Log by Flore from
Florilege Gourmand.
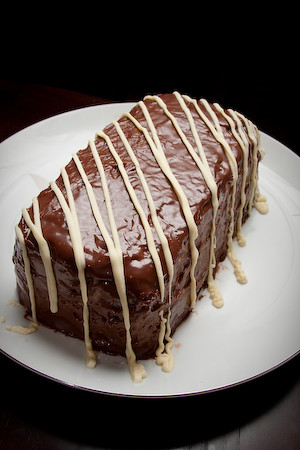
In France you can buy two kinds of Yule log: either the Genoise and Buttercream type with which most of us are familiar (it looks like an actual wooden log), or what is more commonly purchased in France which is a frozen Yule Log very reminiscent of an ice cream cake, only often it’s not made of ice cream but rather frozen mousse of some sort. In French this is called an entremets which is sometimes loosely translated in English as simply a cream dessert. This recipe is not holiday-specific, it is just a scrumptious dessert recipe.
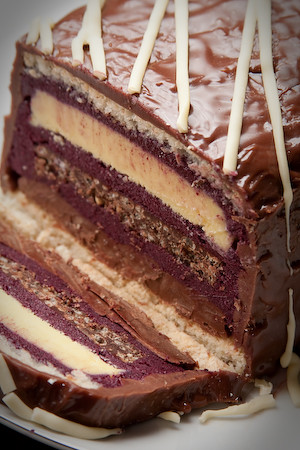
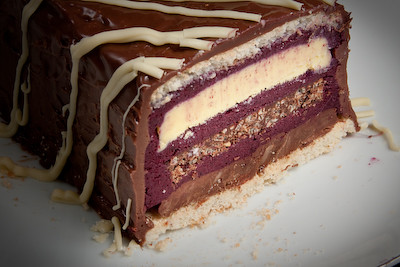
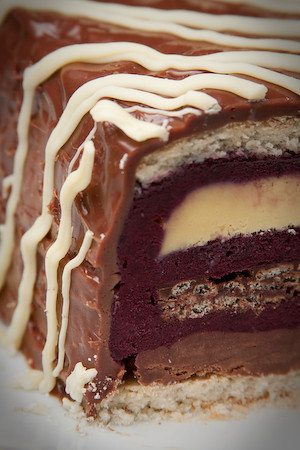
The French Yule Log is basically layers of dacquoise (almond cake), ganache, praline crisp, and crème brulée, sandwiched between layers of mousse, all covered in a chocolate glaze. While this recipe has multiple components and the sum of all its parts takes quite some time, each component taken individually is rather simple. So don't let the length of the recipe deter you from making it.
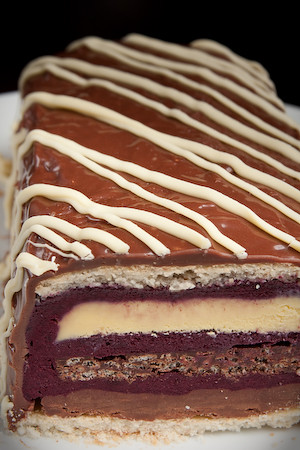
The recipe is best made over the course of two to three days. There are three major waiting periods. The crème brulée needs to cool completely after baking, then it needs to be frozen for one hour. After you layer the dacquoise, crème brulée, and praline insert between several layers of mousse, it needs a few hours in the freezer to set (though I was able to get away with only freezing it for one hour). Then you pipe the ganache onto the frozen mousse, top with the last layer of dacquoise, then freeze it overnight. On the day you are ready to serve the Yule Log, you simply unmold it, glaze it, let it set, then return it to the freezer until you are ready to serve.
For the most part, the Yule Log came together fairly easily. I had never worked with gelatin before, so I did not really know what to expect for the components that included gelatin. I found some powdered gelatin at my grocery store, but then I had no idea how to use it in the recipe because the instructions in the recipe were for gelatin sheets. So, for those who are not familiar with gelatin, here is some information. Gelatin is available in leaves, powder or granules. For leaf gelatin, soak in cold water for 5 minutes to soften, then remove and gently squeeze to remove any excess water. For powdered gelatin, add to a couple tablespoons of warm water and stir until dissolved. If it does not completely dissolve after the addition of warm water, you can heat it in the microwave for 2-3 seconds at a time, but be careful not to boil it.
When making the mousse, the weighted measurement of the cornstarch seemed to be more accurate than the measured quanty. The first time I tried making the mousse, I added 2 tablespoons of cornstarch and despite beating it forever, I was not able to get my egg yolks to be thick, white, and fluffy. So I started over, this time adding 17 grams of cornstarch. I wasn't able to get my yolks completely white, but they were much thicker and fluffier this time around and a very pale yellow.
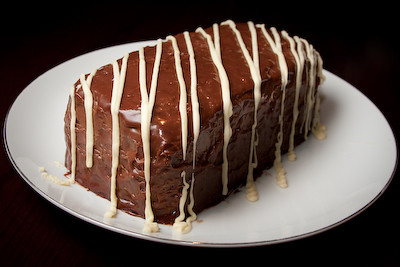
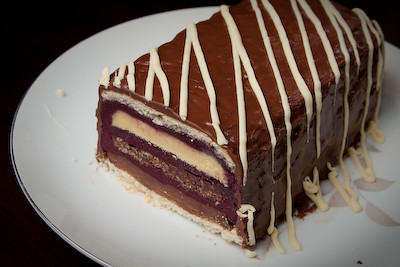
I probably should have used that as an indication that I should weigh my gelatin for the chocolate glaze instead of using the measured amount. My chocolate glaze didn't look as smooth and beautiful as some of the others I have seen so far. I think there was too much gelatin in it. It was very thick and difficult to work with, so my Yule Log looks a bit more "rustic" than some ;)
The only other problem I had with this recipe was with the crème brulée. Seems that this component was the one that most Daring Bakers had problems with for this recipe. Crème brulée isn't that hard to make.
I've made it numerous times in the past and as long as you properly temper the egg yolks, the rest is a breeze. Turns out that many of us had trouble getting it to set at the very low temperature of 210°F. A few bakers noted that they baked it for over two hours, with no success. After reaching the one hour mark and noticing that it was nowhere near set, I checked the Daring Bakers Forum to see if I could get some help. It was then that I discovered that I was not alone. So after baking my crème brulée for 70 minutes, I increased the oven temperature to 225°F for another 10 minutes, then to 250°F for another 20 minutes before it was set. (This also may have been because at very low temperatures, ovens are not very accurate. However, I do not have an oven thermometer so I was not able to gauge this.)
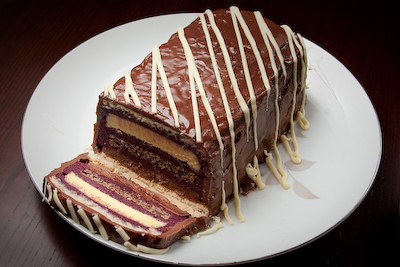
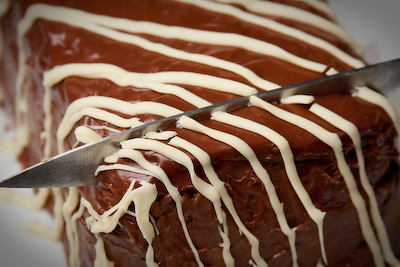
You're supposed to move the Yule Log from the freezer to the refrigerator no more than thirty minutes before serving. However, I had mine thawing in the refrigerator for thirty minutes, then let it sit at room temperature for another thirty minutes, and it was still difficult to slice through it. Having never had one before, I am not sure what the texture is supposed to be like when served, but it was still really frozen and seemed like it would have been better if it had been thawed just a tad longer.
You can customize the various layers in a multitude of ways. I made an almond dacquoise, black raspberry mousse, praline crisp, vanilla crème brulée, dark-milk ganache, and milk chocolate icing. The Yule Log was delicious and definitely a show stopper this Christmas, but I'm not sure I'll be making it again in the future. It wasn't too difficult, but it was time consuming. Just not my cup of tea, I guess.
A big thanks to Hilda and Marion, for choosing this month's challenge. I also need to give special thanks to my brother this month. Since I was home for the holidays, I took advantage of his photography expertise and asked him to shoot all the photos for this post. Make sure you visit the
Daring Bakers Blogroll to see how hundreds of others stacked up!
French Yule Log or Entremets Recipe
by Flore of Florilège Gourmand
I recommend making the elements in this order: - Crème brulée: cool, then freeze overnight - Praline Crisp: can be made while the crème brulée is cooling, then refrigerate overnight- Dacquoise: make this first on day 2- Mousse: can be made while the dacquoise is cooling- Ganache: do not make until after Yule Log has been partially assembled and frozen- Chocolate Icing: make this just before you are ready to glazeElement #1 Dacquoise Biscuit (Almond Cake)Preparation time: 10 mn + 15 mn for baking
Equipment: 2 mixing bowls, hand or stand mixer with whisk attachment, spatula, baking pan such as a 10”x15” jelly-roll pan, parchment paper
Note: You can use the Dacquoise for the bottom of your Yule Log only, or as bottom and top layers, or if using a Yule log mold (half-pipe) to line your entire mold with the biscuit. Take care to spread the Dacquoise accordingly. Try to bake the Dacquoise the same day you assemble the log to keep it as moist as possible.
Ingredients:2.8 oz (3/4cup + 1Tbsp / 80g) almond meal
(learn how to make your own here)1.75 oz (1/2 cup / 50g) confectioner’s sugar
2Tbsp (15g) all-purpose flour
3.5oz (100g / ~100ml) about 3 medium egg whites
1.75 oz (4 Tbsp / 50g) granulated sugar
1. Finely mix the almond meal and the confectioner's sugar. (If you have a mixer, you can use it by pulsing the ingredients together for no longer than 30 seconds).
2. Sift the flour into the mix.
3. Beat the eggs whites, gradually adding the granulated sugar until stiff.
4. Pour the almond meal mixture into the egg whites and blend delicately with a spatula.
5. Grease a piece of parchment paper and line your baking pan with it.
6. Spread the batter on a piece of parchment paper to an area slightly larger than your desired shape (circle, long strip etc...) and to a height of 1/3 inches (8mm).
7. Bake at 350°F (180°C) for approximately 15 minutes (depends on your oven), until golden.
(Don't overbake this or else the dacquoise will be brittle instead of soft. This will make it difficult to cut your Yule into neat slices without the dacquoise crumbling into pieces.)8. Let cool and cut to the desired shape.
Variations on the Almond Dacquoise listed above:Hazelnut DacquoiseSubstitute the same amount of hazelnut meal for the almond meal.Chocolate DacquoiseAdd 3 tablespoons of sifted unsweetened cocoa powder into the almond meal/caster sugar mix in Step #1 of the Almond Dacquoise.Lemon DacquoiseAdd the zest of 1 Lemon after the flour in Step #2 of the Almond Dacquoise.Coconut DacquoiseSubstitute ¼ cup of almond meal and add 2/3 cup shredded coconut in Step #1 of the Almond Dacquoise.Element #2 Dark Chocolate MoussePreparation time: 20mn
Equipment: stand or hand mixer with whisk attachment, thermometer, double boiler or equivalent, spatula
Note: You will see that a Pate a Bombe is mentioned in this recipe. A Pate a Bombe is a term used for egg yolks beaten with a sugar syrup, then aerated. It is the base used for many mousse and buttercream recipes. It makes mousses and buttercreams more stable, particularly if they are to be frozen, so that they do not melt as quickly or collapse under the weight of heavier items such as the crème brulee insert.
In the Vanilla Mousse variation, pastry cream is made to the same effect.
In the Mango Mousse variation, Italian meringue is made to the same effect. Italian meringue is a simple syrup added to egg whites as they are beaten until stiff. It has the same consistency as Swiss meringue (thick and glossy) which we have used before in challenge recipes as a base for buttercream.
The Whipped Cream option contains no gelatin, so beware of how fast it may melt.
Gelatin is the gelifying agent in all of the following recipes, but if you would like to use agar-agar, here are the equivalencies: 8g powdered gelatin = 1 (0.25 oz) envelope powdered gelatin = 1 Tbsp powdered gelatin = 1 Tbsp Agar-Agar.
1 Tbsp. of agar-agar flakes is equal to 1 tsp. of agar-agar powder.
Ingredients:2.5 sheets gelatin or 5g / 1 + 1/4 tsp powdered gelatin
1.5 oz (3 Tbsp / 40g) granulated sugar
1 ½ tsp (10g) glucose or thick corn syrup
0.5 oz (15g) water
50g egg yolks (about 3 medium)
6.2 oz (175g) dark chocolate, coarsely chopped
1.5 cups (350g) heavy cream (35% fat content), divided
1. Soften the gelatin in cold water. (If using powdered gelatin, follow the directions on the package.)
2. Make a Pate a Bombe: Beat the egg yolks until very light in colour (approximately 5 minutes until almost white).
2a. Cook the sugar, glucose syrup and water on medium heat for approximately 3 minutes (if you have a candy thermometer, the mixture should reach 244°F (118°C). If you do not have a candy thermometer, test the sugar temperature by dipping the tip of a knife into the syrup then into a bowl of ice water, if it forms a soft ball in the water then you have reached the correct temperature.
2b. Add the sugar syrup to the beaten yolks carefully by pouring it into the mixture in a thin stream while continuing to beat the yolks. You can do this by hand but it’s easier to do this with an electric mixer.
2c. Continue beating until cool (approximately 5 minutes). The batter should become thick and foamy.
3. In a double boiler or equivalent, heat 2 tablespoons (30g) of cream to boiling. Add the chopped chocolate and stir until melted and smooth.
4. Whip the remainder of the cream until stiff.
5. Pour the melted chocolate over the softened gelatin, mixing well. Let the gelatin and chocolate cool slightly and then stir in ½ cup (100g) of whipped cream to temper. Add the Pate a Bombe.
6. Add in the rest of the WHIPPED cream (220g) mixing gently with a spatula.
Variations on the Dark Chocolate Mousse listed above:White Chocolate MousseSubstitute the same quantity of white chocolate for the dark chocolate in the mousse recipe listed above.Milk Chocolate Whipped Cream (Chantilly):(Can be made the day before and kept in the fridge overnight)
2/3 cup (160g) heavy cream 35% fat
7.8 oz (220g) milk chocolate
2 1/3 tsp (15g) glucose or thick corn syrup
1 1/3 cup (320g) heavy cream 35% fat
1. Chop the chocolate coarsely.
2. Heat the 160g of cream to boiling and pour over the chocolate and glucose syrup.
3. Wait 30 seconds then stir the mix until smooth. Add the remaining cream.
4. Refrigerate to cool, then whip up.Vanilla Mousse2/3 cup (160g) heavy cream (35% fat content)
2/3 cup (160g) whole milk
1 vanilla bean
4 medium-sized egg yolks
3 oz (6 Tbsp / 80g) granulated sugar
3 Tbsp (25g) cornstarch, sifted
4g / 2 tsp powdered gelatin or 2 sheets gelatin
1 cup (240g) whipping cream (35% fat content)
Make a pastry cream:
1. Pour the milk and 2/3 cup cream into a saucepan. Split the vanilla bean in half, scrape the seeds from the vanilla bean halves into milk and put the vanilla bean in as well.
2. Heat to boiling, then turn the heat off, cover and let infuse for at least 30 minutes. Then remove the vanilla bean.
3. Beat the egg yolks with the sugar until white, thick and fluffy.
4. Add the cornstarch, beating carefully to ensure that there are no lumps. While whisking vigorously, pour some of the milk into the yolk mixture to temper it.
5. Put infused milk back on the stove on medium heat. Pour yolk mixture back into the milk while whisking vigorously. Keep whisking vigorously until mixture thickens considerably.
6. As soon as the mixture starts to boil, leave on for only 2 more minutes. (The recipe says you should remove the vanilla bean at this time but in the interest of no one getting burned, that can be done after you take the pastry cream off the stove.)
7. Once removed from the heat, cover the pastry cream by putting plastic film directly on the surface of the cream (this prevents it from forming a thick and unappetizing skin as it cools). Let cool at room temperature.
8. Soften the gelatin in cold water and melt in a small saucepan with 1 tsp of water OR melt in the microwave for 1 second (do not boil). Whisking vigorously, pour the cooled pastry cream over it.
9. Whip the 1 cup whipping cream until stiff and add gradually to the pastry cream (DO NOT WHISK). Blend delicately with a spatula (DO NOT WHISK).Mango Mousse2 medium-sized egg yolks
2 Tbsp (17g) cornstarch
1/3 cup (80g) whipping cream
7 oz (200g) mango puree
3.5 oz (1/2 cup / 100g) granulated sugar
1.3 oz (36g) water
2.5 gelatin leaves or 5g / 2+1/4 tsp powdered gelatin
3.5oz (100g / ~100ml) about 3 medium-sized egg whites
1. Beat the egg yolks with the cornstarch until thick, white and fluffy.
2. Heat the cream in a medium saucepan and once hot, pour a small amount over the egg yolks while whisking vigorously.
3. Pour the egg yolk mixture back into the rest of the cream in the saucepan, add the mango puree and cook, stirring constantly, until it thickens considerably, at least 3-5 mn. Let cool to lukewarm temperature.
4. Make an Italian Meringue: Cook the sugar and water on medium heat until temperature reaches 244°F (118°C) when measured with a candy thermometer. If you don’t have a candy thermometer, test the temperature by dipping the tip of a knife into the syrup then into a bowl of ice water. If it forms a soft ball, you’ve reached the proper temperature.
4a. Beat the egg whites until foamy. Pour the sugar syrup into the whites in a thin stream while continuing to whisk vigorously (preferably with a mixer for sufficient speed). Whisk/beat until cool (approximately 5 minutes). The meringue should be thick and glossy.
5. Soften the gelatin in cold water and melt in a small saucepan with 1 tsp of water OR melt in the microwave for 1 second (do not boil).
6. Put the melted gelatin in a mixing bowl and, while whisking vigorously, pour the lukewarm mango cream over the gelatin.
7. Carefully blend the Italian meringue into the mango mixture.Element #3 Dark Chocolate Ganache InsertPreparation time: 10mn
Equipment: pan, whisk. If you have plunging mixer (a vertical hand mixer used to make soups and other liquids), it comes in handy.
Note: Because the ganache hardens as it cools, you should make it right before you intend to use it to facilitate piping it onto the log during assembly. Please be careful when caramelizing the sugar and then adding the cream. It may splatter and boil.
Ingredients:1.75 oz (4 Tbsp / 50g) granulated sugar
4.5oz (2/3 cup – 1 Tbsp/ 135g) heavy cream (35% fat content)
5 oz (135g) dark chocolate, finely chopped
3Tbsp + 1/2tsp (45g) unsalted butter softened
1. Make a caramel: Using the dry method, melt the sugar by spreading it in an even layer in a small saucepan with high sides. Heat over medium-high heat, watching it carefully as the sugar begins to melt. Never stir the mixture. As the sugar starts to melt, swirl the pan occasionally to allow the sugar to melt evenly. Cook to dark amber color (for most of you that means darker than last month’s challenge).
2. While the sugar is melting, heat the cream until boiling. Pour cream into the caramel and stir thoroughly. Be very careful as it may splatter and boil.
3. Pour the hot caramel-milk mixture over the dark chocolate. Wait 30 seconds and stir until smooth.
4. Add the softened butter and whip hard and fast (if you have a plunging mixer use it). The chocolate should be smooth and shiny.
Variations on the Dark Chocolate Ganache Insert listed above:White Chocolate Ganache Insert1.75 oz (4 Tbsp / 50g) granulated sugar
5 oz (135g) white chocolate, finely chopped
4.5 oz (2/3 cup – 1 Tbsp / 135g) heavy cream (35% fat content)
1. Make a caramel: Using the dry method, melt the sugar by spreading it in an even layer in a small sauce pan with high sides. Heat over medium-high heat, watching it carefully as the sugar begins to melt. Never stir the mixture. As the sugar starts to melt, swirl the pan occasionally to allow the sugar to melt evenly. Cook to dark amber color (for most of you that means darker than last month’s challenge).
2. While the sugar is melting, heat the cream until boiling. Pour cream into the caramel and stir thoroughly. Be very careful as it may splatter and boil.
3. Pour the hot caramel-milk mixture over the dark chocolate. Wait 30 seconds and stir until smooth.Dark-Milk Ganache Insert1.75 oz (4 Tbsp / 50g) granulated sugar
4.5oz (2/3 cup – 1 Tbsp / 135g) heavy cream (35% fat content)
2.7 oz (75g) milk chocolate
3.2 oz (90g) dark chocolate
3Tbsp + 1/2tsp (45g) unsalted butter softened
1. Make a caramel: Using the dry method, melt the sugar by spreading it in an even layer in a small saucepan with high sides. Heat over medium-high heat, watching it carefully as the sugar begins to melt. Never stir the mixture. As the sugar starts to melt, swirl the pan occasionally to allow the sugar to melt evenly. Cook to dark amber color (for most of you that means darker than last month’s challenge).
2. While the sugar is melting, heat the cream until boiling. Pour cream into the caramel and stir thoroughly. Be very careful as it may splatter and boil.
3. Pour the hot caramel-milk mixture over the dark chocolate. Wait 30 seconds and stir until smooth.
4. Add the softened butter and whip hard and fast (if you have a plunging mixer use it). The chocolate should be smooth and shiny.Cinammon-Milk Ganache Insert1.75 oz (4 Tbsp / 50g) granulated sugar
4.5oz (2/3 cup – 1 Tbsp / 135g) heavy cream
A pinch of cinnamon
2.7 oz (75g) milk chocolate, finely chopped
3.2 oz (90g) dark chocolate, finely chopped
3Tbsp + 1/2tsp (45g) unsalted butter softened
1. Make a caramel: Using the dry method, melt the sugar by spreading it in an even layer in a small saucepan with high sides. Heat over medium-high heat, watching it carefully as the sugar begins to melt. Never stir the mixture. As the sugar starts to melt, swirl the pan occasionally to allow the sugar to melt evenly. Cook to dark amber color (for most of you that means darker than last month’s challenge).
2. Heat the cream with the cinnamon (use the quantity of cinnamon you want to infuse the cream, a pinch is the smallest amount suggested) until boiling. Pour cream into the caramel and stir thoroughly. Be very careful as it may splatter and boil.
3. Pour the hot caramel-milk mixture over the milk and dark chocolate. Wait 30 seconds and stir until smooth.
4. Add the softened butter and whip hard and fast (if you have a plunging mixer use it). The chocolate should be smooth and shiny.Element #4 Praline Feuillete (Crisp) InsertPreparation time: 10 mn (+ optional 15mn if you make lace crepes)
Equipment: Small saucepan, baking sheet (if you make lace crepes).
Double boiler (or one small saucepan in another), wax paper, rolling pin (or I use an empty bottle of olive oil).
Note: Feuillete means layered (as in with leaves) so a Praline Feuillete is a Praline version of a delicate crisp. There are non-praline variations below. The crunch in this crisp comes from an ingredient which is called gavottes in French. Gavottes are lace-thin crepes. To our knowledge they are not available outside of France, so you have the option of making your own using the recipe below or you can simply substitute rice krispies or corn flakes or Special K for them. Special note: If you use one of the substitutes for the gavottes, you should halve the quantity stated, as in use 1oz of any of these cereals instead of 2.1oz.
If you want to make your own praline, please refer back to the Daring Baker Challenge Recipe from July 2008.
To make 2.1oz / 60g of gavottes (lace crepes - recipe by Ferich Mounia):
1/3 cup (80ml) whole milk
2/3 Tbsp (8g) unsalted butter
1/3 cup – 2tsp (35g) all-purpose flour
1 Tbsp / 0.5 oz (15g) beaten egg
1 tsp (3.5g) granulated sugar
½ tsp vegetable oil
1. Heat the milk and butter together until butter is completely melted. Remove from the heat.
2. Sift flour into milk-butter mixture while beating, add egg and granulated sugar. Make sure there are no lumps.
3. Grease a baking sheet and spread batter thinly over it.
4. Bake at 430°F (220°C) for a few minutes until the crepe is golden and crispy. Let cool.
Ingredients for the Praline Feuillete:3.5 oz (100g) milk chocolate
1 2/3 Tbsp (25g) butter
2 Tbsp (1 oz / 30g) praline
2.1oz (60g) lace crepes(gavottes) or rice krispies or corn flakes or Special K
1. Melt the chocolate and butter in a double boiler.
2. Add the praline and the coarsely crushed lace crepes. Mix quickly to thoroughly coat with the chocolate.
3. Spread between two sheets of wax paper to a size slightly larger than your desired shape. Refrigerate until hard.
Variations on the Praline Feuillete (Crisp) Insert listed above:Chocolate Crisp Insert3.5 oz (100g) milk chocolate
1 2/3 Tbsp (25g) unsalted butter
2 Tbsp (1 oz / 30g) praline
1 oz. (25g) lace crepes or rice krispies or corn flakes or Special K
1. Melt the chocolate and butter in a double boiler.
2. Add the praline and the coarsely crushed lace crepes. Mix quickly to thoroughly coat with the chocolate.
3. Spread between two sheets of wax paper to a size slightly larger than your desired shape. Refrigerate until hard.Coconut Crisp Insert3.5 oz (100g) white chocolate
1 oz (1/3 cup/25g) shredded coconut
1 2/3 Tbsp (25g) unsalted butter
2.1 oz (60g) lace crepes or rice krispies or corn flakes or Special K
1. Spread the coconut on a baking tray and bake for 5-10 minutes at 375°F (190°C) to toast (a different temperature might work better for you with your own oven).
2. Melt the white chocolate and butter in a double boiler. Stir until smooth and add the toasted coconut.
3. Add the coarsely crushed lace crepes. Mix quickly to thoroughly coat with the chocolate. Spread between two sheets of wax paper to a size slightly larger than your desired shape. Refrigerate until hard.Element #5 Vanilla Crème Brulée InsertPreparation time: 15mn + 1h infusing + 1h baking
Equipment: Small saucepan, mixing bowl, baking mold, wax paper
Note: The vanilla crème brulée can be flavored differently by simply replacing the vanilla with something else e.g. cardamom, lavender, etc...
Ingredients:1/2 cup (115g) heavy cream (35% fat content)
½ cup (115g) whole milk
4 medium-sized (72g) egg yolks
0.75 oz (2 Tbsp / 25g) granulated sugar
1 vanilla bean, split and scraped
1. Heat the milk, cream, and scraped vanilla bean to just boiling. Remove from the stove and let the vanilla infuse for about 1 hour.
2. Whisk together the sugar and egg yolks (but do not beat until white).
3. Pour the vanilla-infused milk over the sugar/yolk mixture. Mix well.
4. Wipe with a very wet cloth and then cover your baking mold (whatever shape is going to fit on the inside of your Yule log/cake) with parchment paper. Pour the cream into the mold and bake at 210°F (100°C) for about 1 hour or until firm on the edges and slightly wobbly in the center.
(I would recommend baking it at 250°F)Tartelette says: You can bake it without a water bath since it is going to go inside the log (the aesthetics of it won't matter as much since it will be covered with other things)....BUT I would recommend a water bath for the following reasons:
- you will get a much nicer mouth feel when it is done
- you will be able to control its baking point and desired consistency much better
- it bakes for such a long time that I fear it will get overdone without a water bath
Now...since it is baked in a pan and it is sometimes difficult to find another large pan to set it in for a water bath, even a small amount of water in your water bath will help the heat be distributed evenly in the baking process. Even as little as 1 inch will help.
5. Let cool and put in the freezer for at least 1 hour to firm up and facilitate the final assembly.
Variations on the Vanilla Crème Brulée insert listed above:Chocolate Creme Brulée Insert½ cup + 1 2/3 Tbsp (140g) whole milk
2/3 cup + 1tsp (140g) heavy cream (35% fat content)
1/3 cup (25g) unsweetened cocoa powder
4 medium-sized (72g) egg yolks
1.4 oz (3 Tbsp / 40g) granulated sugar
1. Heat the milk and cream to just boiling. Add the cocoa powder.
2. Whisk together the sugar and egg yolks (but do not beat until white).
3. Pour the cocoa milk over the sugar/yolk mixture. Mix well.
4. Wipe with a very wet cloth and then cover your baking mold (whatever shape is going to fit on the inside of your Yule log/cake) with parchment paper. Pour the cream into the mold and bake at 210°F (100°C) for about 1 hour or until firm on the edges and slightly wobbly in the center.
Tartelette says: You can bake it without a water bath since it is going to go inside the log (the aesthetics of it won't matter as much since it will be covered with other things)....BUT I would recommend a water bath for the following reasons:
- you will get a much nicer mouth feel when it is done
- you will be able to control its baking point and desired consistency much better
- it bakes for such a long time that I fear it will get overdone without a water bath
Now...since it is baked in a pan and it is sometimes difficult to find another large pan to set it in for a water bath, even a small amount of water in your water bath will help the heat be distributed evenly in the baking process. Even as little as 1 inch will help.
5. Let cool and put in the freezer for at least 1 hour to firm up and facilitate the final assembly.Element #6 Dark Chocolate IcingPreparation time: 25 minutes (10mn if you don’t count softening the gelatin)
Equipment: Small bowl, small saucepan
Note: Because the icing gelifies quickly, you should make it at the last minute.
For other gelatin equivalencies or gelatin to agar-agar equivalencies, look at the notes for the mousse component.
Ingredients:4g / ½ Tbsp powdered gelatin or 2 sheets gelatin
(I would only use 1 teaspoon next time)¼ cup (60g) heavy cream (35 % fat content)
2.1 oz (5 Tbsp / 60g) granulated sugar
¼ cup (50g) water
1/3 cup (30g) unsweetened cocoa powder
1. Soften the gelatin in cold water for 15 minutes.
2. Boil the rest of the ingredients and cook an additional 3 minutes after boiling.
3. Add gelatin to the chocolate mixture. Mix well.
4. Let cool while checking the texture regularly. As soon as the mixture is smooth and coats a spoon well (it is starting to gelify), use immediately.
Variations on the Dark Chocolate Icing listed above:Milk Chocolate Icing1.5 gelatin sheets or 3g / 1/2Tbsp powdered gelatin
4.2 oz (120g) milk chocolate
2 Tbsp (30g) butter
¼ cup (60g) heavy cream (35 % fat content)
1 2/3 Tbsp (30g) glucose or thick corn syrup
1. Soften the gelatin in cold water for 15 minutes.
2. Coarsely chop the chocolate and butter together.
3. Bring the cream and glucose syrup to a boil.
4. Add the gelatin.
5. Pour the mixture over the chocolate and butter. Whisk until smooth.
6. Let cool while checking the texture regularly. As soon as the mixture is smooth and coats a spoon well (it is starting to gelify), use immediately.White Chocolate Icing1.5 gelatin sheets or 3g / 1/2Tbsp powdered gelatin
3.5 oz (100g) white chocolate
2 Tbsp (30g) unsalted butter
1/3 cup (90 g) whole milk
1 2/3 Tbsp (30g) glucose or thick corn syrup
1. Soften the gelatin in cold water for 15 minutes.
2. Coarsely chop the chocolate and butter together.
3. Bring the milk and glucose syrup to a boil.
4. Add the gelatin.
5. Pour the mixture over the chocolate and butter. Whisk until smooth.
6. Let cool while checking the texture regularly. As soon as the mixture is smooth and coats a spoon well (it is starting to gelify), use immediately. How To Assemble your French Yule LogDepending on whether your mold is going to hold the assembly upside down until you unmold it or right side up, this order will be different.
THIS IS FOR UNMOLDING FROM UPSIDE DOWN TO RIGHT SIDE UP.
You will want to tap your mold gently on the countertop after each time you pipe mousse in to get rid of any air bubbles.1) Line your mold or pan, whatever its shape, with rhodoid (clear hard plastic, I usually use transparencies cut to the desired shape, it’s easier to find than cellulose acetate which is what rhodoid translates to in English) OR plastic film. Rhodoid will give you a smoother shape but you may have a hard time using it depending on the kind of mold you’re using.
I used a standard 8.5" x 4.5" loaf pan, lined with plastic wrapYou have two choices for Step 2, you can either have Dacquoise on the top and bottom of your log as in version A or you can have Dacquoise simply on the bottom of your log as in version B:2A) Cut the Dacquoise into a shape fitting your mold and set it in there. If you are using an actual Yule mold which is in the shape of a half-pipe, you want the Dacquoise to cover the entire half-pipe portion of the mold.
3A) Pipe one third of the Mousse component on the Dacquoise.
4A) Take the Creme Brulee Insert out of the freezer at the last minute and set on top of the mousse. Press down gently to slightly ensconce it in the mousse.
5A) Pipe second third of the Mousse component around and on top of the Creme Brulee Insert.
6A) Cut the Praline/Crisp Insert to a size slightly smaller than your mold so that it can be surrounded by mousse. Lay it on top of the mousse you just piped into the mold.
7A) Pipe the last third of the Mousse component on top of the Praline Insert.
8A) Freeze for a few hours to set. Take out of the freezer.
9A) Pipe the Ganache Insert onto the frozen mousse leaving a slight eidge so that ganache doesn’t seep out when you set the Dacquoise on top.
10A) Close with the last strip of Dacquoise.
Freeze until the next day.OR2B) Pipe one third of the Mousse component into the mold.
3B) Take the Creme Brulee Insert out of the freezer at the last minute and set on top of the mousse. Press down gently to slightly ensconce it in the mousse.
4B) Pipe second third of the Mousse component around and on top of the Creme Brulee Insert.
5B) Cut the Praline/Crisp Insert to a size slightly smaller than your mold so that it can be surrounded by mousse. Lay it on top of the mousse you just piped into the mold.
6B) Pipe the last third of the Mousse component on top of the Praline Insert.
7B) Freeze for a few hours to set. Take out of the freezer.
8B) Pipe the Ganache Insert onto the frozen mousse leaving a slight edge so that ganache doesn’t seep out when you set the Dacquoise on top.
9B) Close with the Dacquoise.
Freeze until the next day.If you are doing the assembly UPSIDE DOWN with TWO pieces of Dacquoise the order is:1) Dacquoise
2) Mousse
3) Creme Brulee Insert
4) Mousse
5) Praline/Crisp Insert
6) Mousse
7) Ganache Insert
8) Dacquoise
If you are doing the assembly UPSIDE DOWN with ONE piece of Dacquoise on the BOTTOM ONLY the order is:1) Mousse
2) Creme Brulee Insert
3) Mousse
4) Praline/Crisp Insert
5) Mousse
6) Ganache Insert
7) Dacquoise
If you are doing the assembly RIGHT SIDE UP in a springform pan the order is:1) Dacquoise
2) Ganache Insert
3) Mousse
4) Praline/Crisp Insert
5) Mousse
6) Creme Brulee Insert
7) Mousse
8 OPTIONAL) Dacquoise
THE NEXT DAY...Unmold the cake/log/whatever and set on a wire rack over a shallow pan.
Cover the cake with the icing.
Let set. Return to the freezer.
You may decorate your cake however you wish. The decorations can be set in the icing after it sets but before you return the cake to the freezer or you may attach them on top using extra ganache or leftover mousse, etc...
Transfer to the refrigerator no longer than ½ hour before serving as it may start to melt quickly depending on the elements you chose.


 Posts
Posts