


Among the many goodies I made this holiday season to give away was these stained glass cookies. I came across these cookies on Elise's blog at the end of the holiday season last year, and only now just got around to making them :)
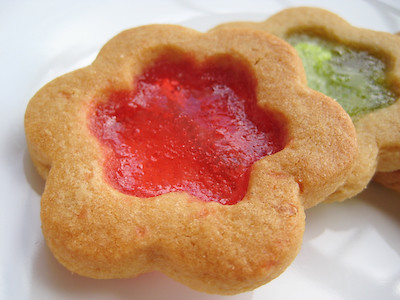
These cookies are just as easy to make as your standard sugar cookie. They have a small amount of molasses in them for a little extra color (and flavor). Just use your favorite cookie cutters and then fill the middle of these cookies with crushed candies to achieve the beautiful stained glass appearance.
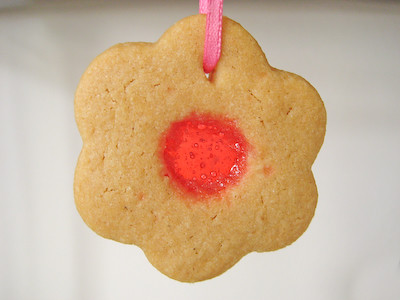
You can simply serve them as is, and they will brighten up any platter... or, you can make a small hole at the top of each one and string a ribbon through the cookie to make the most delicious Christmas ornaments. (They're almost too cute to eat!)

If you've got kids, this is a great way to get them involved with the holiday baking. But rest assured, these will be gobbled up by kids and grown ups alike.

These cookies are being submitted to "Eat Christmas Cookies, Season 2," hosted by Susan of Food Blogga. Click on the logo below to find out more about this event and click here to see the round-up of all the other wonderful cookies being submitted!

Stained Glass Cookies
from Simply Recipes
1/2 cup (1 stick) butter
1/2 cup sugar
1/4 cup brown sugar
1 tablespoon molasses
1/2 teaspoon vanilla extract
1 egg
2 cups flour
1/4 teaspoon salt
3/4 teaspoon baking powder
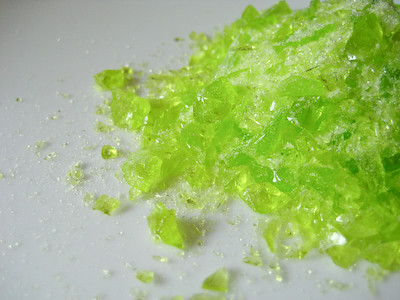
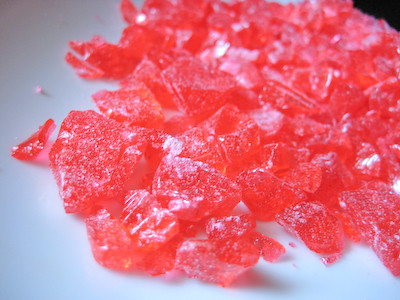
30-40 hard candies (such as Life Savers), preferably in several flavors/colors (I used about 20 Jolly Ranchers)

In a large bowl, using an electric mixer, cream together butter and sugars until fluffy, about 2 minutes. Add molasses and vanilla extract, mixing until incorporated. Add egg and mix until light and smooth, about 1 minute on medium speed.
Sift together flour, salt, and baking powder. Fold dry ingredients into wet mixture. Use electric mixer to blend just until flour is incorporated. Divide dough in half and flatten into two disks. Wrap disks in plastic wrap and refrigerate at least an hour and up to 2 days. (You can also freeze the dough up to 2 months before baking.)
Pre-heat oven to 375°F. Line two baking sheets with parchment paper or Silpat.
Remove any wrappers on candies and separate them by color into plastic bags. Using a mallet to crush candies.
Place one disk between two large sheets of waxed paper and roll to 1/4-inch thickness. Use cookie cutters to cut dough into desired shapes. Transfer cookies to prepared baking sheets, about 1 inch apart. Using a smaller cookie cutter or a knife, cut shapes into centers of cookies, reserving these center bits to add into extra dough.
Use a spoon to sprinkle the crushed candy into the hollowed-out centers of the cookies, filling to the edges. Try to keep the candy within the centers. Any candy specks that fall on the cookie will color the cookie. (I found it easier to use a piece of paper, rolled up, to pour the crushed candy into the centers. I also found that you need to add the candy until it is slightly domed, otherwise there won't be enough candy in the middle after it melts.)
If cookies will be hung as ornaments or decorations, poke a small hole in the top of each cookie before baking. (I used a toothpick to do this. If your cookies are larger, you can use a straw. Remember that as the cookie bakes, it will expand slightly, making your hole a bit smaller - so you'll need to take this into account when creating your holes.)
Bake 9 to 10 minutes. The candy should be melted and bubbling and the cookies just barely beginning to brown. Remove baking sheets from oven and place on wire racks to cool. Allow cookies to cool on pans at least 10 minutes; otherwise, the candy centers may separate from the dough. When cookies are completely cooled, remove and store in an airtight container. String with ribbon if you want to hang as an ornament.
Yield: 2 to 4 dozen cookies, depending on how large you make them.


These are so pretty! I'm definitely making them! Thanks for the recipe :D
ReplyDeleteI have always wanted to try these cookies, but wasn't sure if they would taste good or not. Yours are so festive looking...I might have to try them finally!
ReplyDeleteWOW!! Those look like gemstones!!
ReplyDeleteThey are adorable cookies! I'd like them with Jolly Ranchers in them too! Great cdookie Jaime!!
ReplyDeleteThese look absolutely delicious!
ReplyDeleteThose are just beautiful. I've seen cookies like that before but now you've really tempted me to make them!
ReplyDeleteVery pretty! I never make cookies. I don't know why as I enjoy eating cookies and most don't seem that difficult to make! I need to change that as I'm certain my babygirl would love to make these with all their pretty colors!
ReplyDelete~ingrid
Simple-looking but so beautiful. It's too pretty to eat...
ReplyDeleteGreat job! They look so pretty.
ReplyDeletewonderful! very pretty - thanks for sharing!
ReplyDeleteOooh so pretty and delicate! Nice pics!
ReplyDeleteGorgeous cookies!!
ReplyDeleteSo, so cute!!! I can't wait to try this next year. Thanks for the tips!
ReplyDeletehow cute! they look so impressive too.
ReplyDeleteI love them! So cute and I love jolly ranchers!
ReplyDeleteVery pretty!!
ReplyDeleteWonderful! So cute!
ReplyDeleteI've always wanted to make these, yours look beautiful!
ReplyDeletewow these look really pretty and colourful ;)
ReplyDeleteThese are such fun cookies to make, I haven't made them in years. Your flower shape is a great idea.
ReplyDeleteThose are so pretty!
ReplyDeleteamazing. if i even attempted this, i could see myself making goofball error after goofball error and getting really frustrated, so i choose to just look at and appreciate your lovely creations. :)
ReplyDeleteOh, Jaime, they came out perfectly! I love the pic where they're hanging the window. Now I wish I had a Christmas tree to adorn with them. :)
ReplyDeleteThese are so beautiful! Great job!
ReplyDeleteThese are great! I so wish I had the patience for baking. Beautiful!
ReplyDeleteThis cookies allways look so impressive! I love them! Perfect to hang on the Christmas tree!
ReplyDeleteI thought it was jam or something. What a nice way to add color!
ReplyDeleteHow beautiful! I haven't had a jolly rancher in ages, they're not nearly as popular as they used to be. Thanks for the reminder and the great idea.
ReplyDeleteThese are super cute. You make them sound so easy!
ReplyDeleteso pretty! i've had this recipe flagged too! they look great!
ReplyDeleteThese are very pretty!!! :)
ReplyDeleteThat stained glass is really neat!
ReplyDeleteOk did anyone actually try making these? My roommate and I spent close to two hours (and we used cookie mix) on these, following instructions very carefully, and they came out awful. It is not worth your time. Observe our results: http://i15.photobucket.com/albums/a382/swiftchick/img1260314145659.jpg
ReplyDeleteAnd you think "alright, they don't look the best, but they still taste good, right?" Well, the jolly rancher centers were so hard and chewy they weren't fun to eat.
I really wish this recipe would have worked out, I wanted it to so bad, but I guess you win some, you lose some. The other recipes here look good, but a word of caution: this one is disappointing.
Cate, thanks for your candid feedback. I'm sorry you had issues w/these cookies; all I can say is that while all of mine did not turn out perfect, the vast majority turned out quite nice. Sorry it didn't work out for you!
ReplyDeleteI just mixed up a batch, an am waiting for the dough to set up in refrigerator. I hope they turn out like the pics. Wish me luck
ReplyDeletegood luck, Deb! I hope they turn out well. please come back and let me know :)
ReplyDeleteDo you think that the hard candies could be replaced by LIFESAVERS gummies instead? My sister cannot eat hard candy due to dental problems, do you think gummies would be an acceptable substitute?
ReplyDeleteValerie - so sorry for the delay, just now seeing your comment. I am not sure to be honest. you could melt the gummies and let them set at room temperature and see what happens? It might work but I am just not sure.
ReplyDeleteMy roomate and I made these and they turned out great. We used lollipops and mixed different colours. Tips: make sure you use a thick cookie sheet (or double up), really heap in the candy, keep a close eye on them in the oven and to let them cool completely before popping them off the sheet (10-15 minutes).
ReplyDelete