


Last month's Daring Bakers Challenge was Caramel Cake, with the additional (and optional) challenge of Golden Vanilla Bean Caramels. I was more excited about the caramels than the cake, to be honest, and was really upset that I did not get a chance to complete them in time for posting day.
I had trouble getting my hands on some golden syrup, a key ingredient in the caramels. What's the difference between golden syrup and corn syrup? Golden syrup is made during the process of refining sugar cane juice into sugar, whereas corn syrup is made from corn starch. There are several "recipes" out there where you can use corn syrup to come up with a substitute for golden syrup, but I really wanted to try the recipe as written. After multiple trips to World Market only to find that they were out of stock, I finally found some golden syrup during a trip to Super Walmart.
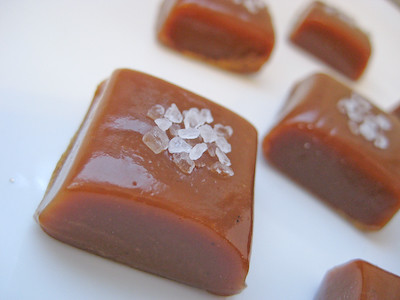
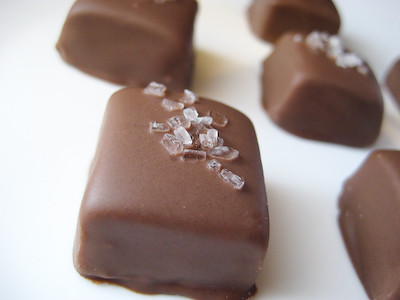
So, I finally got to try my hand at making caramels for the first time. I was so nervous that these would not turn out, as I had read reports from others that they followed the instructions to a "T" and ended up with a block of toffee instead of soft and chewy caramel. I am not sure what happened in those cases, because I pretty much followed the recipe verbatim and ended up with the most wonderful Fleur de Sel Vanilla Bean Caramels! The salty, crunchy sea salt is a great contrast (and complement) to the sweet vanilla bean caramels.
The only change I would probably make next time is to only cook the sugar mixture up to 260F, instead of 265F. I had intended to do that in the first place, but while I was turning around to re-read the recipe to see what temperature they needed to get to, the temperature jumped from 255F to 265F and there was no turning back! Next time, I'll be more careful to keep a closer eye on it. It really takes a long time for it to heat up to 245F... so much so that I was worried it never would. That's partly why I was caught by surprise when it jumped up to 265F so quickly.

My only complaint with this recipe is that the instructions to heat the sugar mixture until it "boils energetically but not violently" is very vague. I think I'd need a video demonstration before I could really tell you what the difference is between "energetic" and "violent." In any case, I had my burner on medium heat the entire time, and that seemed to work out just fine.
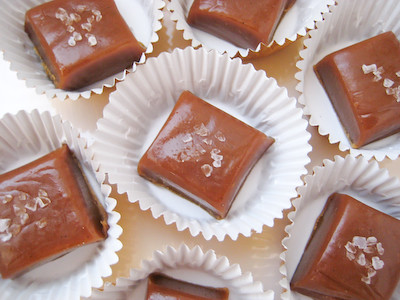
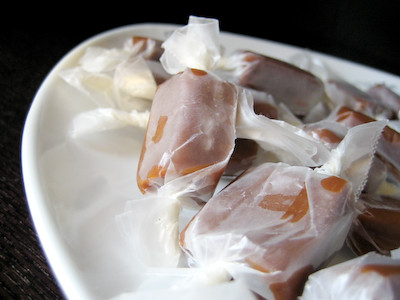
These were another great addition to my gift packages of homemade holiday goodies. I packaged them up in three different ways. I left some of them as is, in gold Wilton candy cups (also called party cups - I also got these at Walmart).
Look at those vanilla bean specks! :)
I wrapped several others in wax paper...

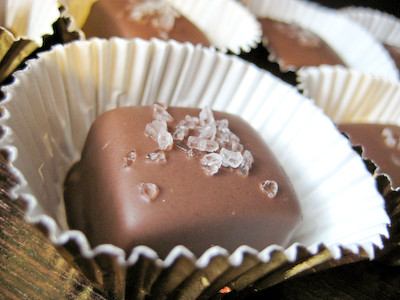
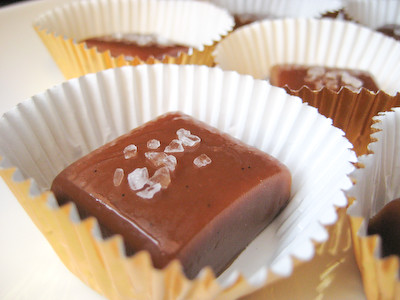
Then I dipped the remaining caramels in melted almond bark. Almond bark is an artificial chocolate that works really well as a chocolate coating. It is made with vegetable fats instead of cocoa butter so it melts easily and hardens nicely at room temperature. If you prefer not to use almond bark, you can also use semisweet chocolate chips, or the premium chocolate of your choice. Simply use the ratio of 1 cup of chocolate chips or 8 ounces of finely chopped chocolate with 1 teaspoon of vegetable shortening (i.e. Crisco) and melt in the microwave or on a double boiler.
I love caramels. I am so excited that I now know how to make them at home myself! If you are worried about working with sugar, please get over your fears and give this recipe a try. These are so good! If you have never tried making candy because you lack a candy thermometer, please go out and buy this digital thermometer. Unlike most candy thermometers, this digital thermometer has many uses. I was able to purchase it for $15 (using a $5 off coupon) and I use it all the time. It is wonderful - it allows you to read the temperature of the meat you are cooking even with the oven door closed... it also has an alarm that sounds when the preset temperature is reached. Even better, it is safe up to 400F, making it the perfect candy thermometer. So what are you waiting for now? Give these a try!
GOLDEN VANILLA BEAN CARAMELS
from Pure Dessert by Alice Medrich
Ingredients
1 cup golden syrup (I used Steen's Syrup which I found at Walmart; you can also get Lyle's Golden Syrup from World Market)
2 cups sugar
3/8 teaspoon fine sea salt
2 cups heavy cream
1 1/2 teaspoons pure ground vanilla beans, purchased or ground in a coffee or spice grinders, or 1 tablespoon plus 1 teaspoon pure vanilla extract (I used vanilla beans from 1 pod + 1 tsp vanilla extract)
3 tablespoons unsalted butter, cut into chunks, softened
Equipment
A 9-inch square baking pan
Candy thermometer (I used my digital thermometer)
Line the bottom and sides of the baking pan with aluminum foil and grease the foil. Combine the golden syrup, sugar, and salt in a heavy 3-quart saucepan and cook over medium heat, stirring with a silicone spatula or wooden spoon, until the mixture begins to simmer around the edges. Wash the sugar and syrup from the sides of the pan with a pastry brush dipped in water. (Don't skip this step - it helps prevent recrystallization of your sugars.) Cover and cook for about 3 minutes. (Meanwhile, rinse the spatula or spoon before using it again later.) Uncover the pan and wash down the sides once more. Attach the candy thermometer to the pan, without letting it touch the bottom of the pan, and cook, uncovered (without stirring) until the mixture reaches 305°F. Meanwhile, combine the cream and ground vanilla beans (not the extract) in a small saucepan and heat until tiny bubbles form around the edges of the pan. Turn off the heat and cover the pan to keep the cream hot.
When the sugar mixture reaches 305°F, turn off the heat and stir in the butter chunks. Gradually stir in the hot cream; it will bubble up and steam dramatically, so be careful. Turn the burner back on and adjust it so that the mixture boils energetically but not violently (I did this at medium heat). Stir until any thickened syrup at the bottom of the pan is dissolved and the mixture is smooth. Continue to cook, stirring occasionally, to about 245°F. Then cook, stirring constantly, to 260°f for soft, chewy caramels or 265°F; for firmer chewy caramels.
Remove the pan from the heat and stir in the vanilla extract, if using it. Pour the caramel into the lined pan. Let set for 4 to 5 hours, or overnight until firm.
Lift the pan liner from the pan and invert the sheet of caramel onto a sheet of parchment paper. Peel off the liner. Cut the caramels with an oiled knife. Wrap each caramel individually in wax paper or cellophane. (I cut out pieces of wax paper that were about 3" x 4". From a standard roll, simply cut out a strip about 3" wide, then fold in thirds and cut the strip into thirds.)
Variations
Fleur de Sel Caramels:
Extra salt, in the form of fleur de sel or another coarse flaked salt, brings out the flavor of the caramel and offers a little ying to the yang. Add an extra scant 1/4 teaspoon of coarse sea salt to the recipe. Or, to keep the salt crunchy, let the caramel cool and firm. Then sprinkle with two pinches of flaky salt and press it in. Invert, remove the pan liner, sprinkle with more salt. Then cut and wrap the caramels in wax paper or cellophane.
Nutmeg and Vanilla Bean Caramels:
Add 1/2 teaspoon freshly grated nutmeg to the cream before you heat it.
Cardamom Caramels:
Omit the vanilla. Add 1/2 teaspoon slightly crushed cardamom seeds (from about 15 cardamom pods) to the cream before heating it. Strain the cream when you add it to the caramel; discard the seeds.
Caramel Sauce:
Stop cooking any caramel recipe or variation when it reaches 225°F or, for a sauce that thickens like hot fudge over ice cream, 228°F. Pour it into a sauceboat to serve or into a heatproof jar for storage. The sauce can be stored in the refrigerator for ages and reheated gently in the microwave or a saucepan just until hot and flowing before use. You can stir in rum or brandy to taste. If the sauce is too thick or stiff to serve over ice cream, it can always be thinned with a little water or cream. Or, if you like a sauce that thickens more over ice cream, simmer it for a few minutes longer.
Yield: eighty-one 1-inch caramels


Those look fantastic! I was unable to complete last months challenge too. I definitely was bummed about not getting the chance to make the caramels, I'll have to put it on my list.
ReplyDeleteHEAVENLY!! Don't be nervous about making treats - you always succeed!! :-)
ReplyDeleteThose look so good! Also, I've never made candy because I don't have a candy thermometer, but I do have that pyrex digital one - I never thought to use it for candy, thanks for the tip!
ReplyDeleteThose look delicious! And what beautiful presentation, congrats!
ReplyDeletethey look so beautiful! fabulous presentation!
ReplyDeleteOMG! I am drooling! I love carmels and your photos of them are just as tasty...eye candy!
ReplyDeleteJaime, your candies are beautiful. Great Job
ReplyDeleteMerry Christmas
AmyRuth
They look perfect! Seriously!
ReplyDeleteI haven't tried the sweet & salty flavor combination going around. Guess I need to jump on the bandwagon.
Thanks for the info on the thermometer I've been eyeing one that is in W-S Catalog, gift card!
~ingrid
Holy crap Jaime, these looks so professional! I was on my way to the kitchen halfway through reading this post until I got to the part about the candy thermometer - I guess I will have to invest in one because I really, really, really want to make these!!
ReplyDeleteThose caramels look good! And chocolate covered! I am going to have to pick up a candy thermometer.
ReplyDeleteGood for you for making these even after November. I would like to but I need to get my hands on a candy thermometer. I cannot imagine trying these without one! Beautiful job on them!
ReplyDeleteBeautiful job! I saw some Sea Salt Caramels at Trader Joes but I think these would be worth to try making at home than purchasing!
ReplyDeleteI loved these caramels and need to make another batch! Love your idea of wrapping them in chocolate!
ReplyDeleteI AM so making these tomorrow! Yours look beautiful!
ReplyDeleteWow those look awesome! Great job. I need to try making caramels like this.
ReplyDeleteThese look amazingly delicious! I would love to be able to make these. I think it is a wonder accomplishment to have them turn out well and look as beautiful as they do too. Great job.
ReplyDeleteThose look -so- good! I love the idea of dipping them in chocolate. I have the golden syrup, but just haven't had the time to try making the caramels.
ReplyDeletewhoa nice! yummy! the chocolate dip is a nice touch!
ReplyDeleteHi..These caramels are just great..My question is that I can not find Golden Syrup anywhere here where I reside and I dont think that internet delivery is an option for the moment,what would you recommend as a replacement to golden syrup? and without thermometer do you think it could work too?
ReplyDeleteI just need the simple version of the caramel-without any chocolate sauce on it. Could you help me about it please? Thank you very much.By the way,your website makes me so hungry!Congratulations,pics and the food-all looks wonderful!
shira_bibi - thank you!
ReplyDeleteif you don't have a candy thermometer you will have to test it at various stages to make sure it gets hot enough. drop a bit into a glass of water, reach in and give it a squeeze... it should turn into a "soft ball" hense the phrase, "softball stage". the longer you cook the mixture, the harder your candy will become. if you go too far, you will end up with hard toffee pieces instead of chewy caramel.
here is a recipe for a golden syrup substitute from recipezaar
Ingredients
* 1/4 cup sugar
* 1/2 teaspoon vinegar
* 1 teaspoon water
* 1/3 cup light corn syrup
Directions
1. Put sugar in a small heavy pan and shake pan so the sugar is in an even layer.
2. Sprinkle it with vinegar and water.
3. Cook over low heat, without stirring, for 5 minutes.
4. Increase heat to medium and cook until syrup has taken on a light caramel color, 5 to 6 minutes.
5. Immediately remove from heat and pour in the corn syrup. DO NOT STIR, but let it bubble for 2 to 3 minutes. When the bubbling stops, stir well.
6. Pour into sealed container. It can be stored at room temperature for several months.
Makes 170g (which seems to be the equivalent of 3/4C)
These look fantastic! I was thinking of making some with, and some without chocolate for Christmas gifts....do you have any idea of what the shelf life is for these? Just trying to gauge how far in advance I could make them....
ReplyDeleteanonymous- I'm not sure but I would guess maybe 2-3 weeks?
ReplyDeleteHi. I made these tonight and they taste delicious but they are waaay to hard. I cooked it according to your instructions but I think 240/245 would be better than 260/265. Unless, you think there is something else i could have done wrong?
ReplyDeleteBobbi - thanks for the feedback! I think what may have happened is your caramel continued to rise in temperature even after you took it off the stove. if this happens, it will definitely be too hard. mine was still chewy - not super soft chewy - but definitely chewy and not hard like a Werther's candy or anything. the great thing about caramel is the ingredient list is easy - so you can make another batch and have some more caramel :)
ReplyDeleteI made the caramels today and follow the recipe to a T and they came out great! Super soft and chewy. the only thing that didn't work out was the aluminum foil It stuck completely to the caramal and I could not get it off, I had to chop of an entire layer of the caramel and cut off the aluminum foil. Could I use parchment paper instead of aluminum foil? Other than that, those are the hit, I wrapped a few in wax paper and will dip the rest in chocolate. They will make great Christmas gifts. Thank you.
ReplyDeleteah! what a shame :( wasted caramel. I am not sure about parchment but I know that your foil must be very well buttered so the caramel will not stick. or maybe try non-stick foil? glad you enjoyed it, I love homemade caramels!
DeleteI have made caramels for eons at Christmas. I use the good old Betty Crocker recipe. May have to try this one!
ReplyDeleteI use a med-low flame and stir constantly. Scorching the bottom is a waste of good caramel! :) Taking them off the burner just as the mix hits 245 is usually a good method as it keeps cooking.
I am definitely trying the oiled knife idea. Cutting has always been a pain!
Hi, When I click on the link you have for the thermometer, it only takes me to the store website but not the thermometer. Can you tell me what the name of the digital one you bought is. Thanks so much,
ReplyDeleteah, I'm sorry about that. I guess they don't make the one I have anymore, it was made by Pyrex. This one seems to be very similar, and is quite popular on Amazon - http://amzn.to/U78XAS
DeleteMade these the last 2 weekends.The first batch I made, I cooked to 245 and they turned out hard. The second time I cooked it until 220 and they are perfectly soft and chewy. I dipped some in dark chocolate and sprinkled sea salt on all. They are wonderful. I plan on making more and giving in gift boxes with homemade vanilla extract and brittle with various nuts. Thanks for the recipe!
ReplyDeleteI love chocolates. and you've really done a great job. glad I found your post.thank you
ReplyDelete