


This week's Tuesdays with Dorie (TWD) recipe was chosen by Mary of Starting from Scratch: the Most Extraordinary French Lemon Cream Tart. That's quite a name to live up to, but I can tell you that this tart certainly earns its title! The crust is buttery and flaky and wow... the filling! It is definitely more tart, than sweet, which I loved! Despite the amount of butter in it, it does not taste heavy at all. Dorie accurately describes it as having the "airy texture of lemon-cream dreams."
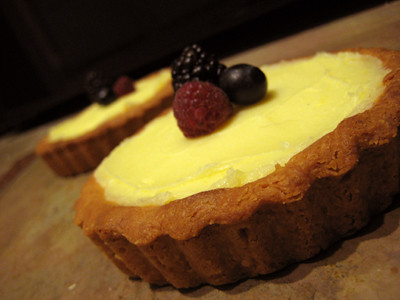
For this recipe I decided that instead of making a single 9-inch tart, that I would make cute little tartlets instead. I halved the lemon cream recipe but actually used the full Sweet Tart Dough recipe. This yielded three 4-inch tartlets which were just the perfect size for consumption :) If you make the crust a tad thinner, you could probably get four tartlets from the sweet tart dough recipe. My crusts are more on the golden side, as Dorie states that "a well-baked golden brown crust has more taste than an underbaked one and more texture too--the better baked the curst, the livelier the contrast with the soft, creamy filling." In order to get my crust nice and golden without burning the edges, I had to adjust Dorie's instructions a bit. I left the foil on the tartlets for 25 minutes, as directed, then removed the foil. I let the edges of the crust brown, and then I cut a hole in the center of the foil pieces I was using and put them back on the tartlets until the centers were golden. (This was similar to what I had to do with the Russian Grandmother's Apple Pie-cake.)

I got quite the workout making the creamy lemon filling for this tart. Dorie says that it can take up to 10 minutes for it to reach 180F, depending on how much heat you're giving the cream. It thickened up for me after about 15 minutes, but the temperature was still hovering around 160F so I wasn't sure if I needed to continue heating it further. So I whisked on... and on... and on... for a full thirty minutes! (Boy, was my arm cramping!) In the end, I only got it up to 172F, but figured that if it hadn't reached 180F after thirty minutes, it probably never would. So I took it off the heat and crossed my fingers that I had cooked it adequately. Thankfully, I think the lemon cream still came together nicely - it was nice and thick and very easy to spread into the tart shells. Since I was leaving on vacation, I made this before any comments were left on the TWD blog - apparently many others had problems getting their cream up to temperature as well. Some said that using a metal bowl instead of glass will work better, and Dorie said that as long as you get up to 165F, you should be fine. So next time, I think I will probably just stop after it has thickened and looks to be the right consistency and just use the thermometer as a rough guideline. I probably cooked it much longer than necessary this time around.
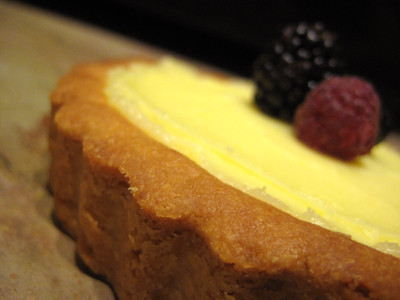
These tarts were amazing! The aroma of the lemon zest and sugar coming together is just a small indication of how wonderful and lemony these tarts are. I think they would be the perfect dessert to make for dinner guests, as they are simple to make and you can make each individual component ahead of time and then assemble right before serving (note that the lemon cream needs to be refrigerated for at least 4 hours before serving). Plus, most people are generally impressed with tarts. It's a nice, light dessert that would be a great way to end any meal, but it would particularly balance out a heavier meal.
Thanks Mary, for picking this week's recipe. This was only my second time making a tart and after trying this wonderful tart, I look forward to making many more! Make sure you check out the Tuesdays with Dorie blogroll to see everyone else's lemony creations.
The Most Extraordinary French Lemon Cream Tart
from Baking: From My Home to Yours, by Dorie Greenspan

Tart
1 cup sugar
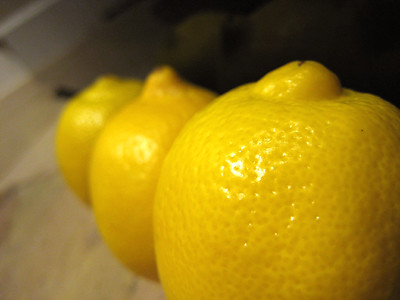
Grated zest of 3 lemons
4 large eggs
¾ c fresh lemon juice (from 4-5 lemons)
2 sticks plus 5 T butter (10 ½ ounces) unsalted butter, cut into tablespoon size pieces, at room temperature.
1 9-inch tart shell made with sweet tart dough (see below).
Getting ready:
Have a instant-read thermometer, a strainer and a blender (1st choice) or food processor at hand. Bring a few inches of water to a simmer in a saucepan.
Put the sugar and zest in a large heatproof bowl that can be set over the pan of simmering water. Off the heat, rub the sugar and zest together between your fingers until the sugar is moist, grainy, and very aromatic. Whisk in the eggs, followed by the lemon juice.
Set the bowl over the pan and start stirring with the whisk as soon as the mixture fees tepid to the touch. Cook the lemon cream until it reaches 180 degrees F. As you whisk- you whisk constantly to keep the eggs from scrambling- you’ll see that the cream will start out light and foamy, then the bubbles will get bigger, and then, as it gets closer to 180F, it will start to thicken and the whisk will leave tracks. Heads up at this point- the tracks mean the cream is almost ready. Don’t stop whisking or checking the temperature, and have patience- depending on how much heat you’re giving the cream, getting to temp may take as long as 10 minutes.
As soon as it reaches 180F, remove the cream from the heat and strain it into the container of the lender (or food processor); discard the zest. Let the cream stand, stirring occasionally, until it cools to 140 degrees F, about 10 minutes.
Turn the blender to high (or turn on the processor) and, with the machine going, add the butter about 5 pieces at a time. Scrape down the sides of the container as needed as you incorporate the butter. Once the butter is in, keep the machine going- to get the perfect light, airy texture of lemon-cream dreams, you must continue to bend the cream for another 3 minutes. If your machine protests, and gets a bit too hot, work in 1-minute intervals, giving the machine a little rest between beats.
Pour the cream into a container, press a piece of plastic wrap against the surface to create an airtight seal and refrigerate at least 4 hours, or overnight. (The cream will keep in the fridge for 4 days or, tightly sealed, in the freezer for up to 2 months; thaw it overnight in the refrigerator.)
When you are ready to assemble the tart, just whisk the cream to loosen it and spoon it into the tart shell. Serve the tart, or refrigerate until needed.
Sweet Tart Dough
1 ½ cups all purpose flour
½ cup confectioners’ sugar
¼ tsp salt
1 stick plus 1 tablespoon (9 T) very cold (or frozen) unsalted butter, cut into small pieces
1 large egg yolk
Put the flour, sugar, and salt in a food processor and pulse a couple of times to combine. Scatter the pieces of butter over the dry ingredients and pulse until the butter is coarsely cut in- you should have some pieces the size of oatmeal fakes and others the size of peas. Stir the yolk, just to break it up, and add it a little at a time, pulsing after each addition. When the egg is in, process in long pulses- about 10 seconds each- until the dough, which will look granular soon after the egg is added, forms clumps and curds. Just before you reach this stage, the sound of the machine working the dough will change- heads up. Turn the dough out onto a work surface and, very lightly and sparingly, knead the dough just to incorporate and dry ingredients that might have escaped mixing.
To press the dough into the pan: butter a 9-inch fluted tart pan with a removable bottom. Press the dough evenly over the bottom and up the sides of the pan, using all but one little piece of dough, which you should save in the refrigerator to patch any cracks after the crust is baked. Don’t be too heavy handed- press the crust in so that the edges of the pieces cling to one another, but not so hard that the crust loses its crumbly texture. Freeze the crust for at least 30 minutes, preferable longer, before baking.
To partially or fully bake the crust: center a rack in the center of the oven and preheat to 375 degrees F.
Butter the shiny side of aluminum foil and fit the foil, buttered side down, against the crust. (Since you froze it, you can bake it without weights). Put the tart pan on a baking sheet and bake the crust for 25 minutes. Carefully remove the foil. If the crust has puffed, carefully press it down with the back of a spoon. For partially baked crust, patch the crust if necessary, then transfer the crust to a cooling rack. To fully bake the crust, bake for another 8 minutes or so, or until it is firm and golden brown. Transfer pan to a rack and cool the crust to room temperature before filling.


The tartlets with the berries were adorable! What a great presentation for entertaining.
ReplyDeleteGreat job! Your little tarts look delicious. I loved mine...the tart was perfect and yet creamy. Mmmm!
ReplyDeleteWhoa, those look GOOD! I look forward to the TWD posts, they always look so yummy! I think I'll be giving last weeks recipe a try today, although your pics sure are something to live up to! Yikes! Beautiful photography!
ReplyDeleteThey look absolutely perfect. Why do my tarts never come out like that? ;)
ReplyDeleteI'm always a bit afraid to overbake my crust, but your dark golden tart shells look gorgeous so I'm going to try your approach tonight. Wish me luck. :)
ReplyDeleteGreat looks tarlettes! Love the berries on top!
ReplyDeleteyour tart looks so pretty!
ReplyDeleteGorgeous! The berries look so pretty on top!
ReplyDeleteMini is always the way to go. I am still intrigued at how people could not get up to 180F. It is a mystery that is bugging me to no end. Oh well.
ReplyDeleteThey turned out great.
We're on the same wavelength. I halved the filling, but made the full recipe for the pastry dough. May make some mini-mini tarts out of the remainder. They look delicious!
ReplyDeleteBeautiful - from what I'm reading, there are many TWD participants who have big one arm muscles from the workout :)
ReplyDeleteYour crust is so perfect! Great job!
ReplyDeleteYour photos are always fabulous. Love the little berries on top. Great job!
ReplyDeleteClara @ I♥food4thought
I love the addition of the berries. It looks so fresh and lovely!
ReplyDeleteAnd your photos rock! Great job!
Your tarts are absolutely fabulous! Perfect job. And thanks for the tip on getting the tart nice and golden!
ReplyDeleteSounds like a lot of work, but they turned out beautiful!
ReplyDeletei'm in awe of your fortitude. thirty minutes of whisking is quite the admirable feat, and to go to so much trouble to get the perfect crust (which it appears you did) is amazing. you deserve a trophy of some sort. :)
ReplyDeleteThe tarts looks so good.
ReplyDeleteI love the thick crust too.
I love the trio of berries on top. Great job!
ReplyDeletebeautiful mini tarts! i love the three berries on top, really pretty looking.
ReplyDeleteNext time I make this recipe, I'll be shooting for a crust like yours! Nice work, your tarts are just beautiful!
ReplyDeleteI love the mini tarts!!
ReplyDeletebeautiful tartlets! I love the berries on top of the lemon cream... :-)
ReplyDeleteI just checked out your blog and its great..Your pictures are awesome and your recipes sound delightful.Your a keeper and I'll have to bookmark you!
ReplyDeleteThey're very elegant. You always get things so nice!
ReplyDeleteYour tartlets are gorgeous!
ReplyDeleteThese are really extraordinary, Jaime. I'm a sucker for anything lemon, but have never tried making this recipe. You've inspired me!
ReplyDeleteLooks fantastic Jaime! I agree, I think this tart is the perfect way to end a meal. I look forward to making it again this summer.
ReplyDeleteYours look fabulous!
ReplyDeleteYour tarts look wonderful! I love the mini tarts and they look so pretty with the berries on top!
ReplyDeleteLovely lovely job!!! Your tarts look great!
ReplyDeleteWhat a great tart. It looks delicious.
ReplyDeleteI've tagged you for a meme, hope you don't mind. Check out the details here
Very cute presentation, the colors of the berries really compliment the yellow of the lemon cream! Looks delicious!
ReplyDeleteBeautiful with the berries on top!
ReplyDeleteI love the photo of the lemons! The berry garnish looks awesome too. Great job!
ReplyDeleteWow - your tarts look amazing! I've just read your profile and had a really good chuckle - I love the idea of living to eat! Hx
ReplyDeletethese look good!
ReplyDelete