Sunday, December 23, 2012

Maple Pumpkin Fudge

I love maple fudge and originally went in search of a maple fudge recipe when I stumbled upon this maple pumpkin fudge.  It's the perfect fall/holiday recipe and seems fairly fool proof - I actually let it get a bit too hot (up to 239 degrees) and it still turned out just fine. 

Just imagine pumpkin pie filling with maple syrup in it, in convenient bite size servings... that is what this fudge tastes like! The maple flavor is certainly there; I'd say it's a good blend of maple of pumpkin... but if you want a predominantly maple fudge with pumpkin undertones, then I would suggest adding maple extract for a stronger maple flavor.

So if you're doing some last minute baking in the days leading up to Christmas, try this unique fudge recipe and let me know what you think.  I'd still like to find a good plain old maple fudge recipe, too, so if you've got one, please leave me a link in the comments section below!
 
Maple Pumpkin Fudge
from Sugar Crafter
    1 1/2 cups granulated sugar
    1 1/2 cups packed light brown sugar
    1 1/2 sticks unsalted butter, cut into small pieces
    2/3 cup evaporated milk
    2/3 cup pureed pumpkin
    1 tsp cinnamon
    1/4 tsp nutmeg
    1/8 tsp cloves
    2 cups white chocolate chips (one 12 ounce bag)
    1/2 lb marshmallows or marshmallow crème
    3 Tbsp maple syrup

Line a 12×8″ baking dish with foil, letting it hang over the edges. In a large sauce pan, whisk together the sugars, butter, evaporated milk, pumpkin, and spices.

Bring to a foil over medium heat, stirring constantly. Continue boiling for 10-12 minutes or until the candy thermometer registers 235 degrees Fahrenheit – soft ball stage (soft ball stage occurs when you drop some of the mixture into a bowl of cold water, and it forms a “soft ball” when it cools and is removed from the water).

Stir in the white chocolate chips first, and then the marshmallows or marshmallow crème and maple syrup.

Stir until melted, and then immediately pour into the prepared pan.

Let cool on a wire rack for 2 hours or until completely cooled. To cut, lift the foil from the ends of the dish. Cut the fudge into 1″ squares. Store in the refrigerator or freezer.

In The Pink White Chocolate Cranberry Fudge

Ok, so I wasn't able to finish posting all of my holiday posts yesterday before the kids started needing my attention.  Today I'll finish off the series with some fudge recipes.  What holiday baking list would be complete without fudge? I love fudge.  Every variety of it - chocolate, peanut butter, chocolate with peanut butter, and maple.  This year I tried two new flavors of fudge: White chocolate cranberry and maple pumpkin (the latter will be my next post).  This white chocolate fudge recipe is nice because it doesn't require the use of a candy thermometer.

I actually made this pink white chocolate cranberry fudge the first time in November for my daughter's birthday party.  I needed both pink and purple desserts and stumbled upon this fudge recipe while browsing the web.  I love white chocolate (even though my husband gets on me for it not being "real" chocolate), so I knew I'd love this fudge.  I omitted the nuts because I never put nuts in my baked goods, but the cranberries were a welcome addition.  The original recipe calls for cherries, but I did not have those on hand.  The dried cranberries work well as a substitute, as they are both tart and sweet.  Everyone who tried this at the party loved it, so if you're looking for something a little bit different this holiday season, I'd encourage you to try this fudge.

In The Pink White Chocolate Cranberry (Almond) Fudge
adapted from Imperial Sugar

2 cups Imperial Sugar® Extra Fine Granulated Sugar
2/3 cup heavy cream
1/2 cup butter
3 cups mini marshmallows
2 cups (one 12 ounce bag) white chocolate chips
1 cup dried cranberries, chopped
3-4 drops red food coloring
1/2 cup chopped slivered almonds, toasted (I omitted these)

Line an 8x8x2-inch baking pan with foil (I used a 9x9 inch pan). Butter foil and set aside.

Combine sugar, cream and butter in a heavy 2-quart saucepan. Cook and stir over low heat until blended. Increase heat to medium. Bring to a boil.  Boil for 5 minutes, stirring constantly.

Remove from heat and stir in marshmallows and white chocolate chips. Stir until chocolate is melted. Stir in cranberries, enough food coloring to turn fudge pink (3-4 drops) and nuts, mixing until well blended.

Spoon into prepared pan. Refrigerate until firm. Cut into squares.  Store tightly covered in refrigerator for up to a month.

Saturday, December 22, 2012

Crunchers

Have you tried these crunchers yet? I've seen variations of this recipe, or similar recipes, made with saltine crackers as well.  I've been seeing them on various blogs and on pinterest for a few years now.  Every time I see them, I've said I want to try them but I've never gotten around to it because I never have butterscotch chips on hand in my pantry.  I love the salty and sweet combination (chocolate covered pretzels are among my favorite!) and when you're baking several different things for the holidays, it's nice to have a few recipes that are simple and quick to prepare.

This recipe is basically club crackers with layers of caramel-type filling in between, topped with a chocolate peanut butter layer.  The best part - they can be made in under 15 minutes.

The best way to describe these "crunchers" would be to compare them to peanut butter Twix.  I actually used multi-grain club crackers because I sent my mom out to get them for me and she didn't know what I'd be using them for so she got the multi-grain variety.  They tasted just fine and I suppose the "multi-grain" aspect might make you feel a little less guilty about eating these ;)

My only issue with them is that they are best when kept refrigerated.  After they are taken out of the refrigerator, the chocolate layer on top starts to get very soft and easily smudged.  So, these wouldn't be the best goodies to ship out if you're looking to mail some holiday goodies.  Don't let that stop you from trying these though because for such minimal effort, these are really good!

Crunchers
from Gonna Want Seconds

    80 - Club Crackers
    1 Cup - Butter
    2 Cups - Graham Cracker Crumbs
    1 Cup - Light Brown Sugar, Firmly Packed
    1/2 Cup - Whole Milk (I used 2%)
    1/3 Cup - Sugar
    2/3 Cup - Creamy Peanut Butter
    1/2 Cup - Semi Sweet Chocolate Chips
    1/2 Cup - Butterscotch Chips

Line a 9x13-inch baking pan with foil, leaving an extension of foil on either end.  Line the foil with 1 layer of club crackers, cutting to fit if necessary.

In a heavy bottom large saucepan, melt butter over medium heat. Add graham cracker crumbs, brown sugar, milk and sugar. Bring to a boil and boil for 5 minutes, stirring constantly. Moderate heat and reduce as needed so mixture doesn't stick to the bottom and mixture doesn't boil too hard (this can cause butter to separate). Remove from heat and spread half of butter mixture evenly over crackers. Place another single layer of crackers evenly over butter mixture, cutting to fit if necessary. Spread remaining butter mixture evenly over crackers. Top evenly with remaining crackers.

In a small saucepan, combine peanut butter, chocolate chips, and butterscotch chips. Melt over medium-low heat, stirring constantly. Spread evenly over top of crackers. Cover, and chill for at least 1 hour. Lift foil overhang and remove bars from pan. Cut into bars. Store in the refrigerator.

Pumpkin Gingerdoodle Cookies

One of the first food blogs I ever started following was Peabody's blog, Culinary Concoctions by Peabody.  Everything she makes looks amazing - I truly wish I was one of her friends so I could have the pleasure of eating all of it ;) So, when I went in search of recipes to try this holiday season, I knew that I could surely find something wonderful to make from there.

And I was right.  After scrolling through a few posts, I stumbled upon these pumpkin gingerdoodle cookies.  Part pumpkin snickerdoodle and part gingersnap cookie, these cookies combine some of everyone's favorite holiday flavors.  My husband walked into the kitchen and saw me pulling these out of the oven and asked, "Can I have a snickerdoodle?" I informed him they weren't snickerdoodles but pumpkin gingerdoodles and he was happy to try them.  He quickly proclaimed, "These are way better than regular snickerdoodles."

I only had two issues with these cookies.  The first issue was really a non-issue: I had way more pumpkin snickerdoodle dough than gingersnap dough.  So in the end, I made some plain pumpkin snickerdoodle cookies as well (all were eagerly consumed regardless). 

The second issue was in the consistency of the cookies.  The pumpkin snickerdoodle dough puffed up into a wonderful moist, slightly cakey cookie.  The gingersnap dough, on the other hand, puffed up but deflated after I pulled it out of the oven.  So, my cookies looked lopsided when I placed the cookie doughs side by side.  Next I tried a batch with the pumpkin snickerdoodle dough on the bottom and the gingersnap dough on top.  Those turned out okay, but they weren't very aesthetically pleasing.  So finally I made a batch with the gingersnap dough on the bottom and the pumpkin snickerdoodle dough on top and those cookies turned out to the look the best.  I'm not sure how Peabody got her cookies to look the way that she did, but the cookies you see in the photo at the top of this blog post were the best that I could do. 

Regardless of how these cookies look, they are amazing.  We couldn't stop eating them in our household and almost didn't have enough to give out to family and friends because we wanted them all to ourselves! So, if you're going to only try one new recipe out this holiday season, I encourage you to make it this one - I promise you won't regret it!

Pumpkin Gingerdoodles
from Culinary Concoctions by Peabody


Pumpkin Snickerdoodle Dough

1 1/2 cups granulated sugar
1 cup unsalted butter
2 eggs
¾ cup pumpkin puree
3 cups all-purpose flour
2 tsp. cream of tartar
1 tsp. baking soda
1/4 tsp. salt

for rolling the cookies in: (I had to double this)
1/4 cup granulated sugar
2 tsp. ground cinnamon

Mix 1 1/2 cups sugar, the butter, pumpkin, and eggs in a stand mixer with paddle attachment.  (It will appear curdled, but don't worry it will all come together in the next step.)

Add in flour, cream of tartar, baking soda and salt and mix on low until fully combined. Set aside.

Gingersnap Dough

3/4 cup butter
1 cup granulated sugar
1/4 cup molasses
1 egg
2 cups all-purpose flour
2 teaspoons baking soda
1/4 teaspoon salt
1 teaspoon cinnamon
1 teaspoon cloves
1 teaspoon ginger

Combine cinnamon and sugar in a small bowl and set aside for rolling dough in.

Cream together butter and sugar. Add molasses and egg and continue beating. Add flour, baking soda, salt, cinnamon, cloves, and ginger and mix until combined, scraping down the sides of the bowl as needed.

Preheat oven to 350°F. Lightly grease baking sheets with no-stick cooking spray and set aside.

(I found that it's best to refrigerate both cookie doughs for at least one hour before assembly and baking.)

Roll a small amount of gingersnap dough into a ball and a small amount of snickerdoodle dough and place them together and gently roll or squeeze together.

Roll in cinnamon sugar.

Place on baking sheets and bake for 9-11 minutes. Remove from oven and allow to cool on baking sheets for 2 minutes before moving to cooling racks.

Magic Middle Peanut Butter Cookies

Wow, has it been a crazy few months. I can't believe that it's been over three months since my last blog post?! I thought that with my daughter starting school in September, I'd have all this extra time to bake and blog again.  However, as many moms out there know - your time without the kids is rare - so I found myself running a million different errands every time she was in school and I was never home to do any baking. I kept thinking to myself that I'd get around to another post "soon" and then before I knew it, I was busy getting ready for my daughter's third birthday party and then a few days later I had my baby girl! Life's been crazy with a newborn and a three year old, to say the least.  For those who have been following my blog for some time and would like to see some pictures of the new little one, you can visit our photographer's blog here. I'm so blessed to be celebrating this holiday with two beautiful little girls that are the light of my life.

And without further ado, I'm hoping to post a flurry of blog posts today to make up for my lack of blogging over the past few months (hopefully the kids will nap long enough for me to get these all up today!).  For those who are still looking for some last minute inspiration for their holiday baking, look no further :) I've got some great recipes that I've tried out this year, and of course there are the tried and true recipes from years past as well.

Let's start off this series of posts with one of my favorite combinations - peanut butter and chocolate.  You really can't go wrong with anything made with these two ingredients! These cookies are impressive yet simple to make.  With chocolate cookies it can be difficult to tell sometimes when the cookies are done baking because they do not turn golden brown like other cookies do.  You'll want to watch these cookies closely - when they just start to barely crack you should take them out of the oven.  They'll continue to bake just a little bit more while they're cooling on your cookie sheet.  If you over bake them, they'll still be good, but a bit on the dry side. 

Magic Middle Peanut Butter Cookies
from Gonna Want Seconds

Cookie:
    1 1/2 Cups - All Purpose Flour
    1/2 Cup - Unsweetened Cocoa Powder
    1/2 Teaspoon - Baking Soda
    1/2 Cup - Sugar
    1/2 Cup - Brown Sugar, Packed
    1/2 Cup - Unsalted Butter, at Room Temperature
    1/4 Cup - Peanut Butter
    1 Teaspoon - Vanilla Extract
    1 - Large Egg

Filling:
    3/4 Cup - Powdered Sugar
    3/4 Cup - Peanut Butter

Preheat oven to 375 degrees.

Make Cookies: In a small  bowl, blend flour, cocoa, and baking soda.

In a large bowl beat white sugar, brown sugar, butter and 1/4 cup peanut butter, until light and fluffy.  Add vanilla and egg, beat until blended.  Stir in flour mixture until blended.  Set aside.

Make the filling: Combine the confectioners sugar and 3/4 cup peanut butter.  Beat well with electric mixer until mixture comes together.

Roll filling into 30 1 inch balls. Form exterior part of cookie by sectioning dough into approximately 1 tablespoon pieces and then shaping the exterior part of cookie around filling balls.  Cover the filling completely.  Place 2 inches apart on an ungreased cookie sheet.  Flatten with a glass dipped in sugar.

Bake at 375 degrees for 7-9 minutes. Allow to cool on cookie sheet for 10 minutes then remove to a cooling rack and cool completely.

Tuesday, September 4, 2012

Nectarine Upside-Down Chiffon Cake (TWD)


This week's Tuesdays with Dorie: Baking with Julia recipe was hosted by Marlise of The Double Trouble Kitchen and Susan of The Little French Bakery: Nectarine Upside-Down Chiffon Cake.  It's been a long, long, time since I've posted for this group - I'm sorry :( I have just been so busy, and on top of that I'm six months pregnant and turning on the oven when it is 100+ degrees outside just hasn't been very appealing.  The good news, however, is that my baby girl (who is not so much a baby anymore) just started school this week so that means this mama is going to have a lot more time to bake each week! So, you should start to see blog posts pick up a little more at least.

I didn't have a pan large enough for this cake, so I made one large nectarine and peach upside-down chiffon cake and one mini blueberry upside-down chiffon cake.  After reading some of the comments on the weekly P&Q, I decided to skip the streusel and made sure to bake my cake for a few extra minutes.  I really think the longer baking time has to do with whether or not the cake is baked on a jelly roll pan.  I did not bake mine on one and I think it only took an extra 3-5 minutes to bake.  I did, however, cover the bottom of my pans with foil to catch the butter drippings, which was good because there was quite a bit.
The blueberry cake was delicious.  The chiffon was light and airy, as it should be.  It's a nice contrast to the denser, more traditional pineapple upside down cake.  I'm not sure how the nectarine and peach cake turned out because that one will be going with my husband to work tomorrow, but I imagine it's just as good as the blueberry cake.
Thanks to Marlise and Susan for hosting; you can find the recipe on their blogs here and here.  Make sure you check here, too, to see what everyone else thought of this sweet, end of summer treat.

* Recipe notes:
- If you bake your cake on a jelly roll pan, be sure to add at least another 10 minutes of baking time to your cake.  Definitely don't forget to wrap the bottom of your pan in foil, or you'll end up with a big mess on the bottom of your oven.
- Frozen blueberries work great with this recipe.  Do not thaw before baking.
- For more recipe notes, check here.

Tuesday, August 28, 2012

Filled Pate a Choux Swans and Turtles (DB)

Kat of The Bobwhites was our August 2012 Daring Baker hostess who inspired us to have fun in creating pate a choux shapes, filled with crème patisserie or Chantilly cream. We were encouraged to create swans or any shape we wanted and to go crazy with filling flavors allowing our creativity to go wild!

I've made pate a choux several times in the past before, but it had been quite some time.  As such, I didn't catch that a key piece of information was missing from the recipe until my dough turned out like soup! :(  The recipe states that you are to melt the butter in water, milk, and salt.  Then remove the saucepan from the heat and add the flour.  Well, it doesn't say if you're to melt the butter over low, medium, or high heat so I did it over medium heat.  Unfortunately, if your liquid isn't boiling when you add the flour, it won't cook the flour and you end up with a soupy mess instead of a beautiful pate a choux dough! So, I've added those notes to the recipe so you can avoid that fatal mistake if you make this recipe.
Otherwise, everything went off without a hitch.  I made a few swans and then loved the idea of making some turtles as another Daring Baker had posted in our private forum.  I filled my pastries with chocolate pastry cream and they were delicious. 
Thanks Kat, for hosting this month's challenge.  You'll find the recipes below.  Also be sure to check out the Daring Bakers' Blogroll to see all the other wonderful creations that were made!

Pate a choux 

(cannot be doubled)

Recipe source: Good Housekeeping Illustrated Guide to Cooking, 1980 edition


Ingredients
½ cup (120 ml) (115 gm) (4 oz) butter
1 cup (240 ml) water
¼ teaspoon (1½ gm) salt
1 cup (240 ml) (140 gm) (5 oz) all-purpose flour
4 large eggs

Directions:
  1. Line at least two baking sheets with silicone mats or parchment paper, or grease pans well.
  2. Preheat oven to moderately hot 375°F/190°C/gas mark 5 .
  3. In a small saucepot, combine butter, water, and salt. Heat over until butter melts (and liquid has come to a full rolling boil), then remove from stove.
  4. Add flour all at once and beat, beat, beat the mixture until the dough pulls away from the sides of the pot.
  5. Add one egg, and beat until well combined. Add remaining eggs individually, beating vigorously after each addition. Resulting mixture should be somewhat glossy, very smooth, and somewhat thick.
  6. Using a ¼” (6 mm) tip on a pastry bag, pipe out about 36 swan heads. You’re aiming for something between a numeral 2 and a question mark, with a little beak if you’re skilled and/or lucky.
  7. Remove the tip from the bag and pipe out 36 swan bodies. These will be about 1.5” (40 mm) long, and about 1” (25 mm) wide. One end should be a bit narrower than the other.
  8. Bake the heads and bodies until golden and puffy. The heads will be done a few minutes before the bodies, so keep a close eye on the baking process.
  9. Remove the pastries to a cooling rack, and let cool completely before filling.
Assembly
  1. Take a swan body and use a very sharp knife to cut off the top 1/3rd to ½.
  2. Cut the removed top down the center to make two wings.
  3. Dollop a bit of filling into the body, insert head, and then add wings.
  4. Your first attempt will probably not look like much, but the more you make, the more your bevy of swans will become a beautiful work of swan art.

Vanilla Crème Patissiere

(Half Batch)
Ingredients:
1 cup (225 ml.) whole milk
2 Tbsp. cornstarch
6 Tbsp. (100 g.) sugar
1 large egg
2 large egg yolks
2 Tbsp. (30 g.) unsalted butter
1 Tsp. Vanilla
Directions:
  1. Dissolve cornstarch in ¼ cup of milk. Combine the remaining milk with the sugar in a saucepan; bring to boil; remove from heat.
  2. Beat the whole egg, then the yolks into the cornstarch mixture. Pour 1/3 of boiling milk into the egg mixture, whisking constantly so that the eggs do not begin to cook.
  3. Return the remaining milk to boil. Pour in the hot egg mixture in a stream, continuing whisking.
  4. Continue whisking (this is important – you do not want the eggs to solidify/cook) until the cream thickens and comes to a boil. Remove from heat and beat in the butter and vanilla.
  5. Pour cream into a stainless steel/ceramic bowl. Press plastic wrap firmly against the surface. Chill immediately and until ready to use.

Chocolate Pastry Cream

(Half Batch Recipe):
Bring ¼ cup (about 50 cl.) milk to a boil in a small pan; remove from heat and add in 3 ounces (about 80 g.) semisweet chocolate, finely chopped, and mix until smooth. Whisk into pastry cream when you add the butter and vanilla.

Coffee Pastry Cream

(Half Batch recipe)
Dissolve 1 ½ teaspoons instant espresso powder in 1 ½ teaspoons boiling water. Whisk into pastry cream with butter and vanilla.

Chantilly Cream

1 cup (225 ml.) cold heavy cream
2 tablespoons confectioners' (powdered) sugar
Chill medium mixing bowl and whisk in freezer for 10 minutes before beginning. In chilled bowl, whisk cream until it begins to foam and thicken. Add sugar and continue to whisk just until soft peaks form. Do not over-whip.

Freezing/Storage Instructions/Tips: While the crème filling stores well when covered tightly and kept in a refrigerator, the baked choux does not store well at all, especially after being filled. Therefore, you must eat these the day they are made. This won’t be a problem, though, I assure you.

Tuesday, July 31, 2012

Blueberry Nectarine Pie (TWD)


This week's Tuesdays with Dorie: Baking with Julia recipe was hosted by Hilary of Manchego's Kitchen and Liz of That Skinny Chick Can Bake: Blueberry Nectarine Pie.  This pie is about as summer as you can get.  I love taking advantage of fresh fruits that are in season. 

In this recipe, the blueberries and nectarines get cooked down in a little bit of lime zest and brown sugar and then they're tossed in some fresh lime juice with more fresh blueberries and nectarines.  The lime is what really brings out the flavors in the fruit.  This pie was delicious, and the only thing I'd probably change is to double the fruit next time, as my pie came out a bit thin.
Thanks to Hilary and Liz for hosting; you can find the recipe on their blogs here and here.  Make sure you check here, too, to see what everyone else thought of this fruit-filled summer treat.

* Recipe notes:
- You'll definitely want to use a pie crust shield or cover the edges of your pie with some foil about half way through the baking process to prevent the edges from getting burned.
- I had to bake my pie about an extra 10-15 minutes before the crust was golden and the fruit juices were bubbling.
- I did not bake my pie on a baking sheet; in my experience that only causes the bottom crust to be undercooked.  Instead, I simply laid a piece of foil at the bottom of the oven to catch any juices that might bubble over.

Friday, July 27, 2012

Homemade Crackers: Pepper Jack and Oregano Crackers and Cheddar Rosemary Icebox Crackers (DB)

Our July Daring Bakers' Host was Dana McFarland and she challenged us to make homemade crackers! Dana showed us some techniques for making crackers and encouraged to use our creativity to make each cracker our own by using ingredients we love.

It's been quite some time since I made homemade crackers, so it's hard for me to compare this experience with my previous one.  However, I found that both of these recipes were extremely quick and easy to execute.  The icebox crackers, in particular, were very simple.  Just mix everything together and form the dough into a log and refrigerate; then slice and bake when ready.


My schedule is a bit hectic these days, so I stuck with the recipes as written and didn't take any creative license with them.  The only thing I changed was to omit the walnuts from the cheddar rosemary crackers because I don't care for nuts.

Both types of crackers were very flavorful.  My only complaint would be that the cheddar rosemary crackers were way too salty; so I'll definitely cut back on the salt next time.  These crackers reminded me of a gourmet version of cheezits; the rosemary is such a wonderful addition.

I really enjoyed this challenge because it reminded me of how much I love making my own crackers.  With a toddler to feed, I love that I can make her a snack that doesn't have all the additives and preservatives that are found in store bought crackers.

Thanks Dana, for hosting this month's challenge.  You'll find the recipes below.  Also be sure to check out the Daring Bakers' Blogroll to see what everyone else thought of these savory homemade treats.

Pepper Jack and Oregano Crackers (Roll with pasta rollers or by hand):

Servings: Approximately 80 crackers

Ingredients

1⅔ cups (400 ml) (235 gm) (8¼ oz) all-purpose (plain) flour
2¼ cups (540 ml) (225 gm/8 oz) grated pepper jack cheese, firmly packed
2 teaspoons (10 ml) (1 gm) dried oregano
½ teaspoon (2½ ml) (3 gm) salt
½ teaspoon (2½ ml) (½ gm) black pepper
½ cup (120 ml) (4 fl oz) vegetable oil
½ cup (120 ml) (4 fl oz) water

Spice topping

¼ teaspoon (1¼ ml) (1/8 gm) cayenne
1 teaspoon (5 ml) (3 gm) kosher salt
1 teaspoon (5 ml) (5 gm) sugar

Directions:

1. Combine the spice topping and set aside.
2. Grate the cheese and put in the bowl of a food processor with flour, oregano, salt and pepper and pulse to combine. This can also be done by hand.

3. Add the oil and pulse until the consistency of wet sand is reached.
4. Add enough water for the dough to come together.
5. Form the dough into two disks, wrap with cling film and refrigerate for several hours or overnight.
6. Heat the oven to moderate 325°F/160°C/gas mark 3.
7. Working with a quarter of the dough at a time, either use a rolling pin or roll out in your pasta rollers to 1/8 of an inch (3 mm) thick. If you use pasta rollers, ensure the dough is well floured so as not to stick.
8. Cut the strips into cracker shapes or cut out using a cookie cutter.

9. Transfer to a parchment lined cookies sheet and sprinkle with the spice mixture.
10. Bake for 20-25 minutes until medium golden brown.
11. Store in an airtight container and eat within three days

Cheddar, Rosemary and Walnut Icebox Crackers (form into a log and slice):

Servings: Approximately 48 crackers

Ingredients

½ cup (120 ml) (1 stick) (115 gm/4 oz) butter, well softened
2¼ cups (540 ml) (225 gm/8 oz) grated aged cheddar cheese (the better the cheese, the better the cracker), firmly packed
1 cup plus 3 tablespoons (285 ml) (190 gm/6oz) all-purpose (plain) flour
1 teaspoon (5 ml) (6 gm) salt (I found this to be way too much! try 1/4-1/2 tsp)
1/2 cup (120 ml) (60 gm/2 oz) finely chopped walnuts
1 tablespoon (15 ml) (1¾ gm) finely chopped rosemary

Directions:

1. Combine butter, rosemary and cheese in a stand mixer and beat well (can also be done by hand)

2. Add the flour, salt and nuts and stir to combine
3. Form the dough into two tight logs and wrap with cling film

4. Chill for at least an hour and up to several days. The log can be frozen at this point for several months.
5. Heat the oven to moderate 325°F/160°C/gas mark 3.
6. Slice a log into 5mm (1/5 inch) coins and place on a parchment lined baking sheet
7. Bake about 10 minutes until golden brown
8. Store in an airtight container and eat within three days
9. Try this recipe with different cheeses, nuts (or no nuts), and spices. Get creative!

Storage and Freezing Instructions/Tips:

Generally crackers with less fat and cheese last for weeks in an airtight container and richer crackers only a few days. Dough can be made days ahead, stored in the fridge and baked when needed. The icebox cracker dough can be frozen for several months before thawed, sliced and baked.

Friday, July 20, 2012

Dove Visible Care Body Wash & Spa Certificate Giveaway

I'm a busy working mom.  Sadly, since the birth of my little girl, I've had less and less time to devote to this blog.  I'm thankful to all my readers who still check in on this blog, despite the less frequent updates.  I know the other mothers out there can relate to what I'm talking about.  Sometimes life is so hectic and chaotic, that something as simple as taking a hot shower feels like a day at the spa! It's my own "me time" where I don't have to worry about getting anything else done for anyone else but myself.

I was recently sent a sample of Dove Visible Care Renewing Body Wash to try out at home. It's part of a new line of premium body washes made by Dove that contains the highest concentration of Nutrium Moisture technology of all Dove products.  I was a bit skeptical that you could really see any kind of difference in a short amount of time, but after using it for just a week, I could actually tell that my skin was softer.  I love that I can improve the look and feel of my skin by using a product that is already part of my daily routine - a body wash - instead of adding another step to my regimen because quite frankly, as a busy mom, my skin care regimen is quite minimal these days!

It is available in three varieties: New Dove® VisibleCare Toning Crème Body Wash helps to promote skin’s elasticity and strength, Renewing Body Wash nourishes and replenishes skin, and Softening Body Wash softens skin and dry spots.
 
Not all of us have the time or money to go pamper ourselves at the spa... but this is one small way that you can pamper yourself with more beautiful looking skin in one easy step.  Of course we'd all love some real pampering at the spa, though, right? So, if you'd be interested in entering a sweepstakes to win one of two $500 spa gift cards, follow the instructions below to enter. Even if you don't win, be sure to visit Dove® VisibleCare® to get a coupon for $1 off!

Enter to win one of two $500 Spafinder gift certificates!

NO PURCHASE NECESSARY
COMMENTS TO THIS POST ARE NOT SWEEPSTAKES ENTRIES. PLEASE SEE BELOW FOR ENTRY METHODS FOR THIS SWEEPSTAKES.

You may receive (2) total entries by selecting from the following entry methods:
a) Follow this link, and provide your email address and your response to the Promotion prompt
b) Tweet (public message) about this promotion; including exactly the following unique term in your tweet message: "#SweepstakesEntry"; and then visit this link to provide your email address and the URL to that Tweet.
c) Blog about this promotion, including a disclosure that you are receiving a sweepstakes entry in exchange for writing the blog post, and then visit this link to provide your email address and the URL to that post.

This giveaway is open to US Residents age 18 or older. Winners will be selected via random draw, and will be notified by e-mail. Winners will have 72 hours to claim the prize, or an alternative winner will be selected.

The Official Rules are available here.

This sweepstakes runs from 7/18/2012 - 8/22/2012

Be sure to visit the Dove® VisibleCare™ Crème Body Wash brand page on BlogHer.com where you can read other bloggers’ reviews and find more chances to win!

Thursday, June 28, 2012

Battenberg Cake (DB)


For the June Daring Bakers' challenge, Mandy of What The Fruitcake?! came to our rescue last minute to present us with the Battenberg Cake challenge! She highlighted Mary Berry’s techniques and recipes to allow us to create this unique little cake with ease.

This cake has far grander beginnings than tea with teddy. It was actually created as a wedding cake for royalty.  The first Battenberg cake was made to celebrate the marriage of Queen Victoria’s granddaughter, Princess Victoria, to husband Prince Louis of Battenberg.

It’s traditionally flavored with almond and has the signature Battenberg markings, that is, the yellow and pink squares (said to represent the four princes of Battenberg). The strips of sponge are glued together using jam (normally apricot) and the whole cake is covered in marzipan. Sometimes the edges are crimped and the top is patterned with a knife.

Although there are specialized Battenberg cake tins available, you don’t need one. This cake can be baked in a square baking tin and a divide made with foil to separate the two batters. This recipe really is all about simplicity.

I found the cake to be very simple to make.  The almond flavor was nice and the crumb was moist and perfect.  Instead of marzipan, I attempted to make some chocolate plastique (plastic chocolate).  I was not so successful with this.  Despite kneading my chocolate for quite some time, I just could not get it to come together.  It simply crumbled as soon as I tried to roll it out.  I'm not sure what I did wrong, but this prevented me from wrapping my cake beautifully as others have done.  Instead, I'm going to attempt a marshmallow fondant (for the first time).  That also means that I haven't finished it yet, so pics for this post will come later...


Thanks Mandy, for hosting this month's challenge.  You'll find the recipe below.  Also be sure to check out the Daring Bakers' Blogroll to see what everyone else thought of these beautiful and impressive cakes!

Traditional Battenberg:

Recipe Source: Traditional Battenberg adapted from Mary Berry’s “Baking Bible”

Servings: approx. 8

Ingredients
¾ cup (1½ sticks) 175gm / 6 oz Unsalted Butter, softened & cut in cubes
¾ cup / 175gm / 6 oz Caster Sugar
1¼ cups / 175gm / 6 oz Self-Raising Flour (*To make your own self raising flour: 1 cup Self Raising Flour = 1 cup / 115g All Purpose Flour + 1 ½ tsp Baking Powder + ¼ tsp Salt (omit salt if there is salt in the recipe) sifted together)
3 Large Eggs, room temp
½ cup / 65gm/ 2 1/3 oz Ground Almonds (Can be substituted with ground rice)
3/4 tsp / 3½ gm Baking Powder
½ tsp / 2½ ml Vanilla Extract
1/4 tsp (1¼ ml) Almond Extract
Red Food Colouring, paste, liquid or gel

To Finish
1/3 cup (80 ml) 100gm /3 ½ oz Apricot Jam
1 cup / 225gm / 8 oz Marzipan, natural or yellow


Directions:
1. Preheat oven to moderate 350°F/180°C/160°C Fan Assisted/Gas Mark 4
2. Grease an 8”/20cm square baking tin with butter
3. Line the tin with parchment paper, creating a divide in the middle with the parchment (or foil)
4. OR Prepare Battenberg tin by brushing the tin with melted butter and flouring


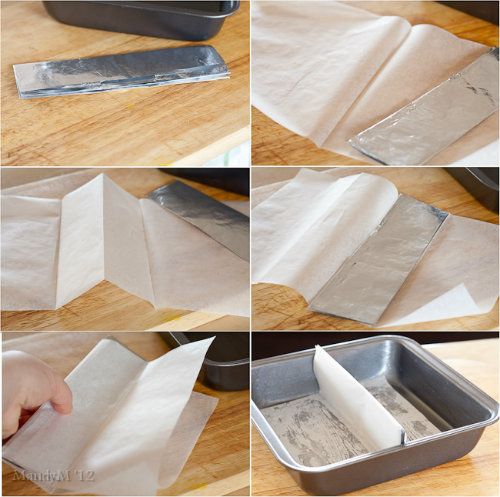
Making the pan divider with parchment paper and foil.

I folded over a sheet of foil several times to help reinforce the divide.
Fold the parchment in half and put the foil into the crease.
Butter the bottom of the cake pan, this will help "glue" the parchment to it.
Make sure the divide is in the middle of the pan and stick the excess parchment onto the bottom.

5. Whisk together the dry ingredients then combine with the wet ingredients in a large bowl and beat together just until the ingredients are combined and the batter is smooth
6. Spoon half the mixture into the one side of the prepared baking tin
7. Add a few drops of red food liquid/gel/paste to the remaining batter, stir until the colour is thoroughly distributed, add more colour if needed
8. Spoon the pink batter into the other half of the prepared baking tin
9. Smooth the surface of the batter with a spatula, making sure batter is in each corner
10. Bake for 25-30mins until the cake is well risen, springs back when lightly touched and a toothpick comes out clean (it should shrink away from the sides of the pan)
11. Leave to cool in the tin for a few minutes before turning out to cool thoroughly on a wire rack
12. Once completely cool, trim the edges of the cake with a long serrated knife
13. Cut each coloured sponge in half lengthways so that you are left with four long strips of sponge
14. Neaten the strips and trim as necessary so that your checkered pattern is as neat and even as possible
15. Gently heat the apricot jam and pass through a small sieve
16. Brush warmed jam onto the strips of cake to stick the cake together in a checkered pattern (one yellow next to one pink. On top of that, one pink next to one yellow)
17. Dust a large flat surface with icing sugar then roll the marzipan in an oblong shape that is wide enough to cover the length of the cake and long enough to completely wrap the cake
18. Brush the top of the cake with apricot jam
19. Place the cake on the marzipan, jam side down
- Tip: Either in the middle or to the one side of the marzipan
20. Brush the remaining three sides with jam
21. Press the marzipan around the cake, making sure the join is either neatly in the one corner, or will be underneath the cake once turned over
- Tip: If you put the sponge to the one side of the marzipan, I found it easiest to "roll" the sponge over and over onto the marzipan instead of lifting the marzipan up onto the sponge
22. Carefully flip the cake over so that the seam is under the cake and score the top of the cake with a knife, you can also crimp the top corners with your fingers to decorate
23. Neaten the ends of the cake and remove excess marzipan by trimming off a small bit of cake on both ends to reveal the pattern

Coffee and Walnut Battenberg:

Servings: Approx. 8
Ingredients
¾ cup (1½ sticks) 175gm / 6 oz Unsalted Butter, softened & cut in cubes
¾ cup / 175gm / 6 oz Caster Sugar
1¼ cups / 175gm / 6 oz Self-Raising Flour (***see end of doc on how to make your own)
3 Large Eggs, room temp
½ cup / 65gm / 2 1/3 oz Ground Almonds (Can be substituted with ground rice)
3/4 tsp / 3½ gm Baking Powder
3 tsp (15 ml) Milk
½ tsp (2½ ml) Vanilla Extract
1½ tsp (7½ ml) 7 gm Instant Coffee Powder or Granules
3 Tbsp / 25gm / 1 oz Walnuts, roughly chopped

To Finish
½ cup (1 stick) 115gm /4 oz Unsalted Butter
2 cups / 225gm /8 oz Powdered (Icing/Confectioners') Sugar
½ tsp / 2 gm Instant Coffee
1½ tsp (7½ ml) Milk or Cream
1 cup / 225gm /8 oz Marzipan, natural or yellow

Directions:
1. Preheat oven to moderate 350°F/180°C/160°C Fan Assisted/Gas Mark 4
2. Grease an 8”/20cm square baking tin with butter
3. Line the tin with parchment paper, creating a divide in the middle with the parchment (or foil)
- Tip: See photos or watch video above for detailed instructions
4. OR Prepare Battenberg tin by brushing the tin with melted butter and flouring
5. Whisk together dry ingredients (except walnuts and coffee) and combine with the wet ingredients in a large bowl (except vanilla and milk) and beat together just until the ingredients are combined and the batter is smooth
6. Spoon half the mixture into a separate bowl and stir in the vanilla, 1½ teaspoons milk and chopped walnuts
7. Spoon the walnut mixture into the one side of the prepared baking tin
8. Dissolve the coffee in the remaining 1½ teaspoon milk and add to the remaining batter, stir until just combined
9. Spoon the coffee batter into the other half of the prepared baking tin
10. Smooth the surface of the batter with a spatula, making sure batter is in each corner
11. Bake for 25-30mins until the cake is well risen, springs back when lightly touched and a
toothpick comes out clean (it should shrink away from the sides of the pan)
12. Leave to cool in the tin for a few minutes before turning out to cool thoroughly on a wire rack
13. Once completely cool, trim the edges of the cake with a long serrated knife
14. Cut each sponge in half lengthways so that you are left with four long strips of sponge
15. Neaten the strips and trim as necessary so that your checkered pattern is as neat and even as possible
16. Combine the buttercream ingredients together and mix until combined
17. Spread a thin layer of buttercream onto the strips of cake to stick the cake together in a checkered pattern (one yellow next to one pink. On top of that, one pink next to one yellow)
- Tip: See photos for detailed instructions
18. Dust a large flat surface with icing sugar then roll the marzipan in an oblong shape that is wide enough to cover the length of the cake and long enough to completely wrap the cake
19. Spread the top of the cake with a thin layer of buttercream
20. Place the cake on the marzipan, buttercream side down
21. Spread buttercream onto the remaining three sides
22. Press the marzipan around the cake, making sure the join is either neatly in the one corner, or will be underneath the cake once turned over
23. Carefully flip the cake over so that the seam is under the cake and score the top of the cake with a knife, you can also crimp the top corners with your fingers to decorate
24. Neaten the ends of the cake and remove excess marzipan by trimming off a small bit of cake on both ends to reveal the pattern

Chocolate Plastique / Modelling Chocolate:

Servings: Approx. 8
Dark Chocolate Plastique
200gm /7 oz Good Quality Dark Chocolate (70% Cocoa content)
¼ cup / 60ml /2 oz Light Corn Syrup / Glucose Syrup / Golden Syrup
Milk Chocolate Plastique
200gm /7 oz Good Quality Milk Chocolate (+-50% Cocoa content)
3 Tbsp / 45ml /1½ oz Light Corn Syrup / Glucose Syrup / Golden Syrup
White Chocolate Plastique
200gm /7 oz Good Quality White Chocolate
2 Tbsp / 30ml /1 oz Light Corn Syrup / Glucose Syrup / Golden Syrup

Directions:
1. Melt the chocolate in a double boiler or in a heatproof bowl over a pot of simmering water, stir occasionally
2. Once completely melted, remove from heat and allow to cool a bit
3. Stir in corn syrup / glucose syrup / golden syrup, it will seize up almost immediately, just keep stirring until mixed and it comes away from the side of the bowl
4. Transfer chocolate into a sealable bag, spread the chocolate out then seal the bag
5. Leave overnight or refrigerate for about 2 hours until completely firm
6. Turn out from the bag and knead on a surface dusted with powdered sugar, at first it will just break , but as you knead, it will warm up and start to become pliable
7. Knead until it's pliable enough to roll out or mould, 5 - 10mins
Storage Instructions/Tips:
- Battenberg will keep for 3-4 days stored at room temperature in an airtight container
- Keep chocolate plastique in an airtight container at room temperature, it will keep for as long as the
expiry date on the chocolate wrapper

Tuesday, June 19, 2012

French Strawberry Cake (TWD)


This week's Tuesdays with Dorie: Baking with Julia recipe was hosted by Sophia of Sophia's Sweets and Allison of Sleep Love Think Dine: French Strawberry Cake.  It's a genoise, or Italian sponge cake, made without any chemical leavening agents.  Instead, the sponge is made by whipping air into the batter and the dry ingredients are folded in.  The batter is extremely delicate, and over mixing will cause it to deflate.  The cake is then split into three layers, and then strawberries and cream are layered into between each cake layer.


I had a few small issues with this cake.  First, I was traveling and did not have an 8-inch cake pan.  I had to use a larger pan, and the resulting cake was too thin to cut into three layers.  So, I ended up baking a second cake and splitting both cakes into two layers instead - resulting a 4-layer cake instead of a 3-layer cake.  Even though I whipped up a full 2 cups of heavy cream (instead of the indicated 1-1/4), I did not have enough cream to pipe around the cake.  Instead, I decided to just decorate my cake with more fresh strawberries.


Thanks to Sophia and Allison for hosting; you can find the recipe on their blogs here and here.  Make sure you check here, too, to see what everyone else thought of wonderful summer treat.

* Recipe notes:
- Be very very careful folding your ingredients together, especially the butter.  If you're not careful all is lost and you shouldn't even bother baking up the deflated batter.
- I'd recommend using at least 2 cups of heavy whipping cream to frost the cake.

Monday, May 28, 2012

Honey White Challah and Cinnamon & Sugar Challah (DB)


May’s Daring Bakers' was pretty twisted – Ruth from The Crafts of Mommyhood challenged us to make challah! Using recipes from all over, and tips from “A Taste of Challah,” by Tamar Ansh, she encouraged us to bake beautifully braided breads.

I was eager to try this recipe, and made one honey white loaf and one cinnamon & sugar loaf.  The honey white was good, but the cinnamon & sugar loaf was to die for! The recipe was easy to follow, though I had to add about 1 extra cup of flour before the dough wasn't too sticky to work with.  I was rather concerned as I was adding so much extra flour, but in the end I still had fluffy loaves with a nice crumb.

To create the cinnamon and sugar filling, I used 2/3 cup brown sugar (packed) mixed with 1 tablespoon ground cinnamon.  After separating the dough into three equal pieces, I simply rolled each piece into a rectangle and then spread 1.5 tablespoons of softened butter on to each rectangle.  I then spread one-third of the cinnamon and sugar mixture on to each one and then rolled the rectangles up lengthwise. Then I simply braided the three rolls like I did with the regular honey white loaf.

The result was a bread that basically tasted like a delicious cinnamon roll, sans icing.  I realized as I was getting ready to put the bread in the oven that I was out of eggs, so my loaves were without egg washes, but I brushed them with a little bit of milk to add just a little more color to them.  The cinnamon & sugar loaf didn't last very long in our household, and I will definitely be making it again.

Thanks, Ruth, for hosting this month.  If you'd like the recipe, you'll find it posted below, and on Ruth's blog.

Honey White Challah
from Tammy's Recipes

Ingredients
1 ½ cups (360 ml) warm water, separated
1 Tbsp. (15 ml) (15 gm/½ oz sugar
2 Tbsp. (2-2/3 packets) (30 ml) (18 gm) (2/3 oz) dry active yeast
½ cup (120 ml) honey
1 Tbsp. (15 ml) oil (light colored vegetable oil, or olive oil if you prefer)
4 large eggs
1 ½ tsp. 7½ ml) (9 gm) (1/3 oz) salt
5 cups (1200 ml) (700 gm/25 oz) all-purpose (plain) flour, plus more as needed (up to 8 or 9 cups total)
1 egg beaten with 1 tsp. water
Directions:
  1. In mixer bowl/large mixing bowl combine ½ cup warm water, 1 Tbsp. sugar and 2 Tbsp. yeast.  Allow to proof approximately 5 minutes until foamy.
  2. To the yeast mixture add the remaining water, honey, oil, eggs, salt and 5 cups of flour. Knead (by hand or with your mixer’s dough hook) until smooth, adding flour as needed.  Knead for approximately 10 minutes.
  3. Transfer dough to a clean, oiled bowl, turn to coat or add a bit more oil on top.  Cover bowl with a kitchen/tea towel.  Leave to rise in a warm place until doubled, about 1 ½ hours. 
  4. Punch down the dough, divide it into two sections.  Use one half to make each loaf (shaped or braided as desired).
  5. Place loaves on parchment lined or greased baking sheets, cover with a towel, allow to rise 30 minutes.
  6. Preheat oven to 325 degrees.
  7. Brush tops loaves with egg wash.  (Sprinkle with seeds or toppings here if wanted.)
  8. Bake loaves 30-40 minutes until done.
  9. Cool on wire racks.

Wednesday, May 2, 2012

Hungarian Shortbread (TWD)


I'm a day late posting, but this week's Tuesdays with Dorie: Baking with Julia recipe was hosted by Lynette of 1smallkitchen and Cher of The not so exciting adventures of a dabbler…: Hungarian Shortbread.  This shortbread recipe is very similar to most traditional shortbreads - made with flour, sugar, and a lot of butter.  However, instead of rolling out the dough, half of it is grated into the pan and then topped with fruit preserves, and then topped with more grated dough.

The dough recipe was simple, and the results quite delicious.  However, I think I spent a good 30 minutes grating all of the dough! It kept getting too soft to grate so I'd have to put it back in the fridge to chill while I grated the other ball of dough. So, while these were buttery, crumbly, and delicious, I'm afraid I won't be making them again simply because I cannot put myself through another 30 minutes straight of grating again!

Thanks to Lynette and Cher for hosting; you can find the recipe on their blogs here and here.  Make sure you check here, too, to see what everyone else thought of these sweet, buttery treats.

* Recipe notes:
- I used a 13 x 9 inch pyrex pan to bake my shortbread.
- Instead of 8 oz of fruit preserves, I used 16 oz.  This seemed to be a good amount.  I think 8 oz would result in a layer of fruit preserves that was too thin.  I would recommend using at least 12 oz.
- I had to bake my shortbread for an extra 15 minutes before it was golden brown on top.  Some bakers noted that the bottom layer seemed undercooked but I did not have this problem since I baked mine longer.

Sunday, April 29, 2012

Armenian Nutmeg Cake (DB)


The Daring Bakers' April 2012 challenge, hosted by Jason at Daily Candor, were two Armenian standards: nazook and nutmeg cake. Nazook is a layered yeasted dough pastry with a sweet filling, and nutmeg cake is a fragrant, nutty coffee-style cake.  We were given the choice to make either dessert, or both if we were really up for a challenge.

I opted to try the Armenian Nutmeg Cake and while it seems deceivingly simple and plain, it is such a delicious cake.  The brown sugar in the cake gives it the most wonderful caramel flavor and the "crust" that is created at the bottom of the cake with a layer of flour, sugar, and butter gives it an unexpected crunch.  The cake vaguely reminded me of the British dessert sticky toffee pudding, just without the sauce.

I stuck to the recipe as written, except I used 1 teaspoon of cinnamon and 1 teaspoon of nutmeg instead of 1.5 teaspoons of nutmeg.  I think the cake lasted a total of about 24 hours in our household, it was that good!

Thanks Jason, for hosting this month's challenge.  I just love it when I find a recipe that is amazing that requires minimal effort! I'll definitely be making this cake again and again. You'll find the recipe below.  Also be sure to check out the Daring Bakers' Blogroll to see what everyone else thought of these Armenian desserts.

Armenian Nutmeg Cake

Makes one 9”/23cm cake which yields 12 servings
Video Instructions by Jason

Ingredients
  • 1 cup (240 ml) milk (I use whole, but nonfat or lowfat should be fine; non-dairy might work just fine, as well)
  • 1 teaspoon (5 ml) (5 gm) baking soda
  • 2 cups (480 ml) (280 gm/10 oz) all-purpose (plain) flour (I suspect pastry flour or another low-gluten flour might even work better to achieve a light, fluffy crumb)
  • 2 teaspoons (10 ml) (10 gm) (⅓ oz) baking powder (I used single-acting, because it's aluminum-free, and it turned out fantastic)
  • 2 cups (480 ml) (400 gm/14 oz) brown sugar, firmly packed
  • 3/4 cup (1½ sticks) (180 ml) (170 gm/6 oz) butter, preferably unsalted, cubed
  • 1/2 cup (120 ml) (55 gm/2 oz) walnut pieces, may need a little more
  • 1 to 1-1/2 teaspoons (5 to 7 ½ ml) (5 to 8 gm) ground nutmeg (try to grate it fresh yourself; the aroma is enchanting)
  • 1 egg
Directions:
Directions - the Traditional Way (The Fast, Easy Way further down)
1. Preheat your oven to moderate 350°F/175°C/gas mark 4.
2. Mix the baking soda (not baking powder; that's for the next step) into the milk. Set it aside.
3. Sift together the flour and the baking powder into a large bowl. One sift is fine
4. Add the brown sugar. Go ahead and mix the flour and brown sugar together. Or not.
5. Toss in the cubed butter.
6. Mash the butter with a fork into the dry ingredients (you can also use your fingers if you want). You'll want to achieve a more-or-less uniform, tan-colored crumbly mixture.
7. Take HALF of this resulting crumbly mixture into your springform (9”/23cm) pan. Press a crust out of it using your fingers and knuckles. It will be easy.
8. Crack an egg into a mixer or bowl.
9. Toss the nutmeg in with the egg.
10. Start mixing slowly with a whisk attachment and then increase to medium speed, or mix with a hand whisk if you're doing it manually. Once it's mixed well and frothy (about 1 minute using a standing mixer, or about 2-3 minutes of vigorous beating with a whisk), pour in the milk and baking soda mixture. Continue to mix until uniform.
11. Pour in the rest of the crumbly mixture. Mix that well, with either a paddle attachment, or a spatula. Or continue to use the whisk; it won't make much of a difference, since the resulting batter is very liquidy.
12. Pour the batter over the base in the springform pan.
13. Gently sprinkle the walnut pieces over the batter.
14. Bake in a preheated moderate oven for about 30-40 minutes. You'll know it's done when the top is a golden brown, and an inserted toothpick comes out clean.
15. Allow to cool in the pan, and then release. Enjoy!


An Even Easier Way...if you have a Food Processor
1. Preheat your oven to moderate 350°F/175°C/gas mark 4 .
2. Mix the baking soda (not baking powder) into the milk. Set aside.
3. Put the flour, baking powder, and the brown sugar into your food processor. Pulse until uniformly mixed.
4. Toss in the cubed butter. Pulse until uniformly mixed into tan-colored crumbs.
5. Pour HALF of the crumbs into your springform (9”/23cm) pan. Press out a crust using your fingers and knuckles.
6. Crack the egg into the food processor with the rest of the crumbs still in it.
7. Grate 1 to 1-1/2 teaspoon of nutmeg. Toss that into the food processor, too. Pulse until well-incorporated.
8. Pour in the milk and baking soda mixture. Continue to mix until a slightly lumpy tan batter is formed.
9. Pour the batter over the crust in the springform pan.
10. Gently sprinkle the walnut pieces over the batter.
11. Bake in a preheated moderate oven for 30-40 minutes. It's ready when the top is golden brown, and when it passes the toothpick test (comes out clean).
12. Cool the cake in the pan, and then dig in. Yum yum!

Freezing/Storage Instructions/Tips: Armenian nutmeg cake will keep (covered) at room temperature for 2-3 days. It tastes even better still warm from the oven.

Allow to cool completely before attempting to freeze. Armenian Nutmeg Cake will freeze fairly well if completely sealed. It can be frozen for up to 3 months.

Thursday, April 26, 2012

$5 Starbucks eGift Card for $1.80

If you're a Starbucks addict, you'll want to head on over here to get a $5 Starbucks eGift Card for just $1.80

It's the daily deal today (check under Charlotte if you don't see it) for $2 and code moviebuff3 (case sensitive) will take 10% off and make it only $1.80!

Act fast, as I am sure that these will sell out quickly! (Also note that the site is extremely slow right now due to increased traffic, but the pages do eventually load)

Monday, April 23, 2012

$10 Off and Free Shipping on Orders over $25 at Vitacost.com

*** Update - it also looks like through 4/24 only, you can get free shipping on all orders over $24, or $2.24 shipping on orders under $24.  Several of the Clif Organic Zbars are just $3.45 for a 6 pack.  This means you can get three 6 packs for $12.59 including shipping, or just $2.59 after your $10 off code! Be sure to look around for some other great deals ***

If you previously signed up for the Vitacost.com $10 off promo but didn't get to use it before the deal expired, here's another one! Through 5/1, Vitacost is offering FREE shipping on your entire order when you purchase $25 or more in Vitacost brand products.  This means you can purchase something like the 54 oz Vitacost Extra Virgin Coconut Oil ($20.99) and the Vitacost Vitamin D3 (200 capsules) ($4.99) and pay only $15.98 for both after the $10 code.  Plus several Vitacost brand items are buy one get one half off right now, too (with code VBOGOE)!

Here's how:
1) Use this link to sign up and get a $10 promo code sent to your email.  After you register for an account with Vitacost.com (to get the code you must go through a referral link like the one provided) you will receive an email with the subject line "Here's your $10 coupon for Vitacost.com" (this may take an hour)

2) Then add  $25 or more in Vitacost brand products to qualify for free shipping.

3) Enter your $10 off code (should arrive in your email) at checkout.

Also, don't forget to add 2 free samples to your cart before checking out (they've got a few different teas and other samples available).  Happy shopping!

Thursday, April 19, 2012

Orange Loaf Cake (TWD)


Ack! I'm not sure how I missed it, but I totally lost track of the days and realized on Wednesday night that I had forgotten to do this week's Tuesdays with Dorie: Baking with Julia recipe! This week's recipe hosted by Truc of Treats and Michelle of The Beauty of Life: Lemon Loaf Cake.

This was a quick and easy one bowl recipe that came together in just minutes (no mixer required!).  I didn't have any lemons on hand so I made an orange loaf cake instead.  I also glazed my loaf with an orange glaze.

The crumb was nice and fluffy, not too heavy at all.  However, I did find the cake a tad dry - not sure if I over baked it?  The orange flavor was quite subtle and I'm not sure you would really taste much of it without the glaze.  One of my favorite treats to get at Starbucks is their iced lemon pound cake.  I'm afraid this one pales in comparison.  It was good, but probably not something that I'll make again.

Thanks to Truc and Michelle for hosting; you can find the recipe on their blogs here and here.  Make sure you check here, too, to see what everyone else thought of citrus infused treat.

Tuesday, April 3, 2012

Pizza Rustica (TWD)


This week's Tuesdays with Dorie: Baking with Julia was hosted by Emily of Capital Region Dining and Raelynn of The Place They Call Home: Pizza Rustica.  I'm not sure where this got its name.  Rustic it is, pizza it's not.  It's more like a quiche, but heavy on the cheese and light on the eggs.  The base of the filling is ricotta cheese.  Then you mix in some mozarella and romano cheeses, some parsley, and some prosciutto.

I didn't have any fresh parsley on hand, so I subbed in 2 teaspoons of dried parsley.  Also used cooked bacon instead of proscuitto, and asiago cheese instead of romano cheese.  Sometimes a quiche tastes to "eggy" for me, so this "pizza" was more appealing to me.

There were some mixed opinions among the group about the pie crust, which was very sweet.  I decreased the amount of sugar in it, just a bit, based on comments that it was too sweet.  In the end, I'm not sure if I liked this savory and sweet combination.  I think cutting the sugar in half with this recipe would be absolutely fine.

I thought this was a pretty good dish; my husband not so much.  He would not eat more than one bite :( He usually isn't very picky, either.  So, this is unfortunately probably the first and last time I'll make this one.... in its entirety at least.  I'll probably make the pie crust recipe again, as this is the first one I've ever made that I didn't have huge problems with and it was delicious :)

Thanks to Emily and Raelynn for hosting; you can find the recipe on their blogs here and here.  Make sure you check here, too, to see what everyone else thought of this non-traditional pizza.

Wednesday, March 28, 2012

Dutch Crunch Bread (DB)


Sara and Erica of Baking JDs were our March 2012 Daring Bakers' hostesses! Sara & Erica challenged us to make Dutch Crunch bread, a delicious sandwich bread with a unique, crunchy topping. Sara and Erica also challenged us to create a one of a kind sandwich with our bread!

Technically, Dutch Crunch doesn’t refer to the type of bread, but rather the topping that is spread over the bread before baking. In Dutch it’s called Tijgerbrood or “tiger bread” after the tiger-like shell on the bread when it comes out of the oven. The final product has a delightful sweet crunch to it that makes it perfect for a sandwich roll. It’s a common option at sandwich shops all over the Bay Area and is often one of the first breads to run out.

I've never had Dutch Crunch bread before, so I was curious to try this one out.  It was a pretty straightforward recipe, and I did not come across any issues making this bread.  It was actually kind of fun schmearing the topping all over the bread prior to baking :) (would be fun for the kids to get involved too!)

I wasn't too creative with my sandwich making.  I just went with a classic BLT.  I'm a bacon lover, so the lettuce and tomato are basically just there to make me feel less guilty (otherwise I'd just be eating plain bacon!).  The dutch crunch topping was a nice textural change to plain bread, but I think this type of soft white roll would have lent itself better to another type of sandwich.  The BLT seems to work better with traditional toasted bread.  Still, I had fun with this challenge and I am glad I tried it.

Thanks Sara and Erica, for hosting this month's challenge.  You'll find the recipe below - be sure to read the note at the bottom about rice flour if you are not familiar with this ingredient. Also be sure to check out the Daring Bakers' Blogroll to see what kind of sandwiches everyone else came up with.

Soft White Roll

Servings: Six sandwich rolls
This recipe approximates the quintessential white sandwich roll found throughout the Bay Area. The recipe is simple, quick, and addictive.

Ingredients
1 tablespoon (1 packet) (15 ml) (7 gm/ ¼ oz) active dry yeast
¼ cup (60 ml) warm water (105-110º F) (41-43°C) (No need to use a thermometer – it should feel between lukewarm and hot to the touch).
1 cup (240 ml) warm milk (105-110º F) (41-43°C) (We’ve tried both nonfat and 2%, with no noticeable difference)
1½ tablespoons (22½ ml) (20 gm/ ⅔ oz) sugar
2 tablespoons (30 ml) vegetable oil (plus additional olive or vegetable oil for greasing bowl during rising)
1½ teaspoons (7½ ml) (9 gm/⅓ oz) salt
Up to 4 cups (960 ml) (600 gm/21oz) all purpose flour

Directions:
1. In the bowl of an electric mixer or large mixing bowl, combine yeast, water, milk and sugar. Stir to dissolve and let sit for about 5 minutes (The mixture should start to bubble or foam a bit and smell yeasty).
2. Add in vegetable oil, salt and 2 cups of flour. Using the dough hook attachment or a wooden spoon, mix at medium speed until the dough comes together. (The photo to below is with the first 2 cups of flour added).
3. Add remaining flour a quarter cup at time until the dough pulls away from the sides of the bowl, as shown in the photo below (For us, this usually required an additional 1½ to 2 cups of flour).
4. Turn out onto a lightly floured surface and knead for about 4 minutes, until smooth and elastic.
5. Place in a lightly greased bowl and cover with plastic wrap. Let rise for 1 hour, or until doubled (or more) in size (see photo comparison).
6. Once the dough has risen, turn it out onto a lightly floured surface and divide it into 6 equal portions (if you’d like to make rolls) or 2 equal portions (if you’d like to make a loaf) (using a sharp knife or a dough scraper works well). Shape each into a ball or loaf and place on a parchment-lined baking sheet (try not to handle the dough too much at this point).
7. Cover with plastic wrap and let rise for 15 minutes while you prepare the topping.
8. Coat the top of each roll or loaf with the topping as described above. While the original recipe recommends letting them stand for 20 minutes after applying the topping, I got better results by putting them directly into the oven.
9. Once you’ve applied the topping, bake in a preheated moderately hot 380ºF/190°C/gas mark 5 for 25-30 minutes, until well browned. Let cool completely on a wire rack before eating.
Our finished products: Note the roll in the foreground on the left. This is what happens if you don’t put enough topping on the bread – no cracking! So be sure to load on the topping.

Dutch Crunch Topping

Servings: This recipe should make sufficient topping for two 9x5 loaves (23cmx13cm) or 12 rolls. If you make only 6 rolls in the first soft white roll recipe, you can cut the topping recipe in half.

You should not prepare the topping until the bread you’ve selected to bake is almost finished rising (~15 minutes from baking). 


Ingredients
2 tablespoons (2 packets) (30 ml) (15 gm/½ oz) active dry yeast
1 cup (240 ml) warm water (105-115º F) (41-46°C)
2 tablespoons (30 ml) (30 gm/1 oz) sugar
2 tablespoons (30 ml) vegetable oil
½ teaspoon (2½ ml) (3 gm) salt
1½ cups (360 ml) (240 gm/8½ oz) rice flour (white or brown; NOT sweet or glutinous rice flour) (increase by 1 cup or more for home-made rice flour)

Directions:
1. Combine all ingredients in a large bowl and beat with a whisk; beat hard to combine. The consistency should be like stiff royal icing – spreadable, but not too runny. If you pull some up with your whisk, as shown below, it should drip off slowly. Add more water or rice flour as necessary. Let stand 15 minutes.
2. Coat the top of each loaf or roll with a thick layer of topping. We tried coating it with a brush but it worked better just to use fingers or a spoon and kind of spread it around. You should err on the side of applying too much topping – a thin layer will not crack properly.
3. Let stand, uncovered, for any additional time your recipe recommends. With the Soft White Roll, you can place the rolls directly into the oven after applying the topping. With the Brown Rice Bread, the loaves should stand for 20 minutes with the topping before baking.
4. When baking, place pans on a rack in the center of the oven and bake your bread as you ordinarily would. The Dutch Cruch topping should crack and turn a nice golden-brown color.

A Note about Rice Flour: If it’s not in your local grocery store, check in a specialty shop (somewhere that would sell gluten-free foods) or online (e.g., amazon.com). Be sure not to buy the sweet or glutinous variety, though either white or brown rice flour works just fine.

If you are unable to find it, or if you’re just curious about how to make it yourself, it’s not very hard to do at all. There are a number of tutorials online, but the basic idea is to put rice in a spice grinder or something else that can break grains, and grind it until it is a fine flour-like powder. You will likely need to sift the final product through a sieve.

Home-made rice flour alters the balance of ingredients in the topping recipe, specifically requiring more rice flour to make it the appropriate paste-like consistency.  You want the topping to form a thick layer on the bread. If it’s too watery or drippy, it will not stay on top of the bread and crack like it’s supposed to.

Thursday, March 22, 2012

Ozeri Pronto Digital Multifunction Kitchen and Food Scale only $11.37


Do you have a kitchen scale? If you don't, now is the time to get one! Right now you can get the
Ozeri Pronto Digital Multifunction Kitchen and Food Scale (in Elegant Chrome) for just $11.37.  Just use coupon code IAMFIT12 during checkout to bring it down from $18.95 to $11.37.  (This item ships FREE with Amazon Prime or with a purchase of $25 or more with Super Saver Shipping)

A kitchen scale is a very inexpensive way to make your life easier while baking.  Weighing ingredients is much more accurate than measuring them, and a digital kitchen scale makes doing that so easy.  If you like the best chocolate chip cookie recipe from my blog, you'll definitely find that making it by weighing the ingredients is faster than measuring out the ingredients, and will give you more consistent results from batch to batch. Act fast, as items do sell out quickly and prices fluctuate quite a bit on Amazon!

Tuesday, March 20, 2012

Irish Soda Bread (TWD) and Vitacost Deal on Coconut Oil


This week's Tuesdays with Dorie: Baking with Julia was hosted by Carla of Chocolate Moosey and Cathleen of my culinary mission.  The chosen recipe was Irish Soda Bread.  So named because instead of yeast, baking soda is used as the leavening agent in this bread.

It's pretty similar to most quick bread recipes (or biscuits), in that you mix all the dry ingredients together in one bowl, then pour the liquid ingredients in and mix it all together.  This recipe does call for a quick kneading, however, and I found the dough to be way too wet to knead.  I had to add quite a bit of extra flour before I could handle it.  Otherwise, this was a super easy recipe and it came together in just a matter of minutes!  I added dried cranberries and chopped dried apricots to mine, which gave it a slightly sweet but not overwhelmingly sweet flavor.  I saw that a few other bakers added cheese to theirs and I think that will be my next rendition of this recipe :)

Thanks to Carla and Cathleen for hosting; you can find the recipe on their blogs here and here.  Make sure you check here, too, to see all the other variations on this classic Irish bread.

Also, if you missed the last Vitacost deal I posted about, their free shipping promotion has been extended through 3/26 at 9am EST.
Right now, Vitacost.com is offering FREE shipping on orders that contain over $20 in Vitacost brand products.  (Normally their shipping fee is $4.95 for orders under $49 and free shipping for orders $49+)  Pair this free shipping offer with their $10 off $10 promo (for new customers) and you can get $20 worth of products for just $10.

You can get the 54oz Vitacost Coconut Oil for just $11.95 after the discount.  It's normally $18.89 on Amazon, so this is quite a savings.

Here's how:
1) Use this link to sign up and get a $10 promo code sent to your email.  After you register for an account with Vitacost.com (it must be through the link provided) you will receive an email with the subject line "Here's your $10 coupon for Vitacost.com" (this may take an hour)

2) Then add the Vitacost Coconut Oil to your cart for $19.95 (used to be $20.99 so it would qualify for free shipping alone).  Add the apple cider vinegar ($2) as a filler to bring your total to $20+.  Then use the $10 off code sent to your email, bringing your order total to $11.95 for both the coconut oil and the apple cider vinegar!

Of course, feel free to look around their website for other items.  You can view all Vitacost brand items that qualify for this free shipping offer here

Also, don't forget to add 2 free samples to your cart before checking out (they've got a few different teas and other samples available).  Happy shopping!