Tuesday, January 29, 2008

TWD: Berry Good Muffins


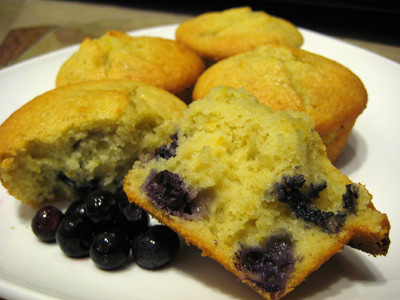
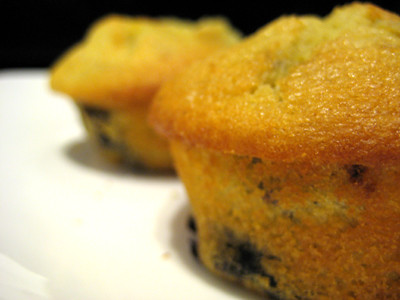
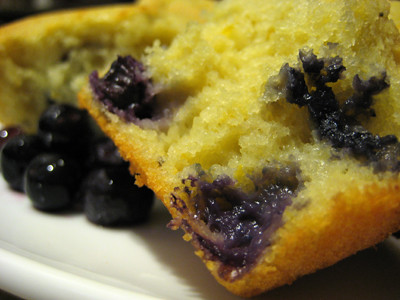
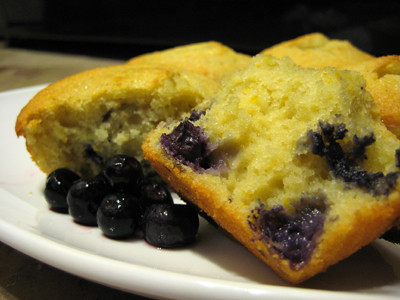
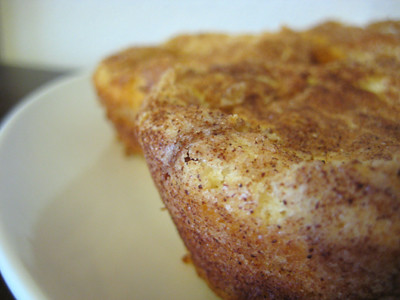
This week's recipe was chosen by Michelle of Sugar & Spice: Orange Berry Muffins. I was excited to make these, as I love anything with fruit, and these muffins looked so simple! Sure enough, these came together in no time and could easily be made on a weeknight to enjoy for breakfast during the week. These muffins are extremely moist, and not too sweet. My mom always complains that things are too sweet (for me, there is no such thing!), but I think she would really like these. Since they are not overly sweet, the blueberry flavor really comes through. The orange flavor is really just a subtle undertone to complement the blueberries.


If you don't have decorating sugar, you can sprinkle the tops of these muffins with granulated sugar before popping them in the oven for a very subtle sparkle.


This week, Nicole of Crazy Delicious and Ashley of eat me, delicious joined the Tuesdays with Dorie group! So don't forget to visit their blogs after checking out Quirky Cupcake, Sugar & Spice, and Abby Sweets to see the fruits of their labor :)

Orange Berry Muffins
from Baking: From My Home to Yours, by Dorie Greenspan

Grated zest and juice of 1 orange
About 3/4 cup buttermilk
2 large eggs
3 Tablespoons honey
1 stick (8 Tablespoons) unsalted butter, melted and cooled
1/3 cup sugar
2 cups all-purpose flour
2-1/2 teaspoons baking powder
1/4 teaspoon baking soda
1/4 teaspoon salt
1 cup blueberries - fresh, preferably, or frozen (not thawed)

Decorating sugar, for topping (optional)


Getting Ready:
Center a rack in the oven and preheat the oven to 400 degrees F. Butter or spray the 12 molds in a regular-size muffin pan or fit the molds with paper muffin cups. Alternatively, use a silicone muffin pan, which needs neither greasing nor paper cups. Place the muffin pan on a baking sheet.

Pour the orange juice into a large glass measuring cup or a bowl and pour in enough buttermilk to make 1 cup. Whisk in the eggs, honey and melted butter.

In a large bowl, rub the sugar and orange zest together with your fingertips until the sugar is moist and the fragrance of orange is strong.


Whisk in the flour, baking powder, baking soda and salt. Pour the liquid ingredients over the dry ingredients and, with the whisk or a rubber spatula, gently but quickly stir to blend. Don't worry about being thorough - the batter will be lumpy and bubbly, and that's just the way it should be. Stir in the blueberries. Divide the batter evenly among the muffin cups.

Bake for 22 to 25 minutes. If you want to top the muffins with decorating sugar, sprinkle on the sugar after the muffins have baked for 10 minutes. When fully baked, the tops of the muffins will be golden and springy to the touch and a thin knife inserted into the center of the muffins will come out clean. Transfer the pan to a rack and cool for 5 minutes before carefully removing each muffin from its mold.

Monday, January 28, 2008

THE Best Chocolate Chip Cookie?

Everyone wants to find "the best" chocolate chip cookie recipe, including me! I am slowly working my way through several recipes (it's hard work, I know!) but so far I have found two favorites.

The first one is the "Best Big Fat Chewy Chocolate Chip Cookie." I actually stumbled across this recipe on Allrecipes.com long before I ever started frequenting the What's Cooking? Board, where it is also known as the BBFCCC :) This cookie is amazing straight out of the oven... it is crisp around the edges and chewy in the center... but the next day they are a little more crunchy and aren't as chewy as I would like (not sure if it is something I am doing, or if it is the recipe - maybe it's because I make them smaller?). They're still awesome, regardless, but I am still in search of that recipe that will still be mostly chewy the next day.

Best Big Fat Chewy Chocolate Chip Cookie

I also wanted to mention that I have seen several others rave about the America's Test Kitchen chocolate chip cookie recipe. However, when I compared the two recipes side by side, there isn't much of a difference. The only difference is 2 tablespoons of flour and 1 teaspoon of vanilla extract (this one calls for 2 cups flour and 1 tablespoon of vanilla whereas the ATK recipe calls for 2-1/8 cups flour and 2 teaspoons vanilla).

My other favorite is the best soft chocolate chip cookie. For a little more background about the origin of the recipe, visit Joelen's Culinary Adventures. The secret ingredient in this recipe is the pudding mix which gives the cookie a softer texture than that of a traditional chocolate chip cookie. I actually prefer this softer cookie over the chewy cookie.

Soft Chocolate Chip Cookie

With both recipes, I cut back on the amount of chocolate chips, from 2 cups to 1-1/2 cups. In my opinion, there were plenty of chocolate chips in every bite. The next thing I want to do is compare the BBFCCC to Alton Brown's chewy chocolate chip cookie and the soft chocolate chip cookie recipe to Alton's puffy chocolate chip cookie recipe! So stay tuned for updates...

Best Big, Fat, Chewy Chocolate Chip Cookie
from Allrecipes.com


2 cups all-purpose flour
1/2 teaspoon baking soda
1/2 teaspoon salt
3/4 cup unsalted butter, melted
1 cup packed brown sugar
1/2 cup white sugar
1 tablespoon vanilla extract
1 egg
1 egg yolk
2 cups semisweet chocolate chips (I only used 1-1/2 cups)

Preheat the oven to 325°F (165°C). Grease cookie sheets or line with parchment paper.

Sift together the flour, baking soda and salt; set aside.


In a medium bowl, cream together the melted butter, brown sugar and white sugar until well blended. Beat in the vanilla, egg, and egg yolk until light and creamy. Mix in the sifted ingredients until just blended. Stir in the chocolate chips by hand using a wooden spoon. Drop cookie dough 1/4 cup at a time onto the prepared cookie sheets. Cookies should be about 3 inches apart.

Bake for 15 to 17 minutes in the preheated oven, or until the edges are lightly toasted. Cool on baking sheets for a few minutes before transferring to wire racks to cool completely.


Soft Chocolate Chip Cookies
from Joelen's Culinary Adventures, original recipe by Ruth Wakefield


2 1/4 cups all-purpose flour
1 teaspoons baking soda
1 cup butter, softened
3/4 cups packed brown sugar
1/4 cup white sugar
1 (3.4 ounce) packages instant vanilla pudding mix
2 eggs
1 teaspoon vanilla extract
2 cups semisweet chocolate chips (I only used 1-1/2 cups)

Preheat oven to 350°F (175°C). Sift together the flour and baking soda, set aside.


In a large bowl, cream together the butter, brown sugar, and white sugar. Beat in the instant pudding mix until blended. Stir in the eggs and vanilla. Blend in the flour mixture. Finally, stir in the chocolate chips.

Drop cookies by rounded spoonfuls onto ungreased cookie sheets.

Bake for 10 to 12 minutes in the preheated oven. Edges should be golden brown.

Sunday, January 27, 2008

Tex Mex Salsa with Homemade Tortilla Chips


If you're still looking for some great appetizers to serve at your Super Bowl party, this might be just what you are looking for! It's different from your traditional salsa, and that's what I like about it. I received a comment on my last Super Bowl appetizer post that made me laugh; it was a question about when the Super Bowl is being played. It was amusing to me because typically, I don't even know when it is either! While I thought it would be fun to blog about several different appetizers in honor of the Super Bowl, I actually don't even watch it! Sometimes we'll turn the TV on, but that's only so we can watch the commercials. We are not football fans in any way, shape, or form :)

I still remember trying this salsa for the very first time back in 2004. I was in school at the time, and one of my classmates had brought this in to share with everyone. Her mom (or aunt, I can't recall now) would make it for her every time she visited her. I couldn't get enough of it, and asked my classmate if she could get the recipe for me. A few weeks later, her mom (or aunt) came to visit again. This time she brought 2 containers full of salsa with her: one for my friend and one for me! :) She told me that there wasn't really a recipe for it, but gave me a rough idea of how to make it. The recipe below includes the proportions I typically use; however, you can easily adapt this recipe to suit your tastes (my husband always thinks I need to double the amount of beans!).

I love to serve this with homemade tortilla chips that are baked, not fried (so much healthier!). For this salsa, I only season the chips with a dash of salt, but for snacking and other dips, I love to season them with other things like garlic seasoning.


Tex Mex Salsa

2 lbs ripe tomatoes, diced (I like to use Roma tomatoes)
1-1/2 to 2 cups "Mexican Blend" cheese or shredded cheddar cheese
1 can black beans, drained (2 cans if you really like beans)
2-3 green onions, chopped
1 cup Kraft Zesty Italian dressing
2 - 3 tbsp chopped cilantro (optional)

Mix all ingredients together and refrigerate for at least 1 hr to allow the flavors to meld and then serve with your favorite tortilla chips. Garnish with additional cilantro.


Homemade Tortilla Chips

flour tortillas
vegetable or canola oil
salt, to taste

Preheat oven to 400°F.

Spritz or drizzle tortillas with vegetable or olive oil. Sprinkle with some salt. Cut the tortillas into strips, and then into triangles. Arrange the triangles evenly on an ungreased baking sheet.

Bake for 8-10 minutes, or until lightly golden brown. Pay careful attention to these, as they go from lightly golden to burnt very quickly!

Saturday, January 26, 2008

Eating Well: The 5 Basic Food Groups


When Emily of Rediscovering the Joy of Cooking shared this recipe, I knew by looking at the ingredient list that it would be good. With bacon, onions, Parmesan, and cream cheese... what's not to love?! :) This recipe includes things from 4 out of the 5 basic food groups: bread (crescent roll), vegetables (onions, parsley), meat (bacon), and dairy (Parmesan, cream cheese, milk). The only thing missing is fruit, but I don't think this would taste so good with the addition of any kind of fruit ;) With 4 out of 5, that makes it good for you, right? So you can eat these without feeling too guilty :)

By rolling the dough up from the short ends, you wind up with things that look more like wedges than crescents. So instead of making little wedges as directed in the recipe, I decided to make pinwheels and crescents rolls. If you click here, you can see what they are 'supposed' to look like. I may be biased, but I think they look a lot more appetizing my way :)


I also adapted the recipe to suit our tastes (read: more bacon!), and included my changes below. These are so good and really come together in no time. This is another great appetizer for your upcoming Super Bowl party :)


Bacon Appetizer Crescents (or Bacon Pinwheels)
from KraftFoods.com

1 pkg. (8 oz.) cream cheese, softened (I used 7 oz. of 1/3 less fat Neufchatel cheese)
8 slices bacon, crisply cooked, crumbled (I used 12 slices!)
1/3 cup grated Parmesan cheese
1/4 cup finely chopped onion
2 Tbsp. chopped fresh parsley (I used 2 tsp dried parsley flakes)
1 Tbsp. milk
1/4 tsp crushed red pepper flakes
2 cans (8 oz. each) refrigerated crescent dinner rolls (I used two 10.1 oz cans)

Preheat oven to 375°F. Mix cream cheese, bacon, Parmesan cheese, onions, parsley, crushed red pepper flakes and milk until well blended; set aside.

Separate each can of dough into four rectangles; firmly press perforations together to seal. Spread each rectangle with 2 rounded tablespoonfuls of the cream cheese mixture. Cut each rectangle into 12 wedges. Roll up wedges, starting at short ends. Place, seam-sides down, on greased baking sheet.

To create the crescents:
Follow directions as above, except roll each wedge starting with the wide edge.


To create the pinwheels:
Take two triangular pieces of dough and press the perforations together to seal and create a rectangle.

If you are using the 8 oz. cans of dough, divide the cream cheese mixture into 4 equal parts and spread 1/4th of the mixture evenly on the dough. If you are using the larger cans of dough, divide the cream cheese mixture into 6 equal parts and evenly spread 1/6th of the mixture on the dough. (You'll just end up with a little less filling if you use the larger cans of dough, which I thought was fine.)

Cut the dough lengthwise into 4 equal pieces, approximately 1/2 to 3/4-inches wide (if you look closely in the photo below, you can see how it is cut). Roll the dough up into a pinwheel and place on baking sheet.


Bake 12 to 15 minutes or until golden brown. Serve warm.

Yield: 8 dozen crescents (or 24 pinwheels, approx. 3-inches in diameter)

Friday, January 25, 2008

Spiced Up Cookies


I was in the mood to bake but didn't have many ingredients on hand. I was flipping through Caprial's Desserts, one the cookbooks I received for Christmas, and stumbled across this recipe. I first noticed the master recipe for vanilla bean shortbread cookies that I imagine yields pretty good cookies, but I wanted something a little different. The adapted recipe, which adds ginger and coconut, looked interesting.

I thought that the ginger and coconut combination was a great way to jazz up the flavor in this cookie, though I think the shredded coconut made it chewier than your typical shortbread cookie which is typically pretty crunchy (or maybe that was because I forgot to chop my shredded coconut?). The ginger flavor was very subtle, and I will probably try adding 3 tablespoons of ginger the next time I make this to make the flavor more prominent. Regardless, this is a great cookie!

I love that you can see the tiny little vanilla seeds in these cookies. If you don't have any vanilla beans on hand, you can leave them out, but the vanilla flavor won't come through as well.

*Note: When shopping for ginger, choose a piece that feels heavy for its size and has a nice, smooth skin (wrinkles are bad). Fresh ginger will keep well in the refrigerator for approximately 3 weeks if you wrap it up in a paper towel and seal it inside a ziploc bag. It also freezes fairly well so if you don't cook/bake with it very often, just pop the rest in the freezer. I usually peel it and cut it up into chunks before popping it in a ziploc to make it more convenient for later use. It will keep for approximately 3 months in the freezer.

Candied Ginger-Coconut Shortbread Cookies
from Caprial's Desserts

Follow the Vanilla Bean Shortbread Cookies master recipe (below), adding 1/2 cup chopped shredded sweetened coconut and 2 tablespoons minced candied ginger along with the flour and sugar. Proceed as directed in the master recipe.


Vanilla Bean Shortbread Cookies
from Caprial's Desserts

2 cups flour
1 cup sugar
1/2 vanilla bean, split in half lengthwise
1/4 tsp pure vanilla extract
1/2 tsp salt
1 cup cold unsalted butter, diced

Place the flour and sugar in the bowl of a mixer fitted with the paddle attachment. Scrape the seeds from the inside of the vanilla bean into the flour mixture (discard the bean), and then add the vanilla extract and salt. With the mixer on low speed, slowly add the butter, a few pieces at a time, and mix just until the dough is smooth.

Spread a 20-inch-long piece of plastic wrap out on the counter. Place the dough on the plastic and form it into a 12-inch-long cylinder. Fold one side of the plastic over the dough, and then roll up the dough tightly in the excess plastic, rolling it on the counter to smooth it. Refrigerate the dough until well chilled, about 1 hour.

Preheat the oven to 350°F. Grease a sheet pan well and set aside.

Using a serrated knife, cut the dough into 1/2-inch-thick slices and place on the prepared pan. Bake until golden brown, 12 to 15 minutes. Let the cookies cool for about 5 minutes on the pan, then transfer to a rack or paper towels and let cool completely.

Thursday, January 24, 2008

Chicken Satay


With the upcoming Super Bowl, I have been featuring various appetizer recipes in my blog. One of my favorite Thai appetizers is Chicken Satay with Peanut Sauce. Satay is popular in Indonesia, Malaysia, Singapore, the Philippines, Thailand, and the Netherlands. You'll find that the recipes for satay vary in each country, but it invariably consists of chunks of meat skewered and grilled over a wood or charcoal fire. While I would love to be able to do that to impart a genuine grilled/smoky taste to my chicken, we don't have a grill... so I use my George Foreman grill instead and it seems to turn out pretty well.

This was the very first recipe I tried for Chicken Satay. I loved it so much, I haven't tried any others. Whenever I make the peanut sauce for the Cold Sesame Noodles, I always make a little extra because I love to use it as a dipping sauce for this dish. Some Thai restaurants will also serve this with a cucumber relish. The cucumber is refreshing and helps cleanse the palate before you take your next bite of the chicken. I don't have photos of it, but I have included a recipe for the cucumber relish below.


Chicken Satay
from Allrecipes.com

2 tablespoons creamy peanut butter
1/2 cup soy sauce
1/2 cup lemon or lime juice
1 tablespoon brown sugar
2 tablespoons curry powder
2 cloves garlic, chopped
1 teaspoon hot pepper sauce (I used Sambal Oelek Chili Paste)
6 skinless, boneless chicken breast halves - cubed

In a mixing bowl, combine peanut butter, soy sauce, lime juice, brown sugar, curry powder, garlic and hot pepper sauce. Place the chicken breasts in the marinade and refrigerate. Let the chicken marinate at least 2 hours, overnight is best.

Preheat a grill to high heat. (I used my George Foreman grill.)

Weave the chicken onto skewers, then grill for 5 minutes per side. (With the George Foreman grill, I find it takes only about 3-5 minutes total, depending on how big your pieces of chicken are.)

Yield: 12 Servings.


Peanut Sauce
from Tyler Florence

1 tablespoon peanut oil
1 green onion, thinly sliced on the diagonal
1/2-inch piece fresh ginger, minced
1-2 garlic cloves, minced
1/2 teaspoon red chili paste, such as Sambal Oelek (omit this if you don't tolerate spicy foods well)
1 tablespoon brown sugar
1/4 cup creamy peanut butter
1-1/2 tablespoons rice vinegar
1-1/2 tablespoons soy sauce
3 tablespoons hot water

In a small saucepan, heat the peanut oil over medium-low flame. Add the green onions, ginger, garlic, and chili paste. Cook and stir for a minute until soft and fragrant. Mix in the brown sugar, peanut butter, vinegar, soy sauce, and hot water. Stir until the sugar is dissolved and the peanut butter has smoothed out.


Cucumber Relish
from Mom :)

1 cucumber, diced
1/2 cup sugar
1/2 cup white vinegar
dash of salt and pepper

In a small bowl, combine the sugar, vinegar, salt, and pepper and mix well. Add the cucumbers and toss to coat. Refrigerate at least 1 hour before serving.

Odd Combinations


I love anything with peanut butter. That includes peanut butter with pasta. While the combination may sound a bit odd to some, it is actually quite delicious.

I was watching the Food Network when I saw an episode of Food 911 in which Tyler Florence made these Cold Sesame Noodles. It looked tasty, so I went online to foodnetwork.com to find the recipe. There, I found two different recipes - one that involved throwing everything together in a blender, and the other entailed cooking the sauce on the stove. I much prefer the latter, as the raw garlic flavor is too strong in the first recipe. The sesame oil definitely lends the dish a sesame flavor, but it's really more like "noodles in peanut sauce" than "sesame noodles" if you ask me :)


This makes a great weeknight meal. You can make the sauce while the pasta is cooking, so it comes together in about 15 minutes (longer if you decide to chill it before serving, obviously). If you don't have a very high tolerance for heat, omit the chili paste.

Note: The pasta seems to absorb a lot of the sauce over time, so leftovers aren't really good. If you plan on having leftovers, reserve some of the sauce to toss in with the noodles later. (Not sure if this is the case with the egg noodles?)

Cold Sesame Noodles
from Tyler Florence

1/2 pound Chinese egg noodles or 12 ounces angel hair pasta
3 tablespoons dark sesame oil
2 tablespoons peanut oil
2 green onions, thinly sliced on the diagonal
1-inch piece fresh ginger, minced
3 garlic cloves, minced
1 teaspoon red chili paste, such as Sambal Oelek
2 tablespoons brown sugar
1/2 cup creamy peanut butter
3 tablespoons rice vinegar
3 tablespoons soy sauce
6 tablespoons hot water
1 tablespoon toasted sesame seeds
Cucumber slices, for garnish
Fresh cilantro leaves, for garnish


Cook the noodles in large pot of boiling unsalted water over medium heat until barely tender and still firm. Drain immediately and rinse with cold water until cool. Drain the noodles really well and transfer to a wide bowl; toss with the sesame oil so they don't stick together.

In a small saucepan, heat the peanut oil over medium-low flame. Add the green onions, ginger, garlic, and chili paste. Cook and stir for a minute until soft and fragrant. Mix in the brown sugar, peanut butter, vinegar, soy sauce, and hot water. Stir until the sugar is dissolved and the peanut butter has smoothed out. Toss the noodles with the peanut sauce until well coated. Serve at room temperature or chilled. Garnish with the sesame seeds, cucumber slices, and cilantro.

Tuesday, January 22, 2008

Tuesdays with Dorie


Thanks to Peabody's recommendations, I put Dorie Greenspan's "Baking: From My Home to Yours" on my Christmas wish list. So when I saw that Michelle of Sugar & Spice was teaming up with Laurie of Quirky Cupcake and April of Abby Sweets to make one recipe per week from the cookbook, I was a little jealous. I left a comment on Michelle's blog telling her how great the idea of "Tuesdays with Dorie" was, but that I would never be able to commit to that every week... she graciously emailed me, asking me to join, without any obligation to participate every week. I plan to participate as much as possible, but my schedule can get a bit hectic at times, so I appreciate the group allowing me join without that huge commitment.

So this week's recipe is Perfection Pound Cake. I decided to go with one of the adaptations included in the book, for a marbled chocolate and vanilla pound cake. The flavor in the cake was really good, but somehow my cake turned out too dry (despite wrapping it in saran wrap and letting it ripen overnight). I'm not sure if I overbaked the cake, or if my oven temperature is off (I need to get an oven thermometer!), but I was able to compensate for the lack of moisture in my cake by turning it into a strawberry shortcake type dessert. I simply sliced up some fresh strawberries, let them macerate in a few tablespoons of sugar, and then drizzled the strawberries and syrup over the pound cake. Top with a dollop of whipped cream (or several in my case) and you have a great strawberry shortcake :)


Don't forget to visit Sugar & Spice, Quirky Cupcake and Abby Sweets to see how their cakes turned out!

Perfection Pound Cake

from Dorie Greenspan, Baking: From My Home to Yours


2 cups all-purpose flour (or 2-1/4 cups cake flour) (I used cake flour)
1 teaspoon baking powder
1/4 teaspoon salt
2 sticks (8 ounces) unsalted butter, at room temperature
1 cup sugar
4 large eggs, at room temperature
1 teaspoon pure vanilla extract

Center a rack in the oven and preheat the oven to 325 degrees F. Butter a 9x5-inch loaf pan or an 8-1/2 x 4-1/2-inch loaf pan. Put the pan on an insulated baking sheet or on two regular baking sheets stacked one on top of the other.

Whisk together the flour, baking powder, and salt.

Working with a stand mixer, preferably fitted with a paddle attachment, or with a hand mixer in a large bowl, beat the butter and sugar on high speed until pale and fluffy, a full 5 minutes. Scrape down the bowl and beater and reduce the mixer speed to medium. Add the eggs one at a time, beating for 1 to 2 minutes after each egg goes in. As you're working, scrape down the bowl and beater often. Mix in the vanilla extract. Reduce the mixer speed to low and add the flour, mixing only until it is incorporated - don't overmix. In fact, you might want to fold in the last of the flour, or even all of it, by hand with a rubber spatula. Scrape the batter into the buttered pan and smooth the top.

Put the cake into the oven to bake, and check on it after about 45 minutes. If it's browning too quickly, cover it loosely with a foil tent. If you're using a 9x5 pan, you'll need to bake the cake for 70 to 75 minutes; the smaller pan needs about 90 minutes. The cake is properly baked when a thin knife inserted deep into the center comes out clean.

Remove the cake from the oven, transfer the pan to a rack and let rest for 30 minutes.

Run a blunt knife between the cake and the sides of the pan and turn the cake out, then turn it right side up on the rack and cool to room temperature.

Storing:
Wrapped well, the cake will keep for 5 to 7 days at room temperature (stale cake is great toasted) or up to 2 months in the freezer.


Marbled Pound Cake:
After the batter is fully mixed, transfer half of it to another bowl and gently blend in 4 ounces of bittersweet chocolate, melted and cooled. Alternate large spoonfuls of the light and dark batters in the pan, then run a kitchen knife in a zigzag pattern through the batters to marble them.

Monday, January 21, 2008

Presto Pesto Pasta


Say that 5 times fast! :) This is a great weeknight meal. I am submitting this recipe to Presto Pasta Nights, hosted by Once Upon a Feast. I admit that this dish isn't very healthy, but I love pesto and this recipe looked like it would be wonderful. Well, I was not disappointed. It is a rich, creamy sauce and the pesto just puts it over the top. This would have been great with the shrimp that is called for in the recipe, or even chicken... but I made this after a long day at work and did not want to take the time to thaw anything out. I saved even more time by using canned tomatoes instead of dicing fresh tomatoes. So even though the recipe calls for shrimp, I've tagged this post vegetarian because it can easily be made vegetarian by omitting the shrimp.

I was in such a rush to make dinner that I forgot to add the tomatoes initially! It was only after I started taking some pictures that I realized something was missing! So that is why you don't see any tomatoes in the photo below :)


This makes quite a bit of sauce, so I am going to try to freeze half of it for later. Not sure how it will taste after it has been frozen, but next time I may just halve the recipe.

Pesto Cream Sauce
from Allrecipes

1 (16 ounce) package linguine pasta (I used angel hair)
2 tablespoons olive oil
1 small onion, chopped
8 cloves garlic, sliced
1/2 cup butter
2 tablespoons all-purpose flour
2 cups milk (I used skim)
1 pinch salt (I used much more salt, to taste)
pinch pepper (I used about 1/4 tsp)
1 1/2 cups grated Romano cheese
1 cup prepared basil pesto
1 pound cooked shrimp, peeled and deveined (I omitted these)
20 mushrooms, chopped (I omitted these)
3 roma (plum) tomato, diced (I used one 14.5 oz can of diced tomatoes, drained)

Bring a large pot of lightly salted water to a boil. Add pasta and cook for 8 to 10 minutes or until al dente; drain.

Heat olive oil in a large skillet over medium heat. Saute onion until tender and translucent. Stir in garlic and butter, and saute until garlic is soft and fragrant, about 1 minute. Dissolve flour in milk, then stir in. Season with salt and pepper, and simmer 4 minutes, stirring constantly. Add cheese, and stir until melted. Stir in pesto. Add shrimp, mushrooms and tomatoes. Cook 4 minutes, or until heated through. Toss with pasta until evenly coated.

Yield: 6 Servings

Saturday, January 19, 2008

Spinach and Artichoke Dip


With the Super Bowl coming up, I plan to feature some great appetizer recipes during the next two weeks. If you missed my recent post, check out my favorite Sweet and Sour Meatballs. A lot of people also seem to like the Buffalo Chicken Dip (aka "crack" dip), although it's a bit heavy and only so so in my opinion. Another popular party appetizer is spinach and artichoke dip.

I have used several different recipes for spinach and artichoke dip. The last one I made was really good... unfortunately, I forgot to write down the recipe (doh!). So, when I saw this recipe on Mary Ellen's Cooking Creations, I knew I wanted to try it.

This was really good. I probably added more than just 'a few pinches' of red pepper flakes because I like things with an extra kick - I thought it was a nice deviation from traditional recipes. I admittedly will make spinach and artichoke dip at random times; not necessarily just for parties. Normally I will eat it the first day and then not really want anymore after that as I get bored/sick of it and the recipes usually yield a large amount that is too much for one person (Brent doesn't really like spinach & artichoke dip). That was not the case with this recipe! I am a bit embarrassed to admit that I polished off the entire thing (over the course of a few days) myself! So, if you haven't, try this recipe the next time you get the chance :) You will not be disappointed.

I have seen a few comments online about roasting the artichoke hearts in the oven before incorporating them into the dip. I imagine that would impart an extra dimension of flavor that would be good. I may try that next time I make this dip.


Spinach and Artichoke Dip
from Mary Ellen's Cooking Creations

1/2 sweet yellow onion finely chopped
4 cloves garlic, pressed
1 tbsp olive oil
1 10 oz box frozen spinach
2 cans artichoke hearts in water, drained and coarsely chopped
2 packages cream cheese, softened
1/2 cup sour cream
1/2 cup mayonnaise
2/3 cup grated Parmesan cheese
1/4 cup mozzarella cheese
Few pinches of red pepper flakes
Salt, to taste

Saute onion and garlic in olive oil and set aside. Cook spinach according to package directions; drain. Mix spinach, onion, and garlic in large bowl.

Add cream cheese, mayonnaise, sour cream, cheeses, red pepper flakes, and salt. Mix well.

Add artichoke hearts; mix; transfer to a baking dish and top with the Parmesan and mozzarella cheese.

Either store in fridge until ready to bake or bake at 350 degrees until hot and bubbly.

Serve with tortilla chips and/or raw vegetables such as carrots and celery. (I served mine with bread cubes.)

Friday, January 18, 2008

The Refund Muffin


When Peabody of Culinary Concoctions by Peabody posted, proclaiming this as her favorite recipe from 2007, I knew I had to try it. The story behind it is rather amusing, as it has now been dubbed the "refund muffin," due to someone emailing Peabody requesting a refund for their cost in supplies after they made the muffin and did not like it!

That person is definitely in the minority, as everyone else seems to love it... including myself. I was not disappointed by this recipe, and I actually prefer these muffins over the traditional cookie. Mine did not turn out quite as lovely as Peabody's, as I became impatient and opened the oven before they were done baking. Regardless of how they looked, they still tasted amazing :)

Not sure if it is just me, but I did have a little bit of difficulty rolling the batter in the cinnamon and sugar mixture. I ended up just dropping each ball of batter into my bowl and then moving my bowl in the same type of motion you would make as if you were using a skillet and trying to flip a pancake. It also took a little trial and error for me to figure out how large to make my batter balls to fit my muffin pans. A few ended up too small so I had to roll additional batter in the cinnamon/sugar and then added them into muffin pans that weren't full enough. This allowed me to create a few muffins that had a cinnamon/sugar swirl in the middle :)

Snickerdoodle Muffins
from Culinary Concoctions by Peabody

2 sticks unsalted butter
1 cup sugar
2 tsp vanilla
2 eggs
¾ tsp baking soda
¾ tsp baking powder
¾ tsp cream of tartar
¾ tsp freshly grated nutmeg
1 and ¼ cup sour cream
2 and ¼ cups all purpose flour
1 cup sugar and 2 TBSP cinnamon mixed together for rolling

Cream the butter and sugar until soft about 3 to 5 minutes. Add in the vanilla. Add in the eggs one at a time and mix until each is incorporated.

In a separate, mix together the flour, baking soda, and baking powder and cream of tartar.

Add the flour mixture and the sour cream alternately to the egg-butter mixture in the additions. Start with the flour and end with the flour. Scrape the bowl occasionally.

Using an ice cream scoop, scoop out muffin batter one at a time and drop into a shallow bowl filled with the cinnamon sugar mixture. Roll the muffin around in the mixture until it is covered completely in cinnamon sugar. Place muffin in to muffin tin. Depending on the size of your tins, you should get about 12 to 14 muffins. Bake them for approximately 20-22 minutes in a 350F oven or until they are golden brown.

Thursday, January 17, 2008

Sweet and Sour Meatballs


Sweet and sour meatballs are one of my favorite party appetizers! I had never really had them until I was in college. I would regularly attend these "teas" which were receptions where we would munch on all sorts of finger foods and then sit down together in a small room to listen to a special guest speaker. It was during these teas that I had the opportunity to meet Madeleine L'Engle, Kenneth Starr, Sandra Day O'Connor, the Indigo Girls, Conan O'Brien, and many others. As much as I would look forward to meeting these noteable figures, I would also look forward to the food! I was always eager to find out what would be served and was thrilled any time I saw these meatballs on the table :)

I never really tried to make them myself, until one day a coworker brought them in. I was raving about them because it had been years since I had had them... and was surprised when she told me that the "secret ingredients" that make up the sauce are grape jelly and chili sauce! I had honestly never even heard of chili sauce before, but sure enough, I found it at the grocery store in the same aisle as the ketchup and barbeque sauces.


You can buy premade frozen meatballs and use them in this recipe to make a super quick and easy appetizer, but I like to make everything from scratch by adapting a recipe from Alton Brown.

Sweet and Sour Meatballs
adapted from Alton Brown

3/4 pound ground pork
3/4 pound ground round
1/2 cup finely grated Parmesan
1 whole egg
1 1/2 teaspoons dried basil
1 1/2 teaspoons dried parsley
1 teaspoon garlic powder
1 teaspoon kosher salt
1/2 teaspoon red pepper flakes
1/4 cup bread crumbs

Sweet and Sour Sauce:
1 bottle (12 oz) of Heinz chili sauce
1 jar (18 oz) grape jelly (alternatively, try a can of jellied cranberry sauce)

Preheat the oven to 400 degrees F.

In a large mixing bowl, combine the pork, ground round, cheese, egg, basil, parsley, garlic powder, salt, red pepper flakes, and bread crumbs. Using your hands, mix all ingredients until well incorporated. Use immediately or place in refrigerator for up to 24 hours. Shape the meatballs into rounds and place the meatballs on an ungreased baking sheet. Bake for 20 minutes or until golden and cooked through.

In a large saucepan, add the chili sauce and grape jelly. Heat on low-medium heat until the jelly is completely melted. Add the meatballs to the sauce and simmer on low heat for 30 minutes. Alternatively, add the sauce ingredients and cooked meatballs to a crockpot and heat on low for 4-6 hrs for optimum flavor.