Showing posts with label tuesdays with dorie - baking with julia. Show all posts

Tuesday, September 4, 2012

Nectarine Upside-Down Chiffon Cake (TWD)


This week's Tuesdays with Dorie: Baking with Julia recipe was hosted by Marlise of The Double Trouble Kitchen and Susan of The Little French Bakery: Nectarine Upside-Down Chiffon Cake.  It's been a long, long, time since I've posted for this group - I'm sorry :( I have just been so busy, and on top of that I'm six months pregnant and turning on the oven when it is 100+ degrees outside just hasn't been very appealing.  The good news, however, is that my baby girl (who is not so much a baby anymore) just started school this week so that means this mama is going to have a lot more time to bake each week! So, you should start to see blog posts pick up a little more at least.

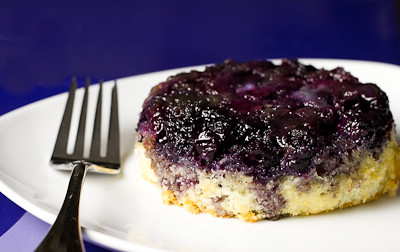
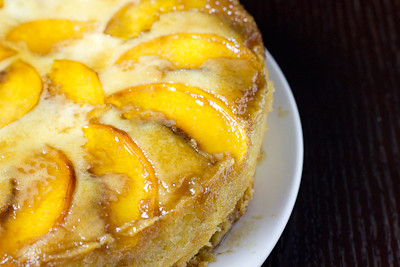
I didn't have a pan large enough for this cake, so I made one large nectarine and peach upside-down chiffon cake and one mini blueberry upside-down chiffon cake.  After reading some of the comments on the weekly P&Q, I decided to skip the streusel and made sure to bake my cake for a few extra minutes.  I really think the longer baking time has to do with whether or not the cake is baked on a jelly roll pan.  I did not bake mine on one and I think it only took an extra 3-5 minutes to bake.  I did, however, cover the bottom of my pans with foil to catch the butter drippings, which was good because there was quite a bit.
The blueberry cake was delicious.  The chiffon was light and airy, as it should be.  It's a nice contrast to the denser, more traditional pineapple upside down cake.  I'm not sure how the nectarine and peach cake turned out because that one will be going with my husband to work tomorrow, but I imagine it's just as good as the blueberry cake.
Thanks to Marlise and Susan for hosting; you can find the recipe on their blogs here and here.  Make sure you check here, too, to see what everyone else thought of this sweet, end of summer treat.

* Recipe notes:
- If you bake your cake on a jelly roll pan, be sure to add at least another 10 minutes of baking time to your cake.  Definitely don't forget to wrap the bottom of your pan in foil, or you'll end up with a big mess on the bottom of your oven.
- Frozen blueberries work great with this recipe.  Do not thaw before baking.
- For more recipe notes, check here.

Tuesday, July 31, 2012

Blueberry Nectarine Pie (TWD)


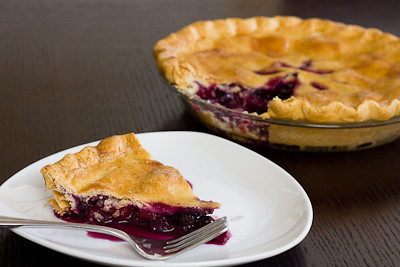
This week's Tuesdays with Dorie: Baking with Julia recipe was hosted by Hilary of Manchego's Kitchen and Liz of That Skinny Chick Can Bake: Blueberry Nectarine Pie.  This pie is about as summer as you can get.  I love taking advantage of fresh fruits that are in season. 

In this recipe, the blueberries and nectarines get cooked down in a little bit of lime zest and brown sugar and then they're tossed in some fresh lime juice with more fresh blueberries and nectarines.  The lime is what really brings out the flavors in the fruit.  This pie was delicious, and the only thing I'd probably change is to double the fruit next time, as my pie came out a bit thin.
Thanks to Hilary and Liz for hosting; you can find the recipe on their blogs here and here.  Make sure you check here, too, to see what everyone else thought of this fruit-filled summer treat.

* Recipe notes:
- You'll definitely want to use a pie crust shield or cover the edges of your pie with some foil about half way through the baking process to prevent the edges from getting burned.
- I had to bake my pie about an extra 10-15 minutes before the crust was golden and the fruit juices were bubbling.
- I did not bake my pie on a baking sheet; in my experience that only causes the bottom crust to be undercooked.  Instead, I simply laid a piece of foil at the bottom of the oven to catch any juices that might bubble over.

Tuesday, June 19, 2012

French Strawberry Cake (TWD)


This week's Tuesdays with Dorie: Baking with Julia recipe was hosted by Sophia of Sophia's Sweets and Allison of Sleep Love Think Dine: French Strawberry Cake.  It's a genoise, or Italian sponge cake, made without any chemical leavening agents.  Instead, the sponge is made by whipping air into the batter and the dry ingredients are folded in.  The batter is extremely delicate, and over mixing will cause it to deflate.  The cake is then split into three layers, and then strawberries and cream are layered into between each cake layer.


I had a few small issues with this cake.  First, I was traveling and did not have an 8-inch cake pan.  I had to use a larger pan, and the resulting cake was too thin to cut into three layers.  So, I ended up baking a second cake and splitting both cakes into two layers instead - resulting a 4-layer cake instead of a 3-layer cake.  Even though I whipped up a full 2 cups of heavy cream (instead of the indicated 1-1/4), I did not have enough cream to pipe around the cake.  Instead, I decided to just decorate my cake with more fresh strawberries.


Thanks to Sophia and Allison for hosting; you can find the recipe on their blogs here and here.  Make sure you check here, too, to see what everyone else thought of wonderful summer treat.

* Recipe notes:
- Be very very careful folding your ingredients together, especially the butter.  If you're not careful all is lost and you shouldn't even bother baking up the deflated batter.
- I'd recommend using at least 2 cups of heavy whipping cream to frost the cake.

Wednesday, May 2, 2012

Hungarian Shortbread (TWD)


I'm a day late posting, but this week's Tuesdays with Dorie: Baking with Julia recipe was hosted by Lynette of 1smallkitchen and Cher of The not so exciting adventures of a dabbler…: Hungarian Shortbread.  This shortbread recipe is very similar to most traditional shortbreads - made with flour, sugar, and a lot of butter.  However, instead of rolling out the dough, half of it is grated into the pan and then topped with fruit preserves, and then topped with more grated dough.

The dough recipe was simple, and the results quite delicious.  However, I think I spent a good 30 minutes grating all of the dough! It kept getting too soft to grate so I'd have to put it back in the fridge to chill while I grated the other ball of dough. So, while these were buttery, crumbly, and delicious, I'm afraid I won't be making them again simply because I cannot put myself through another 30 minutes straight of grating again!

Thanks to Lynette and Cher for hosting; you can find the recipe on their blogs here and here.  Make sure you check here, too, to see what everyone else thought of these sweet, buttery treats.

* Recipe notes:
- I used a 13 x 9 inch pyrex pan to bake my shortbread.
- Instead of 8 oz of fruit preserves, I used 16 oz.  This seemed to be a good amount.  I think 8 oz would result in a layer of fruit preserves that was too thin.  I would recommend using at least 12 oz.
- I had to bake my shortbread for an extra 15 minutes before it was golden brown on top.  Some bakers noted that the bottom layer seemed undercooked but I did not have this problem since I baked mine longer.

Thursday, April 19, 2012

Orange Loaf Cake (TWD)


Ack! I'm not sure how I missed it, but I totally lost track of the days and realized on Wednesday night that I had forgotten to do this week's Tuesdays with Dorie: Baking with Julia recipe! This week's recipe hosted by Truc of Treats and Michelle of The Beauty of Life: Lemon Loaf Cake.

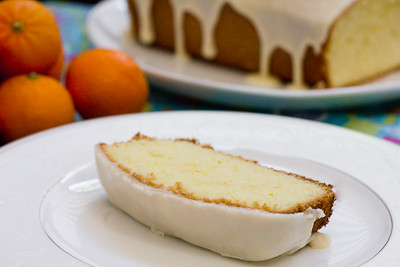
This was a quick and easy one bowl recipe that came together in just minutes (no mixer required!).  I didn't have any lemons on hand so I made an orange loaf cake instead.  I also glazed my loaf with an orange glaze.

The crumb was nice and fluffy, not too heavy at all.  However, I did find the cake a tad dry - not sure if I over baked it?  The orange flavor was quite subtle and I'm not sure you would really taste much of it without the glaze.  One of my favorite treats to get at Starbucks is their iced lemon pound cake.  I'm afraid this one pales in comparison.  It was good, but probably not something that I'll make again.

Thanks to Truc and Michelle for hosting; you can find the recipe on their blogs here and here.  Make sure you check here, too, to see what everyone else thought of citrus infused treat.

Tuesday, April 3, 2012

Pizza Rustica (TWD)


This week's Tuesdays with Dorie: Baking with Julia was hosted by Emily of Capital Region Dining and Raelynn of The Place They Call Home: Pizza Rustica.  I'm not sure where this got its name.  Rustic it is, pizza it's not.  It's more like a quiche, but heavy on the cheese and light on the eggs.  The base of the filling is ricotta cheese.  Then you mix in some mozarella and romano cheeses, some parsley, and some prosciutto.

I didn't have any fresh parsley on hand, so I subbed in 2 teaspoons of dried parsley.  Also used cooked bacon instead of proscuitto, and asiago cheese instead of romano cheese.  Sometimes a quiche tastes to "eggy" for me, so this "pizza" was more appealing to me.

There were some mixed opinions among the group about the pie crust, which was very sweet.  I decreased the amount of sugar in it, just a bit, based on comments that it was too sweet.  In the end, I'm not sure if I liked this savory and sweet combination.  I think cutting the sugar in half with this recipe would be absolutely fine.

I thought this was a pretty good dish; my husband not so much.  He would not eat more than one bite :( He usually isn't very picky, either.  So, this is unfortunately probably the first and last time I'll make this one.... in its entirety at least.  I'll probably make the pie crust recipe again, as this is the first one I've ever made that I didn't have huge problems with and it was delicious :)

Thanks to Emily and Raelynn for hosting; you can find the recipe on their blogs here and here.  Make sure you check here, too, to see what everyone else thought of this non-traditional pizza.

Tuesday, March 20, 2012

Irish Soda Bread (TWD) and Vitacost Deal on Coconut Oil


This week's Tuesdays with Dorie: Baking with Julia was hosted by Carla of Chocolate Moosey and Cathleen of my culinary mission.  The chosen recipe was Irish Soda Bread.  So named because instead of yeast, baking soda is used as the leavening agent in this bread.

It's pretty similar to most quick bread recipes (or biscuits), in that you mix all the dry ingredients together in one bowl, then pour the liquid ingredients in and mix it all together.  This recipe does call for a quick kneading, however, and I found the dough to be way too wet to knead.  I had to add quite a bit of extra flour before I could handle it.  Otherwise, this was a super easy recipe and it came together in just a matter of minutes!  I added dried cranberries and chopped dried apricots to mine, which gave it a slightly sweet but not overwhelmingly sweet flavor.  I saw that a few other bakers added cheese to theirs and I think that will be my next rendition of this recipe :)

Thanks to Carla and Cathleen for hosting; you can find the recipe on their blogs here and here.  Make sure you check here, too, to see all the other variations on this classic Irish bread.

Also, if you missed the last Vitacost deal I posted about, their free shipping promotion has been extended through 3/26 at 9am EST.
Right now, Vitacost.com is offering FREE shipping on orders that contain over $20 in Vitacost brand products.  (Normally their shipping fee is $4.95 for orders under $49 and free shipping for orders $49+)  Pair this free shipping offer with their $10 off $10 promo (for new customers) and you can get $20 worth of products for just $10.

You can get the 54oz Vitacost Coconut Oil for just $11.95 after the discount.  It's normally $18.89 on Amazon, so this is quite a savings.

Here's how:
1) Use this link to sign up and get a $10 promo code sent to your email.  After you register for an account with Vitacost.com (it must be through the link provided) you will receive an email with the subject line "Here's your $10 coupon for Vitacost.com" (this may take an hour)

2) Then add the Vitacost Coconut Oil to your cart for $19.95 (used to be $20.99 so it would qualify for free shipping alone).  Add the apple cider vinegar ($2) as a filler to bring your total to $20+.  Then use the $10 off code sent to your email, bringing your order total to $11.95 for both the coconut oil and the apple cider vinegar!

Of course, feel free to look around their website for other items.  You can view all Vitacost brand items that qualify for this free shipping offer here

Also, don't forget to add 2 free samples to your cart before checking out (they've got a few different teas and other samples available).  Happy shopping!

Tuesday, February 21, 2012

Chocolate Truffle Tartlets (TWD)

I'm so excited to be co-hosting this week's Tuesdays with Dorie: Baking with Julia along with Jessica of Cookbook Habit, Spike of Spike Bakes, and Steph of A Whisk and a Spoon. Just in time for Valentine's Day, we baked Chocolate Truffle Tartlets.

I made this recipe over the course of a few days.  I started the tart dough over the weekend and refrigerated it for a few days before making my tarts. This tart dough recipe is a little different from Dorie's tart dough we've been using the last few years - instead of pressing chunks of dough into the tart, this one is rolled out and then set into the tart pan, similar to what you would do with a traditional pie crust.  When I removed it from the fridge, I could not immediately shape it into a round, it was way too hard. So I let it sit out on the counter for about 30 minutes first. After that, rolling it was a breeze as long as I floured it generously. If a piece came off on my rolling pin, I simply pressed it back down. You don’t need your tart dough to be perfectly even for this recipe :)

As with most chocolate recipes, I used semisweet chocolate chips instead of chopped chocolate in the double boiler.  The "chocolate truffle" filling in these tarts is basically whipped egg yolks with chocolate, butter, and sugar.  It is rich and creamy and delicious.  Before pouring the filling into the tart pans, you add some chopped milk and white chocolate chunks (I used semisweet chocolate chips and white chocolate chips) and bits of biscotti for crunch.  I did not have any biscotti on hand so I omitted it, but I definitely think a little crunch would have been great in these tarts.  Next time I may try throwing some toffee bits in there for crunch and more flavor.  We'll have to see if the toffee bits survive the bake, or if they just melt away into the filling...

I baked these in (2) 5.5″ tart pans and there was the perfect amount of filling to fit in these 2 pans. Apparently the recipe directs you to remove the bottom of your tart pan before starting, but I must have glossed over that part because I didn't even notice that until I started reading the P&Q.  I also did not place my tart pans on a baking sheet because in past experience with TWD, that never worked well for me.  I baked these tart pans directly on the oven racks and with the tart bottoms in my pans without any issues. I did have to bake for an additional 15-20 minutes, though, due to the larger size of my tart pans.

The texture of these tarts is a bit hard to describe.  It reminded me quite a bit of a chocolate chess pie.  Not really cakey or brownie-like, and not fudgey either.  Just velvety smooth chocolate goodness? :) The extra chopped chocolate and biscotti are really what make this dessert special, in my opinion.  They add some extra texture to each bite.  Otherwise it would be a little boring (if you could really ever call chocolate boring!).  My husband loved these and exclaimed that these tarts were "one of the best things you've made in a while." (Not sure if that was a compliment on how good these were, or a comment on how bad the other stuff I've been making is??? Ha!)

This recipe is definitely a keeper, and it was certainly the perfect sweet to share on Valentine's Day.  You can find the recipe below, but be sure to check here, to see how all the other bloggers in our group enjoyed this week's chocolately treat!


Chocolate Truffle Tartlets
Recipe by David Ogonowski, from Baking with Julia by Dorie Greenspan

Makes 6 individual tartlets

1 recipe Chocolate Dough [see below], well chilled
5 tablespoons unsalted butter, cut into 10 pieces
6 ounces bittersweet chocolate, finely chopped
8 large egg yolks
1 teaspoon pure vanilla extract
1/4 cup sugar
2 ounces white chocolate, cut into small dice
2 ounces milk chocolate, cut into small dice
4 biscotti, homemade or store-bought (you can use amaretti di Saronno), chopped

Line a jelly-roll pan with parchment paper and keep at hand. Remove the bottoms from six 4 1/2-inch fluted tartlet pans (or use pans with permanent bottoms and just plan to pop the tartlets out once they're filled, baked, and cooled); spray the pans with vegetable oil spray or brush with melted butter.

Cut the dough into 6 even pieces. Working with one piece at a time, shape the dough into a rough circle, then tamp it down with a rolling pin. Flour the work surface and the top of the dough and roll it into a circle 1/8 to 1/4 inch thick. As you roll, lift the dough with the help of a dough scraper to keep it from sticking. If the dough breaks (as it sometimes does even when the pros are rolling it), press it back together and keep going - it will be fine once it's baked. Fit the dough into a tartlet ring, pressing it into the fluted edges and cutting the top level with the edges of the pan. Again, patch as you go. Use a pastry brush to dust off any excess flour and place the lined tartlet ring on the prepared baking pan.

Chilling the crusts: When all of the shells are rolled out, chill them for at least 20 minutes.

Baking the crusts: Center a rack in the oven and preheat the oven to 350 degrees F.

Prick the bottoms of the crusts all over with the tines of a fork and bake for 12 to 15 minutes, rotating the pan halfway through the baking time, until the crusts are dry, blistery, and firm. Transfer the baking pan to a rack so that the crusts can cool while you make the filling. Reduce the oven temperature to 300 degrees F.

Making the filling: Bring an inch of water to the simmer in a saucepan. Put the butter and bittersweet chocolate in a large metal bowl and place the bowl over the saucepan - don't let the bottom of the bowl touch the water. Allow the butter and chocolate to melt slowly, stirring from time to time, as you work on the rest of the filling. Remove the chocolate from the heat when it is melted and allow it to cool until it is just slightly warmer than room temperature.

Put the yolks and vanilla extract in the bowl of a mixer fitted with the whisk attachment or in a large mixing bowl. Using the whisk or a hand-held mixer, start beating the yolks at medium speed and then, when they are broken up, reduce the speed to low and gradually add the sugar. Increase the speed to medium-high and beat the yolks and sugar until the yolks thicken and form a slowly dissolving ribbon when the beater is lifted.

Spoon about one third of the yolks onto the cooled chocolate mixture and fold them in with a rubber spatula. Don't worry about being too thorough. Pour the chocolate into the beaten yolks and gently fold the two mixtures together until they are almost completely blended. Add the cubed chocolates and biscotti, folding to incorporate the chunky pieces.

Baking the tartlets: Using an ice cream scoop or 1/4-cup measure, divide the filling evenly among the cooled shells. Smooth the filling with a small offset spatula, working it into the nooks and crannies as you circle the tops of the tarts. Bake the tarts for 10 to 12 minutes, until the tops look dry and the filling is just set. Remove to a rack to cool for about 20 minutes before serving.

Storing: Best the day they're made, these are still terrific after they've been refrigerated - they lose their textural finesse, but the taste is still very much there. For longer keeping, wrap the tartlets airtight and freeze them for up to a month. Thaw, still wrapped, at room temperature.

Chocolate Dough Recipe

Makes enough for six 5-inch tartlets or one 10-inch tart

1 1/4 cups all-purpose flour
1/4 cup unsweetened cocoa powder, preferably Dutch-processed
1/4 cup sugar
1/4 teaspoon salt
1 stick (4 ounces) cold unsalted butter, cut into small pieces
1 large egg yolk
1 tablespoon ice water

To make the crust by hand, put the flour, cocoa, sugar, and salt on a smooth work surface, preferably a cool surface such as marble. Toss the ingredients together lightly with your fingertips, then scatter the butter pieces across the dry ingredients. Use your fingertips to work the butter into the flour mixture until it forms pieces the size of small peas. Then use a combination of techniques to work the butter further into the flour: Break it up with your fingertips, rub it lightly between your palms, and chop it with the flat edge of a plastic or metal dough scraper.

Gather the mixture into a mound, make a volcanolike well in the center, and pour in the yolk and ice water. Use your fingers to break up the yolk and start moistening the dry ingredients, then, just as you did with the flour and butter, toss the ingredients with your fingers and use the dough scraper to chop and blend it. The dough will be crumbly and not really cohesive. Bring it together by smearing small portions of it across the work surface with the heel of your hand.

Chilling the dough: Gather the dough together and shape it into a rough square. Pat it down to compress it slightly, and wrap it in plastic. Chill until firm, at least 30 minutes.

To make the dough in a food processor fitted with the metal blade, put the flour, cocoa, sugar, and salt in the work bowl and pulse just to blend. Add the butter and pulse 8 to 10 times, until the pieces are about the size of small peas. With the machine running, add the yolk and ice water and process, in bursts, just until crumbly - don't overwork it. Turn it out onto the work surface and, working with small portions, smear the dough across the surface with the heel of your hand.

Chilling the dough: Gather the dough together and shape it into a rough square. Pat it down to compress it slightly, and wrap it in plastic. Chill until firm, at least 30 minutes.

Storing: The dough can remain in the refrigerator for 3 days, or it can be wrapped airtight and frozen for a month. Thaw the dough, still wrapped, overnight in the refrigerator before rolling it out.

Tuesday, February 7, 2012

Basic White Loaves (TWD)

This is our inaugural post for the new group, Tuesdays with Dorie: Baking with Julia.  After four years, we are finally done baking our way through Baking: From My Home to Yours, and now we're diving head first into Baking with Julia. If you would like to join us, just grab a copy of the book Baking with Julia and sign up here.

Our hosts this week were Laurie and Jules.  They chose the basic white loaves.  Without actually looking at the recipe, I was a bit concerned that this would be a time consuming or difficult recipe because, of course, anything to do with Julia and yeast dough must be difficult, right?!

Well, I was pleasantly surprised to find that this recipe was pretty simple.  There are two 1-hour rest periods, but the actual prep time is about 15-20 minutes.  I started this recipe in the morning, and as Dorie notes, my loaves were done by lunch time.


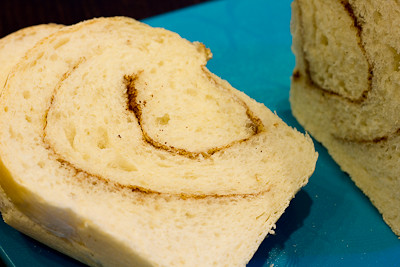
I actually didn't make the basic white loaves. I decided to kick them up a notch.  To my first loaf I added a generous smear of butter and then some Brady Street Cheese Sprinkle from Penzey's.  To my second loaf I added a generous smear of butter and then cinnamon and sugar.  I didn't really measure anything out, just eye balled it, and in retrospect, probably need to add a lot more cinnamon and sugar next time to get the flavors to really come out.  That said, my loaves turned out perfectly! They were golden on the outside and so soft and tender on the inside.  I will definitely be making this one again!

If you would like the recipe, you can find visit Laurie and Jules' blogs, Slush and Someone's in the Kitchen.  You can also go here, to see who else participated in this week's Tuesdays with Dorie.

* Recipe notes:
- I actually made this twice because the first time I used almost dead yeast.  So the second time around I was out of bread flour.  I made it with regular bleached all purpose flour and the bread still turned out fantastic! I am sure it is better with bread flour but if you don't have bread flour that's ok too.
- Another filling I would love to try the next time I make this: pesto or nutella!