Tuesday, December 29, 2009

Low and Luscious Chocolate Cheesecake (TWD)


This week's Tuesdays with Dorie (TWD) recipe was chosen by The Tea Lady of Tea and Scones: Low and Luscious Chocolate Cheesecake. I almost didn't get this one done, but when I read over the recipe, I realized that I could easily put it together in a pinch.

The cheesecake filling takes about all of five minutes to make in the food processor. You simply process the cream sugar and sugar until silky smooth. Then add the eggs, vanilla, and chocolate and then you're done!


The bottom of my graham cracker crust was extremely thin, so I would recommend doubling the crust recipe if you're a crust lover. Otherwise, this cheesecake was good. It's not overwhelmingly chocolately or creamy so if you are in the mood for a super chocolately, super rich cheesecake, I'd look for another recipe. I tend to prefer the super rich and creamy cheesecakes, but this was a nice change after so many heavy desserts over the holidays.

If you would like the recipe, you can find it here. Make sure you check out the TWD Blogroll, to see how everyone else enjoyed this creamy, chocolatey treat.

* Recipes notes:
- I baked my cheesecake in a 9-inch springform pan. I wrapped it in heavy duty foil and placed it in a water bath in the oven and baked for 50 minutes. After it was done, I left the oven cracked open with a wooden spoon until it reached room temperature in order to avoid cracks in the top.
- For tips from other TWD bakers, click here.

Sunday, December 27, 2009

Gingerbread House (DB)


The December 2009 Daring Bakers’ challenge was brought to you by Anna of Very Small Anna and Y of Lemonpi. They chose to challenge Daring Bakers’ everywhere to bake and assemble a gingerbread house from scratch. They chose recipes from Good Housekeeping and from The Great Scandinavian Baking Book as the challenge recipes.


I wasn't able to participate in November's challenge due to the birth of my little one, and almost let this one pass me by but I was able to find some time at the last minute today to get this gingerbread house completed. As Katrina of Baking and Boys! commented on my previous post, everyone says you have to "sleep when baby sleeps," but when you're a Daring Baker you have to "bake when baby sleeps" instead ;)


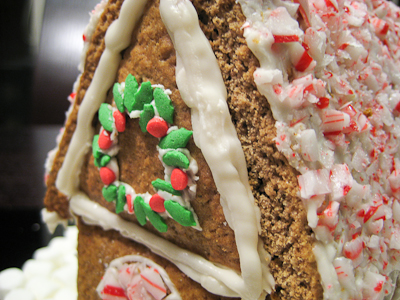
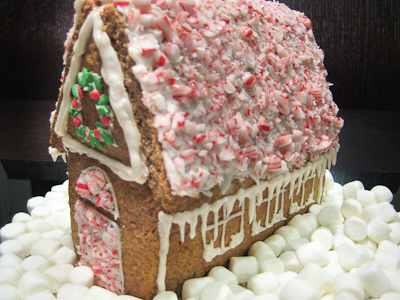
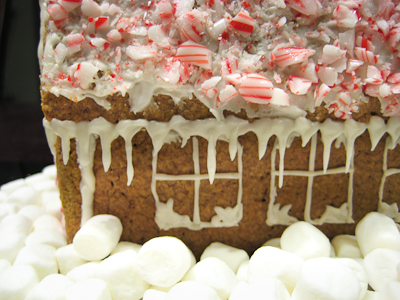
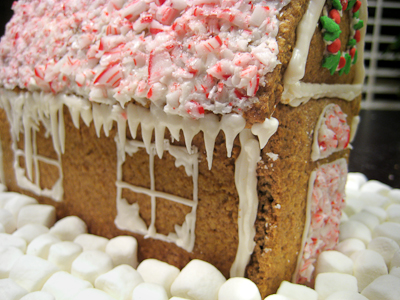
The gingerbread was simple enough to make - just a few minutes to prep and then two hours to chill in the refrigerator. A few bakers noted that their dough was too dry, but I had no such issues with mine. The more time consuming aspect was (obviously) the assembly and decoration of the gingerbread house. I wish I could have made mine more elaborate, but with only short spurts of time available to me today, I had to go simple. I made a half recipe of gingerbread and a full recipe of royal icing and that seemed to be just right for my little house.

Thanks Anna and Y, for hosting this month's challenge. It was fun making my very first gingerbread house. Make sure you check out the Daring Bakers' Blogroll to see all the other wonderful creations.


Scandinavian Gingerbread (Pepparkakstuga)
from The Great Scandinavian Baking Book by Beatrice Ojakangas

1 cup butter, room temperature [226g]
1 cup brown sugar, well packed [220g]
2 tablespoons cinnamon
4 teaspoons ground ginger
3 teaspoons ground cloves
2 teaspoons baking soda
½ cup boiling water
5 cups all-purpose flour [875g]

1. In a large bowl, cream the butter and sugar until blended. Add the cinnamon, ginger and cloves. Mix the baking soda with the boiling water and add to the dough along with the flour. Mix to make a stiff dough. (*Make sure you don't overmix the dough initially as you'll over develop the gluten and make your dough tough and shrinky.) If necessary add more water, a tablespoon at a time. Chill 2 hours or overnight.

2. Cut patterns for the house, making patterns for the roof, front walls, gabled walls, chimney and door out of cardboard.

3. Roll the dough out on a large, ungreased baking sheet and place the patterns on the dough. Mark off the various pieces with a knife, but leave the pieces in place.

4. [I rolled out the dough on a floured bench, roughly 1/8 inch thick (which allows for fact that the dough puffs a little when baked), cut required shapes and transferred these to the baking sheet. Any scraps I saved and rerolled at the end.]

5. Preheat the oven to 375'F (190'C). Bake for 12 to 15 minutes until the cookie dough feels firm. After baking, again place the pattern on top of the gingerbread and trim the shapes, cutting the edges with a straight-edged knife. Leave to cool on the baking sheet.

Royal Icing:

1 large egg white
3 cups (330g) powdered sugar
1 teaspoon white vinegar
1 teaspoon almond extract

Beat all ingredients until smooth, adding the powdered sugar gradually to get the desired consistency (I used about 2.5 cups of powdered sugar). Pipe on pieces and allow to dry before assembling. If you aren't using it all at once you can keep it in a small bowl, loosely covered with a damp towel for a few hours until ready to use. You may have to beat it slightly to get it an even consistency if the top sets up a bit. Piped on the house, this will set up hard over time.

Tuesday, December 22, 2009

Brown Sugar Brownies


My mom always says that everything you bake tastes better with brown sugar, so she substitutes brown sugar for granulated white sugar in almost every recipe. Often times, that's fine, but sometimes (as with cookies) there's a precise ratio of brown sugar to white sugar that needs to be adhered to, or else you end up with the wrong texture.

So when I saw this recipe for Brown Sugar Brownies, I immediately thought of my mom. Was she right? Are brownies better when made with brown sugar? Well, the answer is yes and no. I loved the caramel-y undertone that the brown sugar lends to these brownies, but these are cakey, not fudgey brownies... and when it comes to brownies, I prefer a more fudgey brownie. So if you like cakey brownies, you should give this recipe a try. For something a bit more decadent (but super easy), check out one of my favorites - Gooey Caramel Brownies.

These brownies were made thanks to the generous folks at C&H Sugar who sent me a $20 gift card. Visit their site for great homemade gifts ideas this holiday season - they have recipes for cookie jar gifts, as well as some fabulous looking homemade sugar scrub!

Brown Sugar Brownies
from C&H Sugar

1 cup C&H Pure Cane Golden Brown Sugar, packed
1/2 cup butter or margarine (1 stick), softened
2 eggs
2 oz. unsweetened chocolate (2 squares), melted
1/2 cup all-purpose flour
1 cup walnuts, coarsely chopped (I omitted these)


Preheat oven to 325°F. Grease 8x8x2-inch square baking pan (I used a 9-inch square pan so my brownies were thinner). In large bowl beat sugar and butter until fluffy. Beat in eggs, one at a time. Beat in chocolate, then flour. Stir in nuts. Pour into pan. Bake 20 to 25 minutes. Cool in pan and cut into bars.

Yield: 24 squares

Saturday, December 19, 2009

Sugared Cranberries


Here's a great holiday recipe I found last year. It's so quick and easy! (If I had time to do this for Thanksgiving less than two weeks after having my baby, then surely you have time to make these too.)

All you have to do is make a simple syrup with equal parts sugar and water. Then steep the cranberries in the syrup overnight. The next day, drain them and roll them in some superfine sugar to coat. That's it!


I really like that the sugared cranberries aren't overly sweet. They're slightly tart since you're using fresh cranberries, and then the sugar balances out the tartness with just a little bit of sweet. If you don't have superfine sugar, just toss some regular granulated sugar in your food processor and give it a whirl.


These would be great for your holiday table next week, so give them a try!

Sugared Cranberries
from Cooking Light

2 cups granulated sugar
2 cups water
2 cups fresh cranberries
3/4 cup superfine sugar


Combine granulated sugar and water in a small saucepan over low heat, stirring mixture until sugar dissolves. Bring to a simmer; remove from heat. (Do not boil or the cranberries may pop when added.) Stir in cranberries; pour mixture into a bowl. Cover and refrigerate 8 hours or overnight.

Drain cranberries in a colander over a bowl, reserving steeping liquid, if desired. Place superfine sugar in a shallow dish. Add the cranberries, rolling to coat with sugar. Spread sugared cranberries in a single layer on a baking sheet; let stand at room temperature 1 hour or until dry.

Note: The steeping liquid clings to the berries and helps the sugar adhere. Store in an airtight container in a cool place for up to a week.

Yield: 9 servings (serving size: about 1/3 cup)

Tuesday, December 8, 2009

Sablés (TWD)


This week's Tuesdays with Dorie (TWD) recipe was chosen by Barbara of Bungalow Barbara: Sablés. Sablés are shortbread-like French butter cookies known for their sandy texture (in fact, "sablés" means "sand" in French).


This post is going to be short and sweet because I'm still adjusting to life with a newborn... but let me just say that for a cookie that is so simple to make, the outcome is wonderful. I really enjoyed the crumbly, sandy texture of these cookies, as well as the intense butter flavor. It's a shame that this recipe contains two whole sticks of butter (and yields only 2 dozen cookies), otherwise I'd be more inclined to make these more often! These would be great for holiday gift giving, though.


If you would like the recipe, you can find it here on Barbara's blog. She's also got some great tips on shaping the dough into a log and how to help keep the logs from flattening out while chilling. Make sure you check out the TWD Blogroll, to see how everyone else enjoyed these buttery treats.


* Recipes notes:
- The recipe instructions call for 2 egg yolks to be added to the dough and then an additional yolk to coat the logs before sprinkling them with sugar. The third egg yolk is not listed in the ingredients list but rest assured that the dough is supposed to contain two yolks, not just one.
- I decorated my cookies with red decorating sugar but I think turbinado sugar yields a more classic, elegant look.
- The cookies will keep in a tin at room temperature for about 5 days. If you do not sprinkle the sablés with sugar, they can be wrapped airtight and frozen for up to 2 months. Because the sugar will melt in the freezer, the decorated cookies are not suitable for freezing.
- For tips from other TWD bakers, click here.

Thursday, November 26, 2009

The Sweetest Thing I've Ever Made


This Thanksgiving our family has something to be extra thankful for - this little bun was nine months in the making but absolutely worth the wait.


Annalise was welcomed into this world on November 12th (1 day after her due date) at 5:42pm. She weighed 7 lbs 4.4 oz and measured 20-inches long.


Wishing everyone a wonderful Thanksgiving filled with lots of good eats, sweet treats, and holiday cheer.

Tuesday, November 24, 2009

Sugar-Topped Molasses Spice Cookies (TWD)


As previously mentioned, for the month of November, we're posting recipes in any order, not just one particular week. So for this week's Tuesdays with Dorie (TWD) I'm posting about the Sugar-Topped Molasses Spice Cookies chosen by Pamela of Cookies with Boys. I actually made these cookies last year for the holidays and loved them!

The black pepper really gives them a nice flavor, so I recommend adding 1/4 teaspoon instead of just a pinch. The cookies also spread quite a bit while baking, so be sure not to place them too close together on the baking sheet.

My only other tip would be to watch these closely and take them out while they still look a little soft in the middle. This will yield a soft and chewy cookie. If you wait until they look done in the oven, they will be more of a crispy cookie. I guess it depends on the kind of cookie you like :)

If you would like the recipe, you can find it here or on Cookies with Boys. Make sure you check out the TWD Blogroll, to see what everyone else baked up this week.

Thanks Pamela, for choosing this recipe. While I did not have the time bake along with you this week, I will surely be making them again at some point during the holiday season.

* Recipes notes:
- For tips from other TWD bakers, click here.

Tuesday, November 10, 2009

All in One Holiday Bundt Cake (TWD)


As I pointed out last week, for the month of November, we're switching things up and the recipes can be posted in any order, not just one particular week. So for this week's Tuesdays with Dorie (TWD) installment, I made the recipe chosen by Britin of The Nitty Britty: All in One Holiday Bundt Cake.


It really is everything you think of when it comes to the holidays. It's a spiced pumpkin cake filled with apples, cranberries, and pecans (though I omitted the pecans). Much better than any traditional fruit cake, in my opinion!

Dorie says it's a one bowl recipe, but I am not sure how it can be when you have liquid and dry ingredients? It is, however, a pretty simple recipe that requires only two bowls. The most time consuming aspect of this recipe is peeling and chopping the apple and chopping up the fresh cranberries.


I read that some bakers had problems getting their cake to release from the bundt pan. I had no such issues, but I did butter and flour my pan. The recipe says to just butter it but I have always buttered and floured my bundt pans so I went ahead and did that and it worked just great.


This was a pretty good cake. I really enjoyed the flavors of pumpkin, apples & cinnamon, and cranberries together. A lot of my apple chunks sank to the bottom of the bundt pan (top of the cake) but otherwise everything came out perfectly.


Thanks Britin, for picking this recipe - it's a great cake for the holidays. If you would like the recipe, you can find it here. Make sure you check out the TWD Blogroll, to see what everyone else baked up this week.

* Another update - I am due tomorrow, with no promising signs of labor thus far, so we'll just have to wait and see when this baby makes her arrival! In the meantime, I'll keep baking along...


* Recipes notes:
- For easy release from your bundt pan, butter and flour it before adding the batter. PAM cooking spray with flour works well, too.
- Baking time was just at 65-70 minutes in my oven.
- Wrapped well, the cake will keep at room temperature for up to 5 days, at which point it will be perfect for toasting, or for up to 2 months in the freezer.
- For more tips, click here.

Tuesday, November 3, 2009

Cran-Apple Crisps (TWD)


For the month of November, we're switching things up and the recipes can be posted in any order, not just one particular week. So for this week's Tuesdays with Dorie (TWD) installment, I made the recipe chosen by Em of The Repressed Pastry Chef: Cran-Apple Crisps.


I love baked fruit, and crisps are among my favorite desserts. They take very little time but they're so delicious. This recipe is pretty much your basic apple crisp, with the addition of both fresh and dried cranberries. I have to say that I absolutely loved the cranberries! They were slightly sweet but also tart enough to add a little contrast to the sweet apples. A few bakers thought the filling was too sweet, but I didn't find that to be the case, especially if you serve the crisp with a scoop of vanilla ice cream :)

I made one large crisp in a 1.5 quart casserole dish and then one mini crisp in a creme brulee dish. The mini crisp was done in 45 minutes but the large crisp was done around 50-55 minutes. My only complaint was that the filling was a little runny in the large one, so I would recommend adding more flour to your filling if you are going to make one large crisp instead of individual servings.


Thanks Em, for picking this recipe, I would definitely make it again. If you're looking for a quick and easy dessert for Thanksgiving that will surely be a crowd pleaser, then I would recommend this one. It would be a nice change from all the pumpkin pie, pecan pie, and sweet potato pies that are typically served! If you would like the recipe, you can find it here. Make sure you check out the TWD Blogroll, to see what everyone else baked up this week.

And with eight days left until my due date, I'm not sure when I will be posting another recipe, but stay tuned for an update! :)


* Recipes notes:
- Baking time was increased by about 5-10 minutes for one large crisp as opposed to 8 individual servings.
- Add some extra flour to the filling if you're making one large crisp.
- You can easily make the topping without the use of a food processor by simply cutting the butter in with a pastry blender.
- Omit the sugar from the filling if you prefer something less sweet but keep in mind that the cranberries may seem more tart if you do that.
- For more tips, click here.

Tuesday, October 27, 2009

Macarons (DB)


The 2009 October Daring Bakers’ challenge was brought to us by Ami S. She chose macarons from Claudia Fleming’s The Last Course: The Desserts of Gramercy Tavern as the challenge recipe.

I have long been intimidated by the French macaron, so I was excited to see this was the October challenge because I finally had that extra push I needed to overcome my fears. I am sad to report that after baking along with the Daring Bakers for over a year and half now, I failed my first challenge. Despite my efforts, I could not get those characteristic "feet" at the bottom of my macarons.


I made a full batch but baked the first half using the oven drying method described in the recipe. This is supposed to dry the egg whites out to help them grow the "feet." I was sorely disappointed when I pulled my macarons out of the oven and they did not have any feet. So with the second half batch I let the macarons air dry on the counter for one hour and then did the additional oven drying method. Alas, this still did not produce the desired effect :( According to David Lebovitz, a "perfect macaron needs to be folded just-so. One extra fold, and it's all over. Not enough, and you won't get that little foot." Some bakers note that you'll know when the batter is just right because it will flow like "magma." Honestly, I am still not sure what I did wrong... and I would have persisted until I was successful but I am 38 weeks pregnant now and did not have the time nor the energy to make another batch.


The good news was that despite their lack of feet, these macarons were delicious! I made gingerbread macarons inspired by Tartelette and filled my macarons with chocolate ganache. The gingerbread flavor was very subtle (but just right in my opinion) because I used 1/4 teaspoons ground ginger, 1/8 teaspoon ground cinnamon, 1/8 teaspoon ground nutmeg, and 1/8 teaspoon ground cloves in the below recipe whereas Tartelette's recipe uses the same amount for just 3 egg whites.


Thanks Ami, for hosting this month's challenge. You finally gave me the push I needed to try my hand at macarons... I am only sad to report that I was unsuccessful. But I am proud to say that at least I tried and that's what being a Daring Baker is all about, right? I promise to try again in the future. Make sure you check out the Daring Bakers' Blogroll to see how everyone else enjoyed these classic French sweets.

Macarons
from Claudia Fleming’s The Last Course: The Desserts of Gramercy Tavern

Ingredients
Confectioners’ (Icing) sugar: 2 ¼ cups (225 g, 8 oz.)
Almond flour: 2 cups (190 g, 6.7 oz.)
Granulated sugar: 2 tablespoons (25 g , .88 oz.)
Egg whites: 5 (Have at room temperature)

Directions:

1. Preheat the oven to 200°F (93°C). Combine the confectioners’ sugar and almond flour in a medium bowl. If grinding your own nuts, combine nuts and a cup of confectioners’ sugar in the bowl of a food processor and grind until nuts are very fine and powdery.
2. Beat the egg whites in the clean dry bowl of a stand mixer until they hold soft peaks. Slowly add the granulated sugar and beat until the mixture holds stiff peaks.
3. Sift a third of the almond flour mixture into the meringue and fold gently to combine. If you are planning on adding zest or other flavorings to the batter, now is the time. Sift in the remaining almond flour in two batches. Be gentle! Don’t overfold, but fully incorporate your ingredients.
4. Spoon the mixture into a pastry bag fitted with a plain half-inch tip (Ateco #806). You can also use a Ziploc bag with a corner cut off. It’s easiest to fill your bag if you stand it up in a tall glass and fold the top down before spooning in the batter.
5. Pipe one-inch-sized (2.5 cm) mounds of batter onto baking sheets lined with nonstick liners (or parchment paper).
6. Bake the macaroon for 5 minutes. Remove the pan from the oven and raise the temperature to 375°F (190°C). Once the oven is up to temperature, put the pans back in the oven and bake for an additional 7 to 8 minutes, or lightly colored.
7. Cool on a rack before filling.

Yield: 10 dozen. Ami's note: My yield was much smaller than this. I produced about two dozen filled macaroons.

Cherry Fudge Brownie Torte (TWD)


This week's Tuesdays with Dorie (TWD) recipe was chosen by April of short + rose: Cherry Fudge Brownie Torte. It's a fudgey brownie layer full of chocolate and cherries, topped with a creamy mascarpone mousse.

The brownie layer is very rich and dense. It's nicely contrasted with the light and creamy mascarpone mousse. An interesting ingredient in the brownie layer is ground black pepper. It adds a very subtle flavor to this torte but isn't overpowering. I only added one teaspoon of black pepper - I think two teaspoons would probably be too much. The cherries are a wonderful surprise to bite into and keep this dessert from being too basic.


The torte is simple enough to make but yields a very decadent dessert perfect for serving guests. Thanks April, for picking this recipe, I would definitely make it again. If you would like the recipe, you can find it here. Make sure you check out the TWD Blogroll, to see how everyone else enjoyed this fudgey treat.


* Recipes notes:
- I used semisweet chocolate chips instead of chopped chocolate.
- I omitted the kirsch due to my little bun in the oven :) I simply boiled the cherries and water until almost all of the water was evaporated, then added the preserves with a splash of water until it seemed a good consistency.
- For more tips, click here.
com

Tuesday, October 20, 2009

Sweet Potato Biscuits (TWD)


This week's Tuesdays with Dorie (TWD) recipe was chosen by Erin of Prudence Pennywise: Sweet Potato Biscuits. I love biscuits but have never seen anything like this, so I was eager to try this recipe.

I've never had any problems with making biscuits. The key is to use really cold butter and to not overwork your dough. When cutting the biscuits you also need to make sure you press straight down, as twisting the cutters can inhibit some of the rise in the biscuits.


This recipe presented a lot of problems for me though. Even though I used 29 ounces of canned sweet potatoes (instead of 30 ounces), my dough was super sticky and moist. Not sure where the extra moisture came from? It was so hard to work with; I had a lot of trouble cutting my dough into biscuits. Then after they went in the oven, they hardly rose at all. I know my baking powder isn't too old, so that wasn't the issue. I am not sure what went wrong, but my biscuits look pretty pathetic.

Thankfully, aesthetics aside, these tasted great :) I enjoyed them with some butter and brown sugar. These would be great to make the morning after Thanksgiving, when you want something besides leftovers but don't want to spend too much time in the kitchen.


Thanks Erin for picking this recipe, I loved it. If you would like the recipe, you can find it here. Make sure you check out the TWD Blogroll, to see how everyone else enjoyed this perfect-for-fall breakfast treat.

* Recipes notes:
- Consider putting your butter in the freezer to get it extra cold before using it.
- For more tips, click here.

Tuesday, October 13, 2009

Allspice Crumb Muffins (TWD)


This week's Tuesdays with Dorie (TWD) recipe was chosen by Kayte of Grandma’s Kitchen Table: Allspice Crumb Muffins. I love anything with a crumb or streusel topping, so I knew right off the bat that I would like these. What I did not anticipate was exactly how much I would love these!

They seem pretty plain if you're just reading the recipe. A simple muffin with a crumb topping flavored with some allspice. I actually don't bake with allspice very often, at least not as the star ingredient, so I'm not too familiar with its flavor. Because I rarely bake with it, I didn't have any on hand, so I substituted 1/2 teaspoon cloves, 1/4 teaspoon cinnamon, and 1/4 teaspoon nutmeg based on the recommendations here.

Like most muffin recipes, this one comes together in just a few minutes and does not require a mixer. I followed Dorie's recipe to a "T," including how to make the crumb topping. I have to say that I was not a fan of this method, because it was hard to get nice big crumbs from it. Next time I will just cut the butter in using a pastry cutter to get nicer crumbs.

I baked my muffins in this pan so I didn't get nice muffin tops, but they still tasted great. I thought for a moment about just using cinnamon in place of the allspice, but I am so glad I didn't - I am sure that cinnamon muffins would be good too but I really enjoyed the allspice flavor. These kind of remind me of the coffee cake you can get at Starbucks, except much better.


Thanks Kayte for picking this recipe, I loved it. If you would like the recipe, you can find it here. Make sure you check out the TWD Blogroll, to see how everyone else enjoyed this perfect breakfast treat.

* Recipes notes:
- I would recommend cutting the butter into the crumb topping with either a pastry blender or two knives instead of doing it by hand.

- Don't have any allspice? Here is a link to the substitution, as well as many other common substitutions that will come in handy when you are baking.
- For more tips, click here.

Sunday, October 11, 2009

Sticky Buns (SMS)

This week's Sweet Melissa Sundays (SMS) recipe was chosen by Jen of Not Microwave Safe: Sticky Buns with Toasted Almonds. I love cinnamon rolls and sticky buns and almost chose this recipe when it was my turn to pick, but in the end I chose the Bee Stings instead. So I was delighted to see that someone finally picked this recipe!

Working with yeast really isn't that bad. I remember when I used to be so intimidated by it. This recipe is a bit time consuming, but is not difficult at all. It is split into two days with an overnight refrigeration so you don't feel like you are baking all day. One thing I always do when baking with yeast is I use my oven as a proofing box. I'll preheat the oven for about a minute, just long enough for it to warm up but not to where it starts to get hot. Then I turn the oven off and stick my dough in and let it rise. This ensures that it is always warm enough for my dough to rise regardless of what time of year it is.


I omitted the orange zest from this recipe, just because I didn't have any on hand and didn't want to make a grocery store run just for orange zest... I am sure that the zest would probably add a great subtle flavor to the dough but it also tasted just fine without it.


I also omitted the toasted almonds because I don't like nuts, but you can also cover these with cream cheese frosting if you don't want to top them with sticky sauce. These smelled so good while they were baking in the oven... in fact, that was how I knew to check on them early. The smell of sugar and cinnamon was so strong that I though I'd better check on them - and it was a good thing I did because they were done in HALF the time indicated on the recipe! If I had waited for my timer to go off, these would have been burnt to a crisp!


I would love to try these with cream cheese frosting some time. The dough was really soft and sweet and it's probably just as good as my favorite Cinnabon recipe - though I'll have to try these with the cream cheese frosting before I declare them better than the other recipe :)

Thanks Jen, for choosing this recipe. I will definitely be making this one again. If you would like the recipe, you can find it here. Make sure you visit the SMS Blogroll to see how everyone else enjoyed this sweet, sticky treat!

* Recipe Notes:
- I added room temperature milk instead of cold milk to make sure that my dough would rise.
- I had to add a little over 1/2 cup of extra flour to get my dough to be not so sticky. So I used the full 2-3/4 cup, and then continued adding 1 tbsp of flour at a time until the dough no longer stuck to the edges of the mixing bowl.
- I did not have pure maple syrup so I used pancake syrup instead (Aunt Jemima's).
- I used salted butter in my sticky sauce and could taste a little bit of the salt in it - this was great because salty and sweet flavors go together very well.
- Use your oven as a proofing box. Preheat the oven for about a minute, just long enough for it to warm up but not to where it starts to get hot. Then turn the oven off and stick your dough in and let it rise. This ensures that it is always warm enough for your dough to rise regardless of what time of year it is.- Start checking on your buns around 20 minutes. They will probably be golden brown and done around 25 to 30 minutes, depending on your oven.
- You can easily freeze these. Prepare the recipe as directed up until the overnight refrigeration step. Then, instead of refrigerating it, wrap it tight and freeze it. When you are ready to bake, remove it from the freezer for the second rise until the dough has doubled in size and then bake.
- For more recipe tips, click here.

Tuesday, October 6, 2009

Split Level Pudding (TWD)


This week's Tuesdays with Dorie (TWD) recipe was chosen by Garrett of Flavor of Vanilla: Split Level Pudding. It's homemade vanilla pudding atop a layer of chocolate ganache.

We've made chocolate pudding before for TWD, so I was curious to see how this recipe compared. The method was pretty much the same, using a food processor to help create a perfectly smooth and creamy pudding. The only difference with this recipe is that the chocolate is in a layer beneath the pudding, instead of incorporated into the pudding.


I think if you're in the mood for chocolate, that regular chocolate pudding would be better, but if you want just a hint of chocolate, then this recipe is perfect. Not too chocolately, but enough chocolate to satisfy a chocolate craving.

While homemade pudding is far superior to store bought, I just don't love pudding enough to make it from scratch all the time. So while I enjoyed trying this recipe, I probably won't be making it again. If you're a pudding lover, though, you definitely need to try this.


Thanks Garrett, for picking this. If you would like the recipe, you can find it here. Make sure you check out the TWD Blogroll, to see how everyone else enjoyed this rich, creamy treat.


* Recipes notes:
- If you really like chocolate, I'd double the chocolate ganache recipe so you have a thicker chocolate layer on the bottom. Otherwise, this recipe was great as is.
- For more tips, click here.