Tuesday, January 25, 2011

Chocolatey Swirly Sour Cream Bundt Cake (TWD)


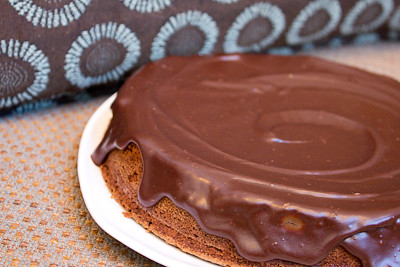
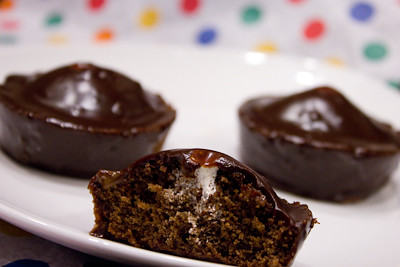
This week's Tuesdays with Dorie (TWD) recipe was chosen by Jennifer of Cooking for Comfort: Nutty, Chocolately, Swirly Sour Cream Bundt Cake.  Cinnamon and sugar, nuts, chocolate chips, and raisins all mixed into a sour cream bundt cake.  Wait a minute. Raisins?! Yes you heard me right - raisins! I know there are many raisin haters out there, but I can tell you that we loved this cake, raisins and all!

This cake was deliciously moist thanks to the addition of sour cream.  I didn't quite get the "swirls" I was expecting, but luckily that didn't affect the taste ;) You're supposed to spoon half the batter into the pan, sprinkle half the swirl in, then top it with the rest of the batter.  You then create a "channel" for the rest of the swirl using a spoon and then you're supposed to cover the swirl with the batter that's on each side of the "channel."  It's a fairly sticky batter, so this was a bit difficult for me.  Plus there wasn't much batter to work with because my "channel" was fairly shallow (but that's what the recipe says to do!).  Luckily I had a bit of batter left in the bowl that I was able to scrape together and use to patch over the top.  Next time I'll probably just reserve a little bit for the end.

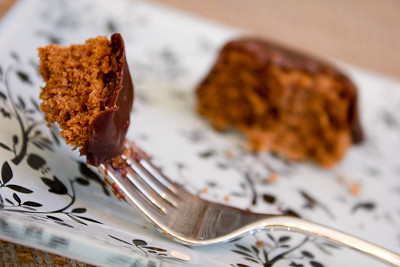
This cake was so good.  Let's just say that I made this yesterday evening, there were three of us munching on this cake, and as I write this there is half of a piece left! If you don't like raisins then leave them out (I left the nuts out of the recipe), but do substitute something like dried cranberries or apricots.  I think the dried fruit really adds a nice flavor to this cake.

Thanks Jennifer, for hosting this week.  I'll definitely be making this again.  If you would like the recipe, you can find it here. Also make sure you check out the TWD Blogroll, to see how everyone else enjoyed swirly chocolate treat!

* Recipe notes:
- I omitted the nuts so I increased the mini chocolate chips to 1/2 cup.
- Some bakers had problems unmolding their bundt cake so be sure to butter and flour your pan well. 
- Careful when you are putting the swirl in that you don't get too much near the edges of the pan or else it will burn.
- When preparing the cake, instead of using half the dough and then the other half on top, I would use a little less than half the dough for the first layer so you have some leftover to put on the very top to cover your "channel" or swirl/filling.
- For more recipe tips, click here

Sunday, January 23, 2011

Speakeasy (SMS)

As I was sitting on our kitchen bar stool looking over this week's Sweet Melissa Sundays (SMS) recipe, I realized that I didn't have any 8x2-inch round cake pans for the cake.  Jeannette of The Whimsical Cupcake had chosen the Speakeasy - I'd never heard of a Speakeasy cake before. Apparently a speakeasy is an establishment that illegally sells alcoholic beverages (these establishments came into prominence during the Prohibition).  So this speakeasy is a chocolate cake with brandy mixed into the batter.  Most of it is baked off in the oven, but you can still get a hint of it in the finished product.  I suppose I could have just used my 9-inch springform pan but instead I used my 8x1-1/4" cake pan and then made 6 mini cakes in a muffin pan.


The cake came together easily enough but I seemed to have the same problem that Jeannette did with hers - it formed a thick crust on the top (kind of like a brownie does but thicker).  So, I guess I may have over whipped my egg whites? My cake didn't form a crater underneath the crust like Jeannette's did, so I simply scraped it off and proceeded as planned.  Plus, Melissa says you should flip the cake over to glaze it anyway.


The only change I made to this cake was to use semisweet chocolate instead of bittersweet, as I don't like bittersweet or dark chocolate.  How did it turn out? I loved this cake. It had a nice, dense crumb with just a hint of brandy. The cake was rich but not over the top rich like a flourless chocolate cake. You can taste the brandy in it, but really only if you know to look for that flavor.  I'll definitely be making it again; maybe next time I'll try it with some rum!


Thank you, Jeannette, for hosting this week. If you'd like the recipe, you can find it here. Make sure you check out the Sweet Melissa Sundays Blog Roll to see how everyone else enjoyed this boozey, chocolatey treat!

* Recipe notes:
- I used semisweet chocolate chips instead of bittersweet chocolate.
- The mini cakes I made in the muffin pan were done around 15 minutes.  My full size cake was done closer to around 60 minutes because it wasn't quite as thick as the one in the recipe.

- The cake will keep in a cake saver at room temperature for 2 days.  For longer storage, you can keep it in the refrigerator for up to 1 week.  I was able to wrap mine in plastic wrap (after the glaze had set) without really messing up the glaze.

Thursday, January 20, 2011

Chicken, Garlic, and Sundried Tomato Pasta... and a Winner!


This is one of my favorite go-to dinners when I'm craving pasta but want something other than a regular red sauce or meat sauce.  It is creamy and delicious but not overly heavy like an alfredo sauce can be sometimes.  I've made it so many times now that I've adjusted it to suit our tastes... namely, I've cut back on the butter, added more garlic, milk, and sun dried tomatoes, and some crushed red pepper to give it a kick! I've also found that if I slice the chicken very thin, I don't have to precook it and I can simply add the chicken in raw, bring the sauce to a quick boil, and then lower the temp and let it simmer for those last 6-8 minutes.

Brownish colored food is never easy to photograph, but you'll have to trust me when I say that even though the photo doesn't look that appetizing, this is a really tasty dish! :)

And, without further ado, the winners of the Kettle Confections giveaway are lucky #9 and #12.  Congrats to Marcy of minus tomato and "ikkinlala."  I'll be contacting you shortly and you have until midnight (CST) January 22nd to email me your mailing address; if I do not hear from you by then, I will select alternate winners.  Enjoy!


Chicken, Garlic, and Sundried Tomato Pasta
from Good Eats 'n Sweet Treats (adapted from Allrecipes)

1 (12 ounce) package farfalle pasta
6 tbsp butter
4-6 cloves garlic, minced
1 (10.75 ounce) can condensed cream of chicken soup
1 (10.75 ounce) can condensed cream of mushroom soup
1 cup skim milk
1 tablespoon dried parsley
1/2 teaspoon salt
1/2 teaspoon freshly ground black pepper
1 tsp crushed red pepper, optional
2 cooked skinless, boneless chicken breast halves, cut into bite-size pieces
2/3 cup sun-dried tomatoes, rehydrated in water
2 tablespoons grated Romano cheese

In a large pot with boiling salted water cook farfalle pasta until al dente. Drain.

Meanwhile, melt butter in a large saucepan. Add garlic cloves and cook until garlic browns. Add the cream of chicken and cream of mushroom soup and milk, stirring until smooth. Stir in the dried parsley, salt, and ground fresh pepper (as well as the crushed red pepper if you are using it). Let simmer for 2 to 3 minutes. Add bite size chicken pieces and hydrated sun dried tomatoes. Simmer for 6 to 8 minutes. Mix in grated Romano cheese.

Toss cooked and drained pasta with chicken sauce. Serve warm.

Tuesday, January 18, 2011

Lemon Poppyseed Muffins (TWD)

This week's Tuesdays with Dorie (TWD) recipe was chosen by Betsy of A Cup of Sweetness : Lemon Poppyseed Muffins. Let me just start with a funny story...

I had never bought poppyseeds before, so when I went to the store I thought I'd check the baking aisle first (that's logical, right?).... but I wandered around and searched and could not find them! I was in a rush (on my lunch break and had to get back to work), so I stopped a random lady and asked her if she knew where I'd find poppyseeds because I've never had to buy them before.  She said she had never bought them before, but told me to check with the spices, so I walked over to the spices... and painstakingly scanned through all of the spices, looking for them (all the bottles within each brand were alphabetical but there were multiple brands)... but of course they didn't have any! They weren't even out of stock, they just didn't have them.  Ha ha.... so I finally found them at another store, but I can't tell you how silly I felt asking a complete stranger that doesn't work in the store where poppyseeds (of all things) might be!


So, on to the recipe of the week.  Like any other muffin recipe, this one is straightforward and quick.  Just mix the dry ingredients and wet ingredients separately, then pour the wet ingredients into the dry ingredients and stir.  The poppyseeds get mixed in at the very end.  I decided to make 6 muffins and 1 mini loaf.  I simply drizzled the muffins with the lemon icing, but poured the icing over the entire mini loaf.  I ended up with just enough icing for everything.


These muffins are nice and moist with a fairly tight crumb.  The drizzled muffins had just a hint of sweetness and tartness that would be perfect for someone who doesn't want something too sugary for breakfast.  For someone like me, however, covering the entire top of the muffin would be much better.  My min loaf was coated with the icing completely and I loved it! It added just the right amount of sweetness with a lot of extra zing! :)  My iced lemon poppyseed loaf reminded me quite a bit of the iced lemon poundcake at Starbucks (one of my favorite "treats" on the rare occasion I happen to go to Starbucks).


Thanks Betsy, for hosting this week.  I'll definitely be making these again (probably as mini loaves instead of muffins - so much easier).  If you would like the recipe, you can find it here. Also make sure you check out the TWD Blogroll, to see how everyone else enjoyed these lemony breakfast treats!

Oh, and if you haven't already, head on over here to enter my current giveaway before it ends!

* Recipe notes:
- You can find poppyseeds along with all of the other spices in your grocery store :)
- You can make jam-filled muffins by filling your muffin tins halfway, putting a dollop of jam in the middle, and then filling the rest of the muffin tin with the batter.
- I baked my mini loaf for about 40 minutes.  I had to use a foil tent around 30 minutes to prevent the top from over browning.
- I would definitely recommend dipping your muffins in the icing instead of drizzling just a small amount over the top. 
 - For more recipe tips, click here

Tuesday, January 11, 2011

Fluff-Filled Chocolate Madeleines (TWD)

This week's Tuesdays with Dorie (TWD) recipe was chosen by Margo of Effort to Deliciousness: Fluff-Filled Chocolate Madeleines.  I don't have a madeleine pan, but instead of skipping this week's recipe I went ahead and made them in a muffin pan.  I halved the recipe and got six of the cutest looking "madeleines" that didn't quite look like cookies and didn't quite look like muffins either! I did, however, get the characteristic madeleine "humps" and was very excited about that :)

I'm not sure if I overbaked mine - I took them out right at 13 minutes but found them to be just slightly dry.  I was worried about over filling them with fluff and having the tops crack, so I wasn't too aggressive with my filling and ended up with under filled madeleines :(


These were good, but I think I enjoy classic madeleines better than the chocolate version.  (Although these were pretty fantastic drenched in a chocolate ganache glaze!)

Thanks Margo, for hosting this week.  If you would like the recipe, you can find it on Margo's blog. (You should go see how cute her madeleines turned out!) Also make sure you check out the TWD Blogroll, to see how everyone else enjoyed these fluff-filled chocolatey treats!

Oh, and if you haven't already, head on over here to enter my current giveaway!

* Recipe notes:
- I used semisweet chocolate instead of bittersweet chocolate for the glaze.
- I used salted butter in this recipe without any problems.
- My cookies were done in 13 minutes but were a little dry.  Judging from the comment below, they may have been ready as early as 8-9 minutes!
- Wrapped airtight, these glazedookies will keep in the freezer for up to 2 months.
- For more recipe tips, click here

Friday, January 7, 2011

All Natural Nougats & A Giveaway


I was recently sent a sample of nougats from Kettle Confections.  They're a small business based out of New York.  Their fresh almond and pistachio nougats are all natural - no artificial colorings, flavors, or preservatives.  They have a lower amount of sugar than mass produced candies but you really can't tell the difference.  I love nougat and and there's just something to be said about candy that is not mass produced.  I enjoyed these straight of of the wrapper, but these would also be really good dipped in chocolate.  I think my favorite flavor was the Pistachio-Cranberry French Nougats.

Want to receive your own sampler?  The folks at Kettle Confections have generously agreed to send an eight piece sampler box to two of my lucky readers.  There are several ways to enter:

- Mandatory entry: Visit Kettle Confections and leave me a comment, telling me what flavor you think you would like best.
- Additional entry: I've just created a Facebook page for Good Eats 'n Sweet Treats"Like" me and become a fan on Facebook and then come back here, leaving me a comment with your first name and last initial so I can verify that you have done this.  If you're already a fan of Good Eats 'n Sweet Treats, then just leave me a separate comment telling me that you're already a fan (also leave me your name).
- Additional entry: Blog about this giveaway using this link and leave a comment with the link to your blog post in a comment.  This must be on your main blog and cannot be done on a blog created just for giveaway entries ;)
- Additional entry: Tweet about this giveaway using this link and then come back here and leave the link.


If you'd simply like to purchase some nougats on your own, the folks at Kettle Confections have set up a special discount code for readers of my blog.  Just use code "sweets" to get 5% off your order!

This giveaway is open to US and Canadian residents.  Entries will be taken until midnight CST on January 18th and the winners will be announced on January 20th.  Please make sure I have a way to contact you if you win! If a winner does not reply within 48 hours, an alternate winner will be chosen.  Also note that comment moderation is in place and it may take some time for your comment to appear below.  Good luck!

Tuesday, January 4, 2011

Choco-Ginger Crackles (TWD)

This week's Tuesdays with Dorie (TWD) recipe was chosen by the group's founder, Laurie of Slush, and Jules of Someone's In The Kitchen: Midnight Crackles. These are chocolate cookies spiced with cinnamon and cloves, named for their dark color and the crackles that form along the top when they are done. I decided to go with one of Dorie's variations and made the Choco-ginger Crackles. I replaced the cinnamon and cloves with ground ginger and added candied/crystallized ginger pieces.

These cookies were very easy to make, and I definitely liked biting into the bits of ginger. My husband thought the ginger flavor in these was too strong, but he's not a big ginger person to begin with. I didn't find the ginger flavor overwhelming at all. However, I'm just not a chocolate cookie person in general. So while I enjoyed these cookies I probably won't be making them again.


Thanks Laurie and Jules, for hosting this week.  I can't believe I've been baking along with the group for three years now!!! Looking forward to baking along in 2011 :)

If you would like the recipe, you can find it here. Make sure you check out the TWD Blogroll, to see how everyone else enjoyed these chocolatey treats!

* Recipe notes:
- I used semisweet chocolate instead of bittersweet chocolate.
- I used 1/4 teaspoon of ground ginger in place of the cinnamon and cloves.
- I used 2 tablespoons of diced candied/crystallized ginger in place of the chopped stem ginger that Dorie recommends. 
- I refrigerated my dough for one hour, and still had to let is sit on the counter for a little bit before I was able to roll it into balls.
- My cookies were done in 9-10 minutes.
- Wrapped airtight, these cookies will keep in the freezer for up to 2 months.
- For more recipe tips, click here