The August 2010 Daring Bakers’ challenge was hosted by Elissa of 17 and Baking. For the first time, The Daring Bakers partnered with Sugar High Fridays for a co-event and Elissa was the gracious hostess of both. Using the theme of beurre noisette, or browned butter, Elissa chose to challenge Daring Bakers to make a pound cake to be used in either a Baked Alaska or in Ice Cream Petit Fours. The sources for Elissa’s challenge were Gourmet magazine and David Lebovitz’s “The Perfect Scoop”.
I decided to make the petit fours since I've never made them before. I'm a few days late posting, but I had some technical difficulties with my ice cream machine! For some reason, I couldn't get the container to freeze, and I didn't realize this until the last minute. So, I had to stick the second container in the freezer and wait for it to freeze before I could make my ice cream. Otherwise, this recipe went off without a hitch.
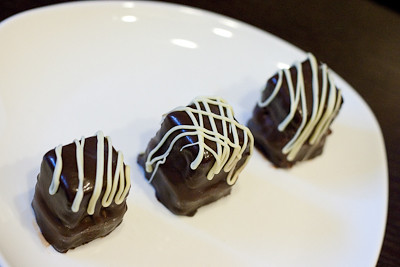
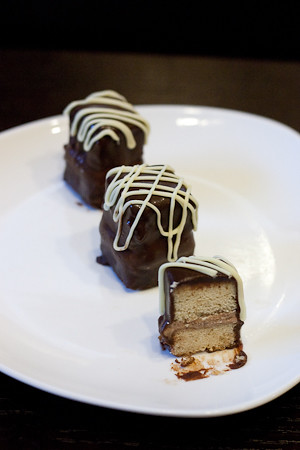
I made Dorie Greenspan's chocolate ganache ice cream for my petit fours, instead of David Lebovitz' vanilla ice cream. The chocolate ice cream sandwiched between the brown butter cake pound cake, drenched in the chocolate glaze was any chocolate lover's dream come true!

My favorite part of this recipe was actually the brown butter pound cake. One of my favorite pastas is the one from Spaghetti Factory that is served with browned butter and mizithra cheese. So I am very familiar with the wonderful nutty aroma of browned butter. This pound cake was moist and delicious and much better than any traditional pound cake I've had. I'll definitely be making it again.
Thanks Elissa, for hosting this month's challenge. I had fun making petit fours for the very first time! Make sure you check out the Daring Bakers' Blogroll to see how everyone else enjoyed this cool and creamy summer treat.
Ice Cream Petit Fours
Preparation time:
Ice cream – 45 min active time, ice cream rests/chills for 1 hour then overnight. Without an ice cream maker, the ice cream chills 2-3 hours and must be stirred every 30 minutes.
Brown Butter Pound Cake – 2 hours (includes cooling time)
Chocolate Glaze – 15 minutes
Assembly of Ice Cream Petit Fours – Ice cream must be frozen ahead of time several hours, then the cake and ice cream freeze overnight. After dipping, the petit fours freeze for one hours.
Equipment required:
• Small and medium saucepans
• Paring knife
• 2 quart (2 litres) bowl
• Electric mixer
• Whisk
• Spatula
• Sieve
• 9”x9” (23cmx23cm) square baking pan
• 10” (25 cm) skillet
• Cake leveler/serrated knife
• Cooling racks
• Rimmed half sheets
• Teacups
• Plastic wrap
• Piping bags (optional)
• Ice cream maker (optional)
• Cooking blow torch (optional)
Directions:
Vanilla Ice Cream
1 cup (250ml) whole milk
A pinch of salt
3/4 cup (165g) sugar
1 vanilla bean, split lengthwise OR 2 teaspoons (10ml) pure vanilla extract
2 cups (500ml) heavy (approx 35% butterfat) cream
5 large egg yolks
1 teaspoon (5ml) pure vanilla extract
1. Heat the milk, salt, and sugar in a medium saucepan until the liquid steams. Scrape out the seeds of the vanilla bean with a paring knife and add to the milk, along with the bean pod. Cover, remove from heat, and let infuse for an hour. (If you do not have a vanilla bean, simply heat the milk, salt, and sugar in a medium saucepan until the liquid steams, then let cool to room temperature.)
2. Set up an ice bath by placing a 2-quart (2 litre) bowl inside a large bowl partially filled with water and ice. Put a strainer on top of the smaller bowl and pour in the cream.
3. In another bowl, lightly beat the egg yolks together. Reheat the milk in the medium saucepan until warmed, and then gradually pour ¼ cup warmed milk into the yolks, constantly whisking to keep the eggs from scrambling. Once the yolks are warmed, scrape the yolk and milk mixture back into the saucepan of warmed milk and cook over low heat. Stir constantly and scrape the bottom with a spatula until the mixture thickens into a custard which thinly coats the back of the spatula.
4. Strain the custard into the heavy cream and stir the mixture until cooled. Add the vanilla extract (1 teaspoon [5ml] if you are using a vanilla bean; 3 teaspoons [15ml] if you are not using a vanilla bean) and refrigerate until thoroughly chilled, preferably overnight.
5. Remove the vanilla bean and freeze in an ice cream maker. If you don’t have an ice cream maker, you can make it without a machine. See instructions from David Lebovitz: http://www.davidlebovitz.com/archives/2007/07/making_ice_crea_1.html
Brown Butter Pound Cake
19 tablespoons (9.5 oz) (275g) unsalted (sweet) butter
2 cups (200g) sifted cake flour (not self-rising; sift before measuring) (See “Note” section for cake flour substitution)
1 teaspoon (5g) baking powder
1/2 teaspoon (3g) salt
1/2 cup (110g) packed light brown sugar
1/3 (75g) cup granulated sugar
4 large eggs
1/2 teaspoon pure vanilla extract
1. Preheat the oven to 325°F/160°C and put a rack in the center. Butter and flour a 9”x9” (23cmx23cm) square pan.
2. Place the butter in a 10” (25cm) skillet over medium heat. Brown the butter until the milk solids are a dark chocolate brown and the butter smells nutty. (Don’t take your eyes off the butter in case it burns.) Pour into a shallow bowl and chill in the freezer until just congealed, 15-30 minutes.
3. Whisk together cake flour, baking powder, and salt.
4. Beat the brown butter, light brown sugar, and granulated sugar in an electric mixer until light and fluffy, about 2 minutes. Beat in the eggs one at a time, mixing well, and then the vanilla extract.
5. Stir in the flour mixture at low speed until just combined.
6. Scrape the batter into the greased and floured 9”x9” (23cmx23cm) square pan. Smooth the top with a rubber spatula and rap the pan on the counter. Bake until golden brown on top and when a toothpick inserted into the center comes out clean, about 25 minutes.
7. Cool in the pan 10 minutes. Run a knife along the edge and invert right-side-up onto a cooling rack to cool completely.
Chocolate Glaze (For the Ice Cream Petit Fours)
9 ounces (250g) dark chocolate, finely chopped
1 cup (250 ml) heavy (approx 35% butterfat) cream
1 1/2 tablespoons (32g) light corn syrup, Golden syrup, or agave nectar
2 teaspoons (10ml) vanilla extract
Stir the heavy cream and light corn syrup in a small saucepan over medium heat until it comes to a boil. Remove from heat and add the dark chocolate. Let sit 30 seconds, then stir to completely melt the chocolate. Stir in the vanilla and let cool until tepid before glazing the petit fours.
Assembly Instructions
1. Line a 9”x9” (23cmx23cm) pan with plastic wrap, so that no sides of the pan are exposed and so there is some extra plastic wrap hanging off the sides. Spread 1 ¾ to 2 cups (450ml to 500ml) ice cream into the pan. Cover with more plastic wrap and freeze several hours.
2. Once the brown butter pound cake has completely cooled, level the top with a cake leveler or a serrated knife. Then split the cake in half horizontally to form two thin layers.
3. Unwrap the frozen ice cream. Flip out onto one of the layers of cake and top with the second layer of cake. Wrap well in plastic wrap and return to the freezer overnight.
4. Make the chocolate glaze (see above.)
5. While the glaze cools, trim ¾” (2cm) off each side of the ice cream cake to leave a perfectly square 7.5” (19cm) ice cream cake. Cut the cake into twenty five petit fours, each 1.5”x1.5” (4cmx4cm).
6. Glaze the petit fours one at a time: place a petit four on a fork and spoon chocolate glaze over it.
7. Place the petit fours on a parchment-lined baking sheet and return to the freezer for one hour.


