


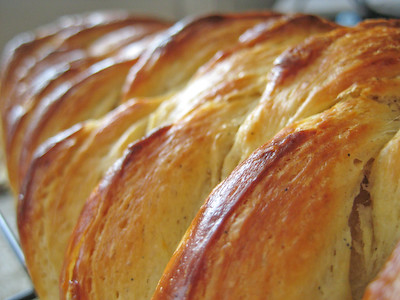
This month's Daring Bakers Challenge was chosen by Kelly of Sass and Veracity and Ben of What's Cookin'?: the Danish Braid. Danish dough is in the family of butter-laminated (or layered) doughs, with puff pastry being the ultimate. While similar to puff pastry, it is sweet and yeast-leavened, while puff pastry is not. While I have recently become comfortable working with yeast, I have never made a laminated dough before, so this was a great challenge and learning experience for me.
This particular Danish dough is a yeast dough, flavored with orange zest, cardamom (I used cinnamon instead), and vanilla. To laminate the dough, it is rolled out thinly, coated with butter, and then folded into thirds, like a tri-fold brochure. This process is repeated several times (or "turns"), resulting in numerous layers of butter and dough. The dough is allowed to rest and chill in the refrigerator between "turns" to allow the butter to firm back up and the gluten in the dough to relax. All the rolling and folding results in a dough that is buttery and flaky.What is great about this recipe is its versatility. While this month's challenge required us to make at least one Danish braid, the recipe yields enough dough to make two braids, so we were also allowed to use any extra dough to make pastries of other shapes as well. I decided to make two smaller braids, and then used the extra dough to make some small croissants and a round pastry.

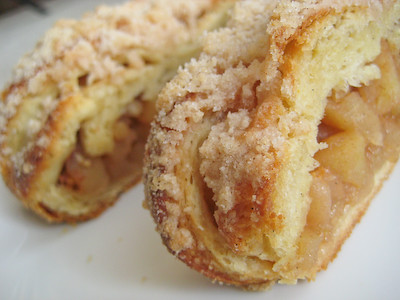
While the challenge instructions included a recipe for an apple filling, we were also allowed to vary the filling, as long as it was made from scratch. I had originally planned on making one braid with the apple filling, and then the second one with a fruit and almond paste or pastry cream filling, but I misread the recipe and did not realize that the apple filling recipe was double what was required for the braids so I ended up with a lot of apple filling! I used way more than the recommended one cup of apple filling in each braid, but still ended up with some left over. I used some of it to fill the round pastry, and then saved the rest for another use. I drizzled the round pastry as well as one of the braids with a simple glaze.

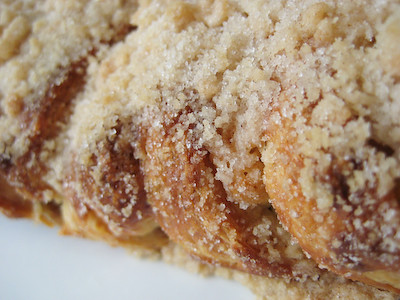
I topped the other braid with a streusel topping, inspired by my favorite apple crumb pie (which I still need to blog about!).
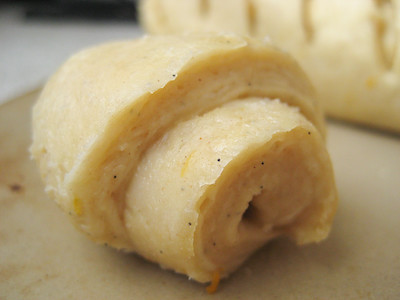
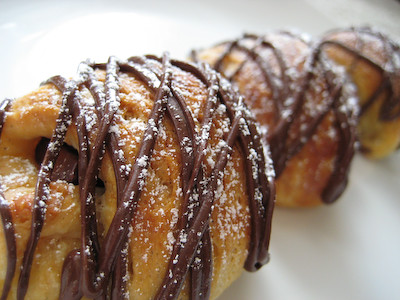
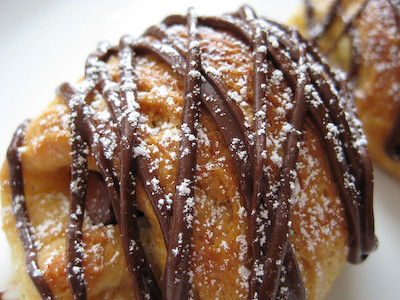
For the mini croissants, I decided to do a chocolate filling.
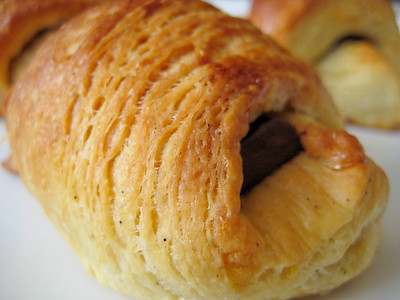
I've been holding on to my (free) Amano chocolate from Blake Makes for a while now... waiting for the perfect opportunity to use it. I knew this was it. For those who are not familiar with Amano, it is one of the few manufacturers in the U.S. that makes its chocolate from the raw, natural bean. They strive to make the highest-quality product possible by creating the chocolate in small batches with the best ingredients. Since this danish dough was flavored with orange juice and orange zest, I decided to fill these croissants with the Amano Madagascar chocolate. This chocolate has a "mild chocolate flavor, accented with citrus and highlighted by the particularly flavorful Venezuelan bean" - a flavor unique to chocolate from Madagascar.

I love chocolate filled croissants, and these were no exception. The citrus undertone of the Amano chocolate really complemented this dough. To satisfy any healthy chocolate craving, I also drizzled these with chocolate and then sprinkled them with a little confectioner's sugar.
Overall, I was very happy with this challenge. I never realized just how easy it is to create your own buttery, flaky goodness :) While initially this challenge seemed very daunting, if you just take it one step at a time, it is very easy to complete. I've included lots of step by step pictures below, but if you still need another visual, you can check out Julia Child's video demonstration here.
The recipe is a bit time consuming (there are three 30 minute chilling intervals as well as one last 5 hour interval for the laminated dough), so I would recommend making it over the course of two days. You can start the laminated dough on the first day, and make the filling during the 30 minute chilling intervals. Then on the second day you can assemble the braid, let it proof, and then bake it.

Never in a million years would I have imagined myself making a Danish braid with laminated dough! So thank you to Kelly and Ben for choosing this recipe. You introduced me to a wonderful new baking technique and now I'm one tiny step closer to attempting puff pastry dough - the ultimate challenge. Make sure you visit the Daring Bakers Blogroll and see everyone else's buttery, flaky creations!

DANISH BRAID
from The Secrets of Baking: Simple Techniques for Sophisticated Desserts, by Sherry Yard
Makes enough for 2 large braids Ingredients
2 cups apple filling, jam, or preserves (see below)
Glaze, optional (see below)
Streusel Topping, optional (see below)
For the egg wash: 1 large egg, plus 1 large egg yolk
1. Line a baking sheet with a silicone mat or parchment paper. On a lightly floured surface, roll the Danish Dough into a 15 x 20-inch rectangle, ¼ inch thick. If the dough seems elastic and shrinks back when rolled, let it rest for a few minutes, then roll again. Place the dough on the baking sheet.
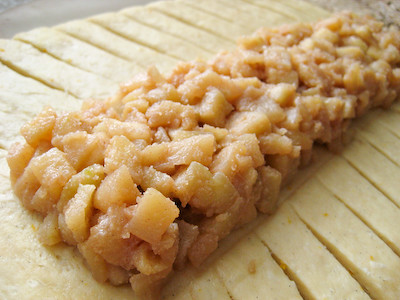
2. Along one long side of the pastry make parallel, 5-inch-long cuts with a knife or rolling pastry wheel, each about 1 inch apart. Repeat on the opposite side, making sure to line up the cuts with those you’ve already made.3. Spoon the filling you’ve chosen to fill your braid down the center of the rectangle.
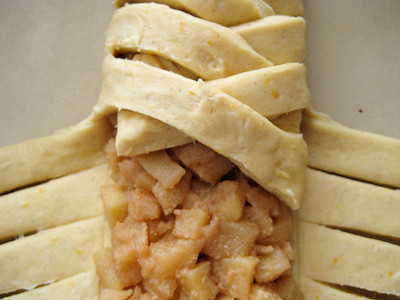
Starting with the top and bottom “flaps”, fold the top flap down over the filling to cover.
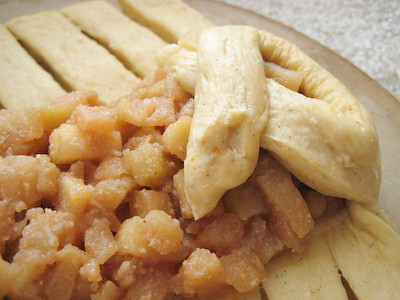
Next, fold the bottom “flap” up to cover filling. This helps keep the braid neat and helps to hold in the filling.
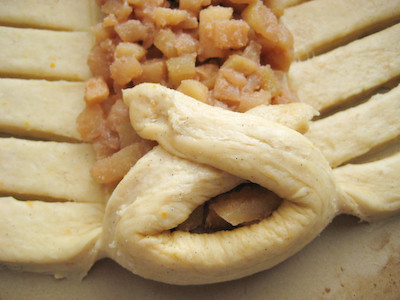
Now begin folding the cut side strips of dough over the filling, alternating first left, then right, left, right, until finished.
Trim any excess dough and tuck in the ends.

Egg Wash
Whisk together the whole egg and yolk in a bowl and with a pastry brush, lightly coat the braid.
Proofing and Baking
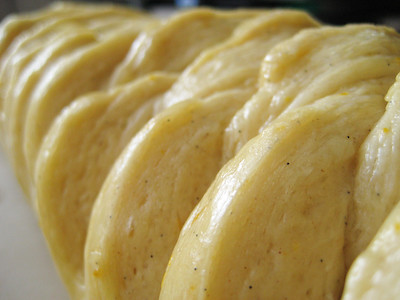
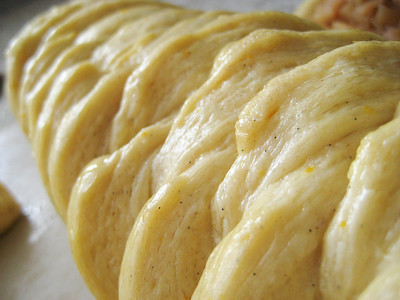
1. Spray cooking oil (i.e. Pam) onto a piece of plastic wrap, and place over the braid. Proof at room temperature or, if possible, in a controlled 90 degree F environment for about 2 hours, or until doubled in volume and light to the touch. (I like to set my oven to 170°F, let it preheat for 30 seconds to let it warm up just a bit, turn it off, and then let the dough rise in the warmed oven.)
2. Near the end of proofing, preheat oven to 400 degrees F. Position a rack in the center of the oven.
3. Bake for 10 minutes, then rotate the pan so that the side of the braid previously in the back of the oven is now in the front. Lower the oven temperature to 350 degrees F, and bake about 15-20 minutes more, or until golden brown.
Cool and serve the braid either still warm from the oven or at room temperature. The cooled braid can be wrapped airtight and stored in the refrigerator for up to 2 days, or freeze for 1 month.
DANISH DOUGH
Makes 2-1/2 pounds dough
Ingredients
For the dough (Detrempe)
1 ounce fresh yeast or 1 tablespoon active dry yeast
1/2 cup whole milk
1/3 cup sugar
Zest of 1 orange, finely grated
3/4 teaspoon ground cardamom (I used cinnamon)
1-1/2 teaspoons vanilla extract
1/2 vanilla bean, split and scraped
2 large eggs, chilled
1/4 cup fresh orange juice
3-1/4 cups all-purpose flour
1 teaspoon salt
For the butter block (Beurrage)
1/2 pound (2 sticks) cold unsalted butter
1/4 cup all-purpose flour
DOUGH
Combine yeast and milk in the bowl of a mixer fitted with the paddle attachment and mix on low speed. (I proofed the yeast first by adding 1 tablespoon of sugar (from the 1/3 cup) to lukewarm milk. I dissolved the yeast and sugar in the milk, and let it rest, covered, for about 5 minutes.) Slowly add sugar, orange zest, cardamom, vanilla extract, vanilla seeds, eggs, and orange juice. Mix well. Change to the dough hook and add the salt with the flour, 1 cup at a time, increasing speed to medium as the flour is incorporated. (I kept the paddle attachment on until all of the flour was incorporated, then switched to the dough hook for the kneading. KitchenAid does not recommend using the dough hook at speeds higher than level 2, so using the paddle attachment allowed me to mix the flour it at medium speed.) Knead the dough for about 5 minutes, or until smooth. You may need to add a little more flour if it is sticky. (I had to add almost 3/4 cup more flour. This will vary depending on the humidity of your kitchen and moisture content of your flour, but you can definitely start to see when the dough stops sticking to the sides. It will start to follow the dough hook around as it spins and will start flopping around the bowl in a large ball.) Transfer dough to a lightly floured baking sheet and cover with plastic wrap. Refrigerate for 30 minutes.
Without a standing mixer: Combine yeast and milk in a bowl with a hand mixer on low speed or a whisk. Add sugar, orange zest, cardamom, vanilla extract, vanilla seeds, eggs, and orange juice and mix well. Sift flour and salt on your working surface and make a fountain. Make sure that the “walls” of your fountain are thick and even. Pour the liquid in the middle of the fountain. With your fingertips, mix the liquid and the flour starting from the middle of the fountain, slowly working towards the edges. When the ingredients have been incorporated start kneading the dough with the heel of your hands until it becomes smooth and easy to work with, around 5 to 7 minutes. You might need to add more flour if the dough is sticky.
BUTTER BLOCK
1. Combine butter and flour in the bowl of a mixer fitted with a paddle attachment and beat on medium speed for 1 minute. Scrape down the sides of the bowl and the paddle and then beat for 1 minute more, or until smooth and lump free. Set aside at room temperature.
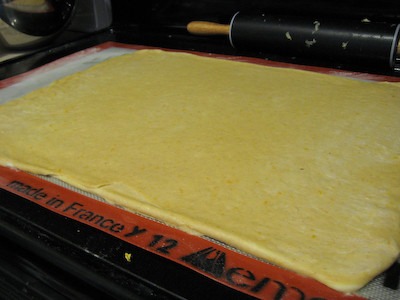
2. After the detrempe has chilled 30 minutes, turn it out onto a lightly floured surface. Roll the dough into a rectangle approximately 18 x 13 inches and ¼ inch thick. The dough may be sticky, so keep dusting it lightly with flour.

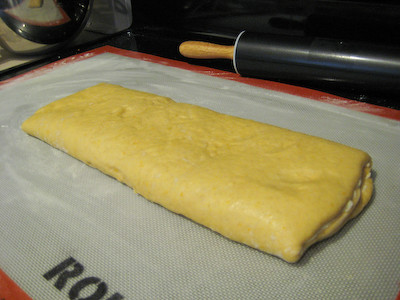
Spread the butter evenly over the center and right thirds of the dough.

Fold the left edge of the detrempe to the right, covering half of the butter.

Fold the right third of the rectangle over the center third.

The first turn has now been completed. Mark the dough by poking it with your finger to keep track of your turns, or use a sticky and keep a tally. Place the dough on a baking sheet, wrap it in plastic wrap, and refrigerate for 30 minutes.
3. Place the dough lengthwise on a floured work surface. The open ends should be to your right and left.
Roll the dough into another approximately 13 x 18 inch, ¼-inch-thick rectangle. (It is recommended that long, continuous strokes be used to roll the dough rather than short, jerky strokes to make sure the butter block is evenly distributed.)
Again, fold the left third of the rectangle over the center third and the right third over the center third. No additional butter will be added as it is already in the dough. The second turn has now been completed. Refrigerate the dough for 30 minutes.
4. Roll out, turn, and refrigerate the dough two more times, for a total of four single turns. Make sure you are keeping track of your turns. Refrigerate the dough after the final turn for at least 5 hours or overnight. The Danish dough is now ready to be used.

If you will not be using the dough within 24 hours, freeze it. To do this, roll the dough out to about 1 inch in thickness, wrap tightly in plastic wrap, and freeze. Defrost the dough slowly in the refrigerator for easiest handling. Danish dough will keep in the freezer for up to 1 month.
APPLE FILLING
Makes 4 cups (enough for two braids or 5 pounds of dough) (I went heavy on the apple filling so I used about 3 to 3-1/2 cups of filling for the 2-1/2 pound dough recipe)Ingredients
4 Fuji or other apples, peeled, cored, and cut into ¼-inch pieces (I used Granny Smith)
1/2 cup sugar
1 tsp. ground cinnamon
1/2 vanilla bean, split and scraped
1/4 cup fresh lemon juice
2 tablespoons brown sugar
4 tablespoons unsalted butter
Toss all ingredients except butter in a large bowl.

Melt the butter in a sauté pan over medium heat until slightly nutty in color, about 6 - 8 minutes. Then add the apple mixture and sauté until apples are softened and caramelized, 10 to 15 minutes. If you’ve chosen Fujis, the apples will be caramelized, but have still retained their shape. Pour the cooked apples onto a baking sheet to cool completely before forming the braid. (If making ahead, cool to room temperature, seal, and refrigerate.) They will cool faster when spread in a thin layer over the surface of the sheet. After they have cooled, the filling can be stored in the refrigerator for up to 3 days. Left over filling can be used as an ice cream topping, for muffins, cheesecake, or other pastries.
GLAZE
Makes enough to drizzle over 1 recipe Danish dough (2.5 pounds)
1 cup confectioners' sugar
2 teaspoons milk
Mix together confectioners' sugar and milk in a ziplog bag until smooth. Snip the corner of the bag and drizzle icing over danishes.

STREUSEL TOPPING
Makes enough to for 1 recipe Danish dough (2.5 pounds)
1/2 cup sugar Combine sugar and cinnamon with flour; using two knives or a pastry blender, cut in butter until crumbly. Sprinkle crumb mixture over pastry.
1/2 tsp cinnamon
3/4 cup flour
1/3 cup cold unsalted butter


In Germany the Danish pastry differs from puff pastry with the layers, puff pastry has more... Great looking braid, well done!
ReplyDeleteUlrike from Küchenlatein
All of your versions look lovely. I think the chocolate ones are cute...but I am an apple girl!
ReplyDeletemmmmmmmmmmmm chocolate looks divine!!!
ReplyDeleteVery impressive! This looks awesome and I'm sure tasted the same.
ReplyDeleteYour Danish Braid is beautiful! I will learn a lot from the pictures the next time I try this. Great job!
ReplyDeleteYour braid looks great and I love the little chocolate bites!
ReplyDeleteThose chocolate ones look too good to be true! Great job!
ReplyDeleteNo worries about using way more apple filling in the pastry, than the recipe calls for - they look WONDERFUL!! As do the mini chocolate croissants :0)
ReplyDeleteBeautiful!!
ReplyDeleteEverything looks wonderful! I love all of the variety you used. The apple cinnamon filling looks delicious and I love the strudel topping.
ReplyDeleteOh wow!!! Perfect! The apple braid looks great, but I would LOVE one of those chocolate ones! Great job!
ReplyDeletei am extremely, extremely impressed! first of all, the fillings you chose would are pretty much exactly what i would choose. and your breads make it look like you've had years of experience making bread in a bakery--each one is perfect. nicely done!
ReplyDeletegod, yours looks so good. and chocolate? dear lord.
ReplyDeleteWow, everything looks so delicious! I have got to try making chocolate croissants. And the streusel on the apple one--my favorite pie is apple with crumbs on top. Awesome job!
ReplyDeleteOh my goodness those pictures are luscious! that looks amazing.
ReplyDeleteBeautiful braid! I love the chocolate filled croissants best though - lovely!
ReplyDeleteOh my, you did a totally awesome job! And those mini chocolate croissants - well, I wish I had some of them for myself! What an awesome idea you had for them!
ReplyDeleteWow! Your pastries look unbelievable. The chocolate croissant is calling to me, and I love, love the idea of the streusel topping!
ReplyDeleteOMG! I could have reached right into the computer to grab the chocolate one - I'll have to try that next time!
ReplyDeleteYour braid look good and those chocolate drizzled pastries look amazing!
ReplyDeleteGREAT job on your pastry. I love that you did many different shapes.
ReplyDeleteoh my, you really did an amazing job!
ReplyDeleteWow, they all look so delicious. I love how the butter is so perfectly spread on the dough. You're amazing.
ReplyDeleteShari@Whisk: a food blog
Can I come over and share? Yours look gorgeous.
ReplyDeleteOops, sorry I have been learning the tech part since I got off work today. What do you suggest for photographing? Obviously I need a digital camera. What kind. How do I light and aim like you? Thank you very much.Amber
ReplyDeleteamber - you don't need a fancy digital camera to take good pics. i think my camera was $100? it's a canon powershot. the key to good photos is (1) good lighting (natural light is better than indoor lighting, though many of my photos are taken after the sun has set due to my work schedule) (2) don't use the flash - ever. this means if lighting it sub-optimal, you either need a tripod or a very steady hand to avoid fuzzy images - i try to rest my arms on something to keep them steady (3) use the macro setting (flower symbol) for your pics - it will let you get close up w/o blurring everything. (4) take lots of pics from lots of different angles from various distances - i take about 100 images per food item to get the handful that i post.
ReplyDeletehope that helps! :)
i love the photos, they're extremely helpful! wish i had them while i was making my danish!
ReplyDeletewow! that looks amazing and makes me wish I had tried harder!!! I have to try and make those croissants now!!
ReplyDeleteEverything looks so scrumptious and perfect! I particularly love the chocolate ones which are very pretty!
ReplyDeleteCheers,
Rosa
Absolutely gorgeous Danish, so many layers. And love the chocolate drizzle.
ReplyDeleteBravo! What beautiful creations! I think the apple filling looks particularly delicious...now I am wishing I had made it! Yum :)
ReplyDeleteYour variations look fantastic!
ReplyDeleteYour chocolate croissants look amazing!
ReplyDeleteoh good lord, your chocolate danishs makes me want to jump into the screen and devour them!! =D
ReplyDeleteOh wow!! those look absolutely fabulous! Love the struesel one (gotta try that sometime). Thanks for all of the great pics.
ReplyDeleteThis is amazing!! I just had a full course in pastry making and it was for FREE!!!!Thank you so much for the informative post. It surely looks easy and delicious!!!
ReplyDeleteAll of your pastries are absolutely without a doubt drop dead deliciously gorgeous! I love the streusel topping, and the chocolate...oh my..! :)
ReplyDeleteWow Jaime that looks delicious! I think I gain about 5 lbs everytime I check your blog!
ReplyDeleteoooooh the chocolate one sounds so amazing and looks fantastic too!
ReplyDeletewow, all of your creations look amazing! love the chocolate ones, and really like the streusel topping idea too. all very beautiful!
ReplyDeleteLooks delicious! It came out great :)
ReplyDeleteI'll try both flavors, Jaime, thank you very much! ;)
ReplyDeleteWow! the braid looks amazing, and what a great idea to make mini croissants... I think I'll give it a try sometime.
ReplyDeleteAbsolutely gorgeous! I love the chocolate ones, sounds great! Beautiful pics too!
ReplyDeleteYour photos are spectacular! I'm in awe of how wonderful they look. Bravo!
ReplyDeletewow, that looks delicious! the filling looks wonderful and so does the glaze. i'd love to give this a try, the only thing is how long it takes!
ReplyDeletewow...I can't decide which one looks tastier...the apple or chocolate...hmmm...Can I have both? ;)
ReplyDeletehi jaime, thanks for the tips. i think i will give it a try on the weekend. and i will be trying those lemon bars. i added you to my blogroll...hope you don't mind!
ReplyDeleteAmazing photos! I love the streusel topping you added. And you just can't go wrong with chocolate, can you?
ReplyDeleteWow wow wow. Invite me over please.
ReplyDeleteYour braid looks amazing! As well as all of the other pastries. And what a great way to use your Amano chocolate!
ReplyDeleteEvery single thing you made looks like it is straight out of a bakery window. Amazing job!!
ReplyDeleteOh my gosh. You just made me so jealous with those chocolate croissants. I wish I had used my extra dough to make those!
ReplyDeleteAbsolutely lovely work! Especially the little chocolate fellas.
ReplyDeleteWow... if you hadn't admitted you had no previous experience with laminate dough I'd never have guessed... you've got some of the flakiest layers I've seen in *hundreds* of braids.
ReplyDeleteAnd the chocolate croissant? Oh. My Gawd.
Great job!
Your braid and pastries look amazing! Excellent job.
ReplyDeleteOMG, I'm dizzy at the variations you took on this recipe! And the photos are just magnificent. They all look delicious and expertly done.
ReplyDeleteYour photos are awesome! The chocolate filling sounds great.
ReplyDeletei totally regret not filling half with chocolate!!
ReplyDeleteWow, this is all so beautiful!
ReplyDeleteAmazing! The streusel topping looks wonderful and the chocolate croissants divine! You really out-did yourself!
ReplyDeleteThese look awesome. great post!
ReplyDeleteThis is great! I loved all your creations and pictures! Can't believe I almost missed this one!
ReplyDeleteThat is some seriously gorgeous danish! Beautiful!
ReplyDeleteHi Jaime
ReplyDeleteCould you give me some tips on how to roll a dough into a rectangle. Thank You.
Hi Jackie,
ReplyDeleteWhat exactly is it that you are having trouble with? I usually use my silpat mat as a rough guide to roll the dough out into a rectangular shape. Make sure you flour the work surface and the rolling pin. If you maybe describe what you are having trouble with, I might be able to better help you.
Jaime
Hi Jaime
ReplyDeleteI want to malke a cinnamon raisin bread, but the recipe tells me to roll the dough out to a 12x18 inch rectangle and spread the cinnamon-sugar on it and roll it up to a loaf. How do you begin to roll it into those measurements.
Jackie - I would recommend that you use this recipe if you are wanting to make bread instead of a danish pastry:
ReplyDeletehttp://www.goodeatsblog.com/2007/10/brown-sugar-raisin-bread-revisited.html
In regards to your question, if the dough is rolled out to 12x18 with the width being 18" and the "height" being 12" as you face it, you'll want to roll the dough from left to right and should end up with a loaf that is 12" long.
EXCELLENT i have been looking for a recipe that is easy to follow! Thanks very much i will be printing this out and trying as soon as possible.
ReplyDeleteThis looks like an excellent easy to follow recipe...thanks for the pictures and detailed instructions. One question though: what was the oven temperature and baking time for the croissants and small rounds?
ReplyDeleteThanks
anonymous - I hope you like it if you try it! It was great! I used the same oven temp, and for baking time I honestly don't remember anymore - start checking half way through the time indicated for the danish braid and see how it looks....just bake until golden.
ReplyDeleteI love the Danish Apple Pastries, they are really delicious. At school we added 2 Tablespoons of jam (nearly every jam is ok) and ground almonds and hazelnuts. This also gives it a great taste!
ReplyDeleteI'm going to try your recipe for this Sunday's brunch at The Underground Restaurant. Looks amazing.
ReplyDelete