


This month's Daring Bakers Challenge was hosted by Dolores of Culinary Curiosity, Alex of Blondie and Brownie, and Jenny of Foray into Food: Caramel Cake. We also had an optional challenge this month in addition to the cake: Golden Vanilla Bean Caramels. I really wanted to make the caramels, but every time I went to World Market, they were out of Lyle's Golden Syrup. I still plan to make them, but won't be able to post about them today.
Caramel cake was actually the very first thing I blogged about over a year ago. That cake had a different kind of frosting, though. It was a thick, sugary, caramel frosting. This caramel cake has a browned butter frosting that is similar in consistency/texture to a cream cheese frosting. Having made browned butter before, I had no problems with this aspect of the recipe. I can imagine that those who had never made it before, probably had some difficulty, as the recipe gave the very vague instructions of "cook butter until brown." I've included more detailed instructions on how to do this below, for anyone interested in making this cake.
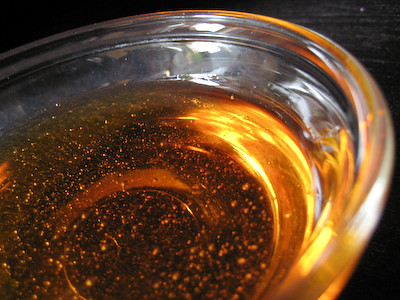
The tricky thing with caramel is that the darker you get it, the better the flavor. However, the longer you heat it, the higher the risk of burning it. I actually think I didn't cook my caramel long enough, because after I added the water to it, it changed from a deep amber to a lighter, caramel color. The consistency of my syrup was right - it was supposed to be similar to thick, maple syrup - but the flavor wasn't as prominent because I didn't let it caramelize enough.

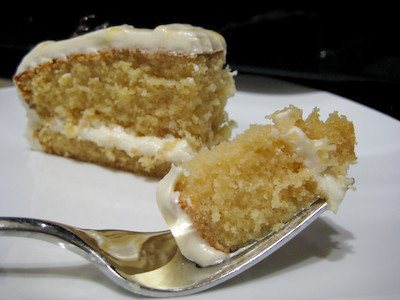
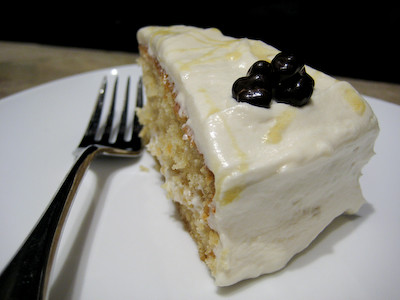
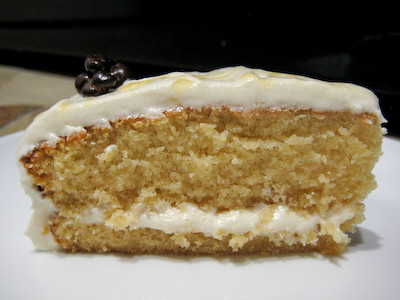
You'll have to excuse the fact that I cut my cake layers completely uneven - it sure looked even when I cut it, but somehow I ended up with one really thin layer and one really thick layer ;) I topped my cake with a drizzle of caramel syrup and some chocolate covered cacao nibs from TCHO chocolate. A lot of bakers complained about the cake being too sweet, and I partially agree. Without the sea salt, it would definitely be too sweet (and I always like things sweet). But the sea salt was a great contrast in flavor, not to mention texture.

The cake was very moist and had just a hint of caramel to it (the flavor would have been better if I had cooked the caramel syrup longer). I received many compliments on it. While I enjoyed this cake, I'm not sure if it is meant for everyone. It is very sweet, and I think many will probably consider it too sweet, even with the added sea salt.
If you decide to make this, be sure you read these tips here first.
Thanks Dolores, Alex, and Jenny for choosing one of my favorite flavors this month! I can't wait to try making the caramels. Make sure you visit the Daring Bakers Blogroll to see how hundreds of others fared with this sugary challenge!
*Recipe notes:
- Save time by starting the caramel syrup while you are letting the ingredients for the cake come to room temperature.
- You only need to make a half recipe of caramel syrup and that will be plenty for both the cake and the frosting.
- Leftover caramel syrup? Drizzle some over ice cream. Add some to your hot apple cider for some delicious caramel apple cider. Or just lick it right from the spoon :)
- If you have leftover browned butter, it is delicious tossed with some spaghetti or angel hair pasta and some mizithra cheese (if you can't find mizithra, you can substitute freshly grated parmesan cheese).
Caramel Cake with Caramelized Butter Frosting
from Shuna Fish Lydon as seen on Bay Area Bites
10 tablespoons unsalted butter at room temperature
1 1/4 cups granulated sugar
1/2 teaspoon kosher salt
1/3 cup Caramel Syrup (see recipe below)
2 each eggs, at room temperature
splash vanilla extract
2 cups all-purpose flour
1/2 teaspoon baking powder
1 cup milk, at room temperature (I used skim)
Preheat oven to 350F
Butter one tall (2 – 2.5 inch deep) 9-inch cake pan. (I used a regular 9-inch pan. I would also recommend lining it with parchment - my cake stuck to the buttered pan quite a bit!)
In the bowl of a stand mixer fitted with a paddle attachment, cream butter until smooth. Add sugar and salt & cream until light and fluffy.
Slowly pour room temperature caramel syrup into bowl (add a little bit at a time, and wait until it is incorporated before adding more). Scrape down bowl and increase speed. Add eggs/vanilla extract a little at a time, mixing well after each addition. Scrape down bowl again, beat mixture until light and uniform.
Sift flour and baking powder.
Turn mixer to lowest speed, and add one third of the dry ingredients. When incorporated, add half of the milk, a little at a time. Add another third of the dry ingredients, then the other half of the milk (slowly - only a bit at a time) and finish with the dry ingredients. {This is called the dry, wet, dry, wet, dry method in cake making. It is often employed when there is a high proportion of liquid in the batter.}
Take off mixer and by hand, use a spatula to do a few last folds, making sure batter is uniform. Turn batter into prepared cake pan.
Place cake pan on cookie sheet or 1/2 sheet pan. Set first timer for 30 minutes, rotate pan and set timer for another 15-20 minutes. Your own oven will set the pace. Bake until sides pull away from the pan and skewer inserted in middle comes out clean. Cool cake completely before icing it.
Cake will keep for three days outside of the refrigerator.
CARAMEL SYRUP
(I halved this recipe)
2 cups sugar
1/2 cup water
1 cup water (for "stopping" the caramelization process)
In a small stainless steel saucepan, with tall sides, mix water and sugar until mixture feels like wet sand. Brush down any stray sugar crystals with wet pastry brush. Turn on heat to highest flame. Cook until smoking slightly: dark amber.
When color is achieved, very carefully pour in one cup of water. Caramel will jump and sputter about! It is very dangerous, so have long sleeves on and be prepared to step back. (I used a measuring cup and poured very slowly and from a very high distance. This worked well for me. You can also cover your saucepan with some aluminum foil and cut a small hole in the top and then pour the water through that. The foil will serve as a nice splatter guard.)
Whisk over medium heat until it has reduced slightly and feels sticky between two fingers. {Obviously wait for it to cool on a spoon before touching it.} (This took about 2-3 minutes.)
Note: For safety reasons, have ready a bowl of ice water to plunge your hands into if any caramel should land on your skin.
CARAMELIZED BUTTER FROSTING
12 tablespoons unsalted butter
1 pound confectioner’s sugar, sifted (I used 3 cups)
4-6 tablespoons heavy cream (I used 4 tbsp)
2 teaspoons vanilla extract
2-4 tablespoons caramel syrup (I used 4 tbsp)
Kosher or sea salt to taste (I used 1/2 tsp but would probably recommend 1 tsp)
Cook butter until brown. (For those who have never browned butter before, here's how...Place butter in a saucepan over medium heat. Bring butter to a slow boil (about 5 minutes). Once the butter begins to boil, stir constantly to prevent residue from sticking to the bottom of the pan. As the butter cooks, it will start to foam and rise. Continue stirring, otherwise the butter foam could overflow and catch fire. Once the butter stops foaming and rising (about 5 minutes), cook until amber in color (about 1 to 2 minutes). It will have a pleasant caramel aroma.)

Pour through a fine meshed sieve into a heatproof bowl (let it cool for a few minutes before pouring it through the sieve if you are using a plastic sieve - otherwise it will melt!), set aside to cool.
Pour cooled brown butter into mixer bowl.
In a stand mixer fitted with a paddle or whisk attachment, add confectioner's sugar a little at a time. When mixture looks too chunky to take any more, add a bit of cream and or caramel syrup. Repeat until mixture looks smooth and all confectioner's sugar has been incorporated. Add salt to taste.
Note: Caramelized butter frosting will keep in fridge for up to a month.
To smooth out from cold, microwave a bit, then mix with paddle attachment until smooth and light.


I love how thick your caramel syrup looks, and chocolate covered cacao nibs probably helped cut the sweetness as well. Very pretty.
ReplyDeleteMmmm... looks so yummy! Great job!
ReplyDeleteUmmmm...your syrup looks drinkable! Lovely job!
ReplyDeleteLOOKS DELICIOUS JAMIE! HAPPY THANKSGIVING!
ReplyDeleteWell done, it looks GREAT!
ReplyDeleteCaramel is one of my favorite flavors as well!! Loooove your cake.
ReplyDeleteYour cake looks great even with the uneven layers. This is bad of me to say but they make me feel better about my layers which are not always even. :-) THX!
ReplyDeleteI'm actually intending to give this cake a try. Thank you for all the great tips.
~ingrid
Loved the shot of the caramel syrup. Your cake is lovely!
ReplyDeleteI love caramel cake! Good job!
ReplyDeleteWhat a nice participation Jaime! Oh! how that sirupy picture looks stunning! WOW... almost wish I could bathe in that! LOL LOL
ReplyDeleteVery nice, simple yet elegant cake!
I t really looks good, I love how moist your cake looks.
ReplyDeleteThanks for your instructions. I was one of the "foam might rise, overflow and catch fire" cases. No clue, never done it before. I couldn't decide if I should move the pan away from the flame and get butter everywhere or hold the butter high away from the heat but still falling over the flame. What a predicament. Next time, I will stir constantly. :)
ReplyDeleteI love caramel and I bet it is so good in this cake! Great photos too!
ReplyDeleteYum! Good job! The syrup photos are especially luscious.:)
ReplyDelete-Mandy
I think I'll try the brown butter. It looks amazing!
ReplyDeleteYour cake looks delicious! I love caramel too, almost as much as I love chocolate :) You should definitely make the caramels, because they are fabulous!
ReplyDeleteLooks great! I agree this needed salt to bring out the flavor.
ReplyDeleteYour cake looks terrific! And I love the pictures of the caramel syrup. I think I should have let mine color more, too, but I was afraid of letting it go too far. Oh, and great use of the TCHO chocolate covered nibs--aren't they tasty? =)
ReplyDeleteBeautiful presentation! Now I'm craving caramel cake... lol
ReplyDeleteAbsolutely yummy cake and beautiful pics! Thank you for the excellent notes too.
ReplyDeletedon t bother about the layers this cake looks great. Nice photos too :)
ReplyDeleteYour caramel looks perfect! Mine went to being pretty dark and developed an intense flavor, which I didn't mind because it took away a lot of the cake's sweetness with the frosting. :) Great job!
ReplyDeleteI absolutely love your pictures of the caramel!!! It's beautiful. This cake was SO good...I think I'd do it again. Great job!
ReplyDeleteGreat pics. Great cake. Great job.
ReplyDeleteAfter seeing this everywhere I want to make it now. Interesting about it being too sweet. Yours turned out great.
ReplyDeleteGreat work on this month's challenge. Love that you made a layer
ReplyDeleteOoh, chocolate-covered cacao nibs are a genius touch! (And I'm getting samples of TCHO chocolate to try later this week, I'm psyched.) That's a good-looking cake you've got!
ReplyDeleteThat drizzling picture is beautiful.
ReplyDeleteI like how you used salt and nibs to control the sweetness.
Thanks much for the added instructions on the browned butter piece and the clarifications on the modifications you made. Great job. Thanks for baking with us this month. Let us know how the caramels turn out.
ReplyDelete