


The October 2010 Daring Bakers’ challenge was hosted by Lori of Butter Me Up. Lori chose to challenge DBers to make doughnuts. She used several sources for her recipes including Alton Brown, Nancy Silverton, Kate Neumann and Epicurious.
We were actually supposed to post these doughnuts yesterday, but somehow the entire month got away from me and I did not get around to making these until today! I am so glad I checked the Daring Bakers' forums before embarking on this challenge because Audax had posted the most helpful information/tips! I was especially glad to see that Alton's yeast doughnut recipe could be adapted to the oven instead of the fryer. Not that I am afraid of frying things, but rather because we try to avoid eating fried foods as much as possible.
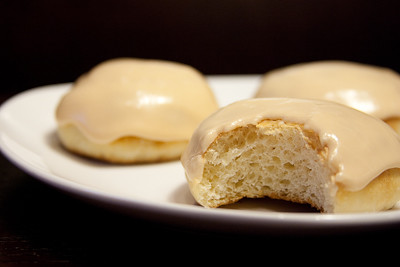
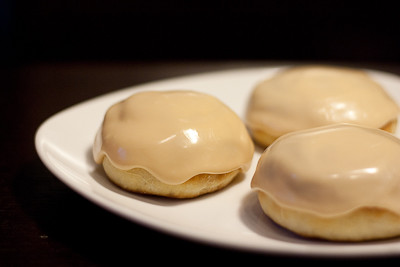
This recipe was simple and not very time consuming at all (if you don't count the time it takes for the dough to rise). I always use my oven as a proofing box (by turning it on to preheat for a few seconds and then turning it off), so my dough easily doubled in size in one hour. I halved the recipe and ended up with plenty of doughnuts! Since I was baking these and not frying them, I didn't cut holes in the middle. I made smaller doughnuts, so they were done baking in only 8 minutes (at 425F). One of my favorite kinds of doughnuts is a maple glazed doughnut, but I did not have any maple syrup so I decided to glaze my doughnuts with a caramel icing.
Thanks Lori, for hosting this month's challenge. These doughnuts were delicious and I had fun making them. You'll find the recipe for the doughnuts, as well as Audax's tips, and the caramel glaze recipe below.
Make sure you check out the Daring Bakers' Blogroll to see how everyone else enjoyed these deep fried (or in my case - baked) treats.
Yeast Doughnuts
from Alton Brown
Preparation time:
Hands on prep time - 25 minutes
Rising time - 1.5 hours total
Cooking time - 12 minutes
Yield: 20 to 25 doughnuts; 20 to 25 doughnut holes, depending on size
Ingredients
Milk 1.5 cup / 360 ml
Vegetable Shortening 1/3 cup / 80 ml / 70 gm / 2.5 oz (can substitute butter, margarine or lard)
Active Dry Yeast 4.5 teaspoon (2 pkgs.) / 22.5 ml / 14 gm / ½ oz
Warm Water 1/3 cup / 80 ml (95°F to 105°F / 35°C to 41°C)
Eggs, Large, beaten 2
White Granulated Sugar ¼ cup / 60 ml / 55 gm / 2 oz
Table Salt 1.5 teaspoon / 7.5 ml / 9 gm / 1/3 oz
Nutmeg, grated 1 tsp. / 5 ml / 6 gm / ¼ oz
All Purpose Flour 4 2/3 cup / 1,120 ml / 650 gm / 23 oz + extra for dusting surface
Canola Oil DEPENDS on size of vessel you are frying in – you want THREE (3) inches of oil (can substitute any flavorless oil used for frying)
Directions:
1. Place the milk in a medium saucepan and heat over medium heat just until warm enough to melt the shortening. (Make sure the shortening is melted so that it incorporates well into the batter.)
2. Place the shortening in a bowl and pour warmed milk over. Set aside.
3. In a small bowl, sprinkle the yeast over the warm water and let dissolve for 5 minutes. It should get foamy. After 5 minutes, pour the yeast mixture into the large bowl of a stand mixer and add the milk and shortening mixture, first making sure the milk and shortening mixture has cooled to lukewarm.
4. Add the eggs, sugar, salt, nutmeg, and half of the flour. Using the paddle attachment of your mixer (if you have one), combine the ingredients on low speed until flour is incorporated and then turn the speed up to medium and beat until well combined.
5. Add the remaining flour, combining on low speed at first, and then increase the speed to medium and beat well.
6. Change to the dough hook attachment of the mixer and beat on medium speed until the dough pulls away from the bowl and becomes smooth, approximately 3 to 4 minutes (for me this only took about two minutes). If you do not have a dough hook/stand mixer – knead until the dough is smooth and not sticky.
7. Transfer to a well-oiled bowl, cover, and let rise for 1 hour or until doubled in size.
8. On a well-floured surface, roll out dough to 3/8-inch (9 mm)thick. (Make sure the surface really is well-floured otherwise your doughnuts will stick to the counter).
9. Cut out dough using a 2 1/2-inch (65 mm) doughnut cutter or pastry ring or drinking glass and using a 7/8-inch (22 mm) ring for the center whole. Set on floured baking sheet, cover lightly with a tea towel, and let rise for 30 minutes.
10. Preheat the oil in a deep fryer or Dutch oven to 365 °F/185°C.
11. Gently place the doughnuts into the oil, 3 to 4 at a time. Cook for 1 minute per side or until golden brown (my doughnuts only took about 30 seconds on each side at this temperature).
12. Transfer to a cooling rack placed in baking pan. Allow to cool for 15 to 20 minutes prior to glazing, if desired.
Tips from Audax:
This recipe (the first challenge recipe) produces absolutely and utterly the best doughnuts I have ever had; the interiors of the doughnuts are soft, fluffy and airy (light as a feather) and the crusts are thin and crisp. The doughnuts are mildly sweet and with a coating of icing (powdered) sugar they are perfect. An absolutely marvellous recipe! It is best to think of the dough as an artisan (high-hydration) bread dough i.e. very soft and sticky. Work it gently and try to keep as much air in the dough when you are handling it. I have a lot of experience working with high-hydration (high ratio of water to flour) soft and sticky doughs so I had no problems with this recipe. If you feel the initial dough mixture is too sticky and soft don't add flour just let the dough rise; during this time the water will hydrate (wet) the flour and the dough will become less sticky and firmer (it will always be a soft dough) and the gluten will develop. Only add flour after the first rising (and only on the counter and the cutting tools you are using).
A few comments on this recipe
1. I used butter since I hate the fat-sticking-to-the-roof-of-my-mouth-feel that shortening produces and also vegetable shortening is impossible to find in Australia.
2. It is best to weigh the flour if possible 23 oz or 650 gm or 4⅔ cups (of settled flour straight from the bag do not fluff up the flour first just measure the cup volume straight from the bag I checked 4⅔ cups of flour does equal 650 grams/23 oz) this amount produces a sticky batter-like cake-dough, very unlike normal bread-dough, this is how it is meant to be. Resist the temptation of adding more flour to make the dough like normal-bread-dough it is meant to be very sticky and like a very thick cake-batter the dough will become less sticky during the first rising. So please resist the urge to "correct" the recipe’s measurements. Just do what the recipe says and you won't be disappointed. As the dough (sticky batter) rises, the water absorbs into the flour and the final mixture will become more like a normal soft dough.
3. The dough is very yellow (as compared to normal bread dough) mainly due to the use of butter and eggs.
4. You should “pour” the soft dough into the rising bowl. And let it rise the dough will become less sticky and more firm but it will be soft dough. And it rises a lot so use a large bowl. The dough might take up to 2 hours (even longer) to double in size; rising time depends on: how much kneading you did, temperature and humidity:- so don't worry too much if nothing happens after an hour just wait it will happen.
5. You can keep the (first-rise) dough in the refrigerator up to four days before you roll it out and second-rise and deep-fry it.
6. I only needed a tiny amount of flour (about 1 tablespoon) on the counter to 'pat' out the soft dough to 3/8 inch (9mm) thick to do the cutting of the doughnut shapes. I lightly floured the cutting tools so they wouldn't stick to the soft dough.
7. I used a small piping connector to cut out the inner 'hole' of the doughnut.
8. I had no trouble lifting the cut-out and risen doughnuts from the counter into the hot oil. I used my lightly-floured fingers and hands to lift the risen doughnuts no problems.
9. Cooking the doughnuts only took about 30 seconds each side I used a thermometer to check the oil temperature. If you do not have a thermometer you can test the temperature by placing a small piece of white bread in the oil it should brown in about 60 seconds. If the oil is too cold the doughnuts will absorb the cooking oil and will became very greasy and if the oil is too hot the outside of the doughnut will cook too quickly while the inside will still be doughy.
10. I used rice bran oil which has a very high smoke point 490°F/254°C and has a very mild (almost flavourless) taste, I particularly dislike canola oil for deep-frying since it has a fishy/strange taste and odour to it, though I do use a combination of canola oil and olive oil for most of my shallow frying.
11. If you like your doughnuts sweet increase the sugar to ½ cup.
Special notes if you are making the dough by hand (not using a machine to mix the dough)
1. I have made high-hydration doughs many hundred's of times so I have a lot of experience with them.
2. The dough will be to sticky to knead by hand without adding a lot of extra flour and it will be very messy so if you are making the dough by hand, just roughly combine the dough ingredients using a plastic scraper (see first picture below) or wooden spoon. No need to knead too much; a longer resting/rising time is equivalent to kneading that is if you only roughly knead for one minute or so and let the dough rise for a longer time this is equivalent to kneading for a longer time. I only roughly combined the dough ingredients for a minute with a plastic scraper and let the dough rise for about 1½ hour (½ hour longer than the stated time in the recipe) which made the final dough silky and allowed the gluten to develop to maximum hydration.
3. The initial dough will look wet, very soft, sticky and not-combined but after rising/resting it will combine into a fully-hydrated (i.e. the gluten well-developed) mass.
4. Don't worry too much about the look and feel of the dough on initial mixing, only really look and feel the dough after the first rising (if you only roughly mixed the dough at the beginning the rising time will be longer than the stated time in the given recipe but the dough will come together with full gluten development) then flour the counter and cutting tools use the minimum extra flour to help you cut, shape and re-rise the doughnuts so they can be deep-fried.
If you're using a mixing machine just follow the instructions given in the recipe.
Caramel Glaze
from Good Eats 'n Sweet Treats
1 cup confectioner's sugar
1 tbsp homemade caramel sauce
1 tbsp milk + a few extra drops
Add all of the ingredients together in a small bowl and stir to combine. If you need your glaze to be slightly thicker, add a little more confectioner's sugar. If you'd like it to be thinner, add a little more milk until you reach your desired consistency.


I have never had a doughnut with caramel icing but it seriously looks and sounds divine.
ReplyDeleteYou get a big thumbs up on the caramel glaze, which I will now be adding to my caramel recipe list. :)
ReplyDeleteHappy Friday!
~ingrid
long but very instesting and informative post...I love all the tips, I think they can be very useful for someone scared of yeasted doughs like me...and your douhgnuta look really great btw! Thanks!
ReplyDelete-Amalia
http://buttersweetmelody.wordpress.com
Your donuts look perfect! Now I'm wishing I had baked some of mine too.
ReplyDeleteWhat gorgeous donuts! The glaze on top looks perfect. And I love that you baked them instead of frying them.
ReplyDeleteThe fact that they are baked means u can have an extra serving right?LOL, The maple glaze looks divine!
ReplyDeleteThose look amazing. I've always wanted to make doughnuts!!
ReplyDeleteI love all your comments on the recipe. So useful! I've been wanting to make donuts but I'm so scared to even try. I think you've inspired me.
ReplyDeleteI made donuts the other day and they turned out nothing like I wanted. I can't wait to try these!
ReplyDeleteWhat gorgeous fluffy doughnuts! I've tried making doughnuts once and fried them, but really want to try baking them.
ReplyDeleteI've been meaning to make baked doughnuts for quite some time, but haven't gotten around to it yet... I'm so curious, how does the texture of baked doughnuts compare to normal fried ones? The outer crust definitely looks much different.
ReplyDeleteEmily, the texture is definitely different. not quite as crisp and yummy but they are still good. just a different kind of good. you should give them a try! I feel better eating baked doughnuts b/c they are a little healthier :)
ReplyDelete