


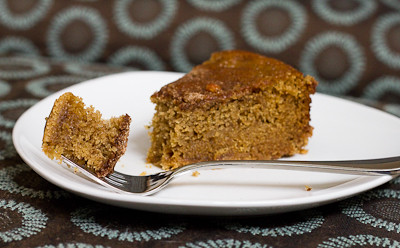
I opted to try the Armenian Nutmeg Cake and while it seems deceivingly simple and plain, it is such a delicious cake. The brown sugar in the cake gives it the most wonderful caramel flavor and the "crust" that is created at the bottom of the cake with a layer of flour, sugar, and butter gives it an unexpected crunch. The cake vaguely reminded me of the British dessert sticky toffee pudding, just without the sauce.
I stuck to the recipe as written, except I used 1 teaspoon of cinnamon and 1 teaspoon of nutmeg instead of 1.5 teaspoons of nutmeg. I think the cake lasted a total of about 24 hours in our household, it was that good!
Thanks Jason, for hosting this month's challenge. I just love it when I find a recipe that is amazing that requires minimal effort! I'll definitely be making this cake again and again. You'll find the recipe below. Also be sure to check out the Daring Bakers' Blogroll to see what everyone else thought of these Armenian desserts.
Armenian Nutmeg Cake
Makes one 9”/23cm cake which yields 12 servingsVideo Instructions by Jason
Ingredients
- 1 cup (240 ml) milk (I use whole, but nonfat or lowfat should be fine; non-dairy might work just fine, as well)
- 1 teaspoon (5 ml) (5 gm) baking soda
- 2 cups (480 ml) (280 gm/10 oz) all-purpose (plain) flour (I suspect pastry flour or another low-gluten flour might even work better to achieve a light, fluffy crumb)
- 2 teaspoons (10 ml) (10 gm) (⅓ oz) baking powder (I used single-acting, because it's aluminum-free, and it turned out fantastic)
- 2 cups (480 ml) (400 gm/14 oz) brown sugar, firmly packed
- 3/4 cup (1½ sticks) (180 ml) (170 gm/6 oz) butter, preferably unsalted, cubed
- 1/2 cup (120 ml) (55 gm/2 oz) walnut pieces, may need a little more
- 1 to 1-1/2 teaspoons (5 to 7 ½ ml) (5 to 8 gm) ground nutmeg (try to grate it fresh yourself; the aroma is enchanting)
- 1 egg
Directions - the Traditional Way (The Fast, Easy Way further down)
1. Preheat your oven to moderate 350°F/175°C/gas mark 4.
2. Mix the baking soda (not baking powder; that's for the next step) into the milk. Set it aside.
3. Sift together the flour and the baking powder into a large bowl. One sift is fine
4. Add the brown sugar. Go ahead and mix the flour and brown sugar together. Or not.
5. Toss in the cubed butter.
6. Mash the butter with a fork into the dry ingredients (you can also use your fingers if you want). You'll want to achieve a more-or-less uniform, tan-colored crumbly mixture.
7. Take HALF of this resulting crumbly mixture into your springform (9”/23cm) pan. Press a crust out of it using your fingers and knuckles. It will be easy.
8. Crack an egg into a mixer or bowl.
9. Toss the nutmeg in with the egg.
10. Start mixing slowly with a whisk attachment and then increase to medium speed, or mix with a hand whisk if you're doing it manually. Once it's mixed well and frothy (about 1 minute using a standing mixer, or about 2-3 minutes of vigorous beating with a whisk), pour in the milk and baking soda mixture. Continue to mix until uniform.
11. Pour in the rest of the crumbly mixture. Mix that well, with either a paddle attachment, or a spatula. Or continue to use the whisk; it won't make much of a difference, since the resulting batter is very liquidy.
12. Pour the batter over the base in the springform pan.
13. Gently sprinkle the walnut pieces over the batter.
14. Bake in a preheated moderate oven for about 30-40 minutes. You'll know it's done when the top is a golden brown, and an inserted toothpick comes out clean.
15. Allow to cool in the pan, and then release. Enjoy!
An Even Easier Way...if you have a Food Processor
1. Preheat your oven to moderate 350°F/175°C/gas mark 4 .
2. Mix the baking soda (not baking powder) into the milk. Set aside.
3. Put the flour, baking powder, and the brown sugar into your food processor. Pulse until uniformly mixed.
4. Toss in the cubed butter. Pulse until uniformly mixed into tan-colored crumbs.
5. Pour HALF of the crumbs into your springform (9”/23cm) pan. Press out a crust using your fingers and knuckles.
6. Crack the egg into the food processor with the rest of the crumbs still in it.
7. Grate 1 to 1-1/2 teaspoon of nutmeg. Toss that into the food processor, too. Pulse until well-incorporated.
8. Pour in the milk and baking soda mixture. Continue to mix until a slightly lumpy tan batter is formed.
9. Pour the batter over the crust in the springform pan.
10. Gently sprinkle the walnut pieces over the batter.
11. Bake in a preheated moderate oven for 30-40 minutes. It's ready when the top is golden brown, and when it passes the toothpick test (comes out clean).
12. Cool the cake in the pan, and then dig in. Yum yum!
Freezing/Storage Instructions/Tips: Armenian nutmeg cake will keep (covered) at room temperature for 2-3 days. It tastes even better still warm from the oven.
Allow to cool completely before attempting to freeze. Armenian Nutmeg Cake will freeze fairly well if completely sealed. It can be frozen for up to 3 months.


No comments:
Post a Comment