Friday, December 14, 2007

Maamoul: Middle Eastern Treat


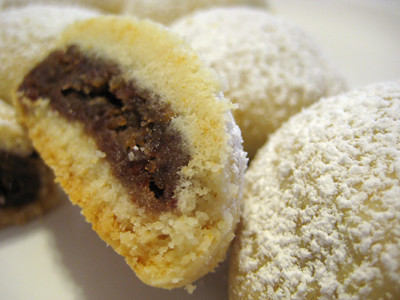
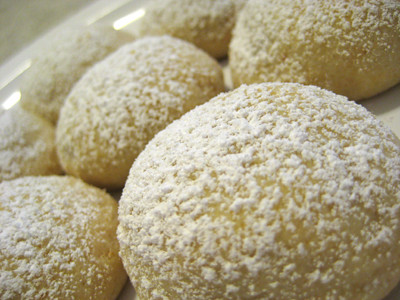
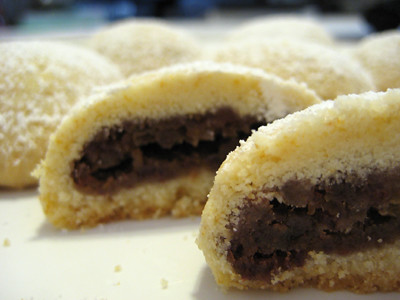
I found these cookies on the 2004 list of the Food Network's 12 Days of Cookies. Maamoul are Middle Eastern cookies that are typically served during special occasions/holidays. The three most traditional fillings are dates, walnuts, or pistachios. They are normally molded into specific shapes, but these are made by hand.


I had some dates in my pantry, so I thought I would give them a shot. They weren't too difficult to make once I got the hang of it, but they aren't as universally appealing as some of the cookies I included in my holiday gift packages... not everyone likes dates! Still, I wanted to include them so I would have a little more variety in my treats. I think next time I may try the alternative filling of apricot and raisin (listed at the bottom).


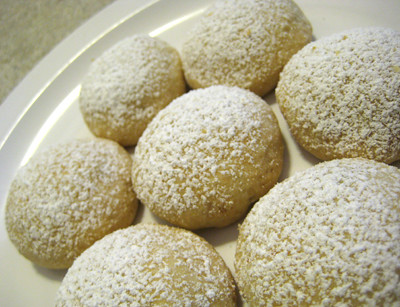
I did take the time to poke the tops of my cookies (with a toothpick), but by the time the powdered sugar went on top, you couldn't really make any of the designs out. So, next time I'll just save myself the hassle and omit that step altogether, or use something larger like a skewer.

Maamoul: Stuffed Date-Orange Cookies
From Food Network Kitchens


Filling:
1/2 pound pitted soft Medjool dates
2 tablespoons water
Pinch fine salt
1/4 cup finely chopped crystallized ginger
1/2 teaspoon finely grated orange zest

Dough:
2 cups all-purpose flour
1 teaspoon baking powder
1 tablespoon confectioners' sugar, plus about 1/2 to 2 cups more for dusting
Pinch fine salt
1/2 cup unsalted butter (1 stick), plus 2 tablespoons
2 tablespoons neutral flavored oil, such as canola
1/4 cup milk


Preheat the oven to 325 degrees F.

To make the filling: Puree the filling ingredients in a food processor until evenly combined, about 1 to 2 minutes. Remove and set aside. Clean the processor bowl.

Put the flour, baking powder, the 1 tablespoon confectioners' sugar, and salt in the bowl of food processor and pulse 3 to 4 times to mix. Add the butter, oil, and milk pulsing until the dough just comes together. Take care not to overwork the dough; it will be slightly wet.

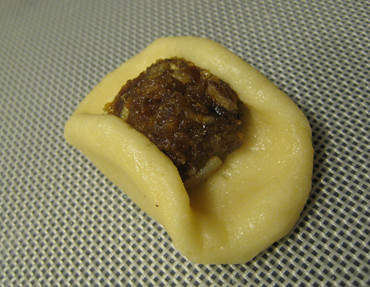
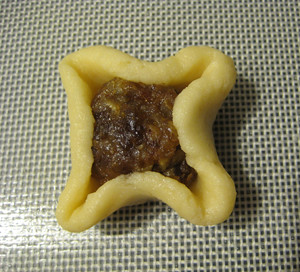
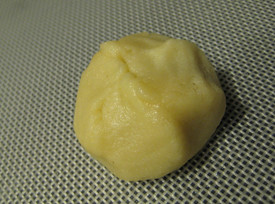
Remove dough from the processor, and roll into 20 equally sized balls. In the palm of your hand, press and pat each ball of dough into a 2 3/4-inch round. Place a rounded teaspoon of filling (I used a cookie scoop to save time) in the center of each round and draw the edges up and around the filling. Pinch the dough together to make a sealed ball, and then carefully roll the cookie between your palms to make a smooth round ball (see my tips below). Press gently to flatten the cookie slightly, then place them seamed side down on a parchment-lined baking sheet. Repeat with the remaining dough and filling. Gently prick the cookies with a fork or a wooden skewer in a decorative pattern taking care not to pierce the dough to the filling.


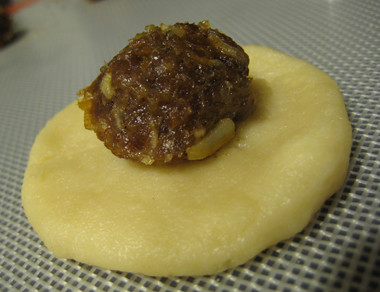
I found that the easiest way to make these was to start by pushing up the 'north' and 'south' ends of the cookie dough circle:


Then, push up the 'west' and 'east' ends of the circle:


Then, push the 'NW', 'SW,' 'NE', and 'SE' edges of the circle over the top of the filling and then pinch everything together to seal it.

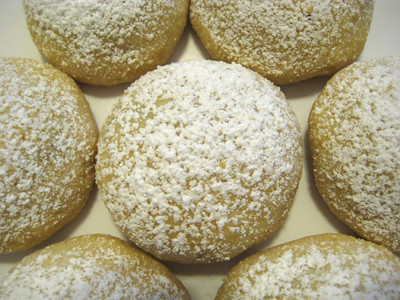
Bake the cookies until firm and slightly puffed, and the tops are pale but the bottoms are just beginning to turn slightly golden, about 25 to 30 minutes. Dust generously with confectioners' sugar, cool and dust again.


Alternative fillings:

Apricot Golden Raisin Nut Filling:
1/3 cup hazelnuts, toasted and chopped (other nuts can be substituted)
1/3 cup golden raisins
3 tablespoons apricot jam
Pinch fine salt

Puree in a food processor until evenly combined.

Quince-Walnut Filling:
1/2 cup walnuts, toasted
1/3 cup quince jam
Pinch fine salt

Puree in a food processor until evenly combined.

Chocolate and Peanut Butter Delights


I found this recipe while I was flipping through some of my mother-in-law's cookbooks over the Thanksgiving holiday. I am so glad it caught my attention, because it is definitely something I plan to make again.


This was one of my favorite things that I made during my holiday baking extravaganza. It's a layer of marshmallows sandwiched between chocolate cake and chocolate peanut butter rice krispies -- what more could a chocolate and peanut butter lover ask for? :) These delectable delights are best served chilled and I promise they will not last long once you take them out of the fridge.


Deluxe Chocolate Marshmallow Bars
from Esther Shank, Taste of Home's Holiday Get-Together 2006


3/4 cup butter
1-1/2 cups sugar
3 eggs
1 tsp vanilla extract
1-1/3 cups all purpose flour
3 tbsp baking cocoa
1/2 tsp baking powder
1/2 tsp salt
1/2 cup chopped nuts, optional (I omitted these)
4 cups miniature marshmallows

Topping:
1-1/3 cup chocolate chips
1 cup peanut butter
3 tbsp butter
2 cups crisp rice cereal

In a mixing bowl, cream butter and sugar. Add eggs and vanilla; beat until fluffy. Combine flour, cocoa, baking powder and salt; add to creamed mixture. Stir in nuts if desired. Spread in a greased 15 x 10 x 1" pan. (I used a 13x9" pan)

Bake at 350F for 15-18 minutes. Sprinkle marshmallows evenly over cake; return to oven for 2-3 minutes. Using a knife dipped in water, spread the melted marshmallows evenly over cake. Cool. (I did not have to spread the marshmallow layer because I used a 13x9" pan, so the 4 cups of marshmallows amounted to an even, single layer of marshmallows)

For topping, combine chocolate chips, peanut butter and butter in a small saucepan. Cook over low heat, stirring constantly, until melted and well blended. Remove from heat; stir in cereal. Immediately spread over bars. Chill.

Yield: 3 dozen

Saturday, December 8, 2007

Pan-Fried Fresh Salmon Cakes


I saw this recipe on Ashley's blog, Delish. I'm always on the lookout for great fish recipes, and I knew this was a good one when I saw it. I even thought this might be something that my husband might eat, despite the fact that he does not like seafood.

Panko is Japanese breadcrumbs made from wheat bread. It is larger and coarser than traditional bread crumbs. You can find it in the international/asian foods aisle at your grocery store, but if you cannot find it there, try a specialty foods store like Whole Foods, Trader Joe's, or Central Market. Any local asian grocery store will carry it as well. The panko really gives these salmon cakes a great texture, so I would not recommend substituting the panko with traditional bread crumbs.

Ashley commented that these seemed to take forever to make, but I did not feel that way at all. By the time I was done making these, I was pleasantly surprised by how little work and prep they required. I served these with a spinach salad, and I think the meal came together in under 30 minutes. Even though there is not that much lemon juice in these, the lemon flavor really shines in this recipe. The salmon, parsley, and onion are excellent together. Even my husband liked them :) I definitely plan to make these again the next time salmon is on sale!

Pan-Fried Fresh Salmon Cakes
from Delish


1-1/4 lb salmon fillets, skinned, any bones removed
1 slice high-quality white sandwich bread, such as Pepperidge Farm, crusts removed & finely chopped (I used whole wheat bread)
1/4 cup grated onion
2 tbsp fresh parsley leaves
2 tbsp mayonnaise
3/4 tsp salt
1-1/2 tbsp fresh lemon juice
1/2 cup all-purpose flour
2 large eggs
3-4 tbsp olive oil
3/4 cup panko, or plain dry bread crumbs

Chop salmon into 1/2-inch pieces and mix with chopped bread, onion, parsley, mayonnaise, salt & lemon juice in medium bowl. Scoop a generous 1/4 cup portion and use your hands to form into a patty measuring roughly 2 1/2 inches in diameter and 3/4 inch thick. Place on parchment-lined baking sheet and repeat with remaining mixture, making 6-8 patties. Freeze the patties until the surface moisture has evaporated, about 15 minutes.

Meanwhile, spread the flour in a shallow dish. Beat the eggs in a second shallow dish. Spread the bread crumbs in a third. Dip the chilled salmon patties in the flour to cover and shake off the excess. Transfer to the beaten egg and with a slotted spatula, turn to coat; let the excess drip off. Transfer to the panko, shaking the dish to coat the patties completely. Return breaded patties to baking sheet.

Heat olive oil in large heavy skillet over medium-high heat until simmering, about 3 minutes. Add salmon patties and cook until medium golden brown on the bottoms. Flip cakes and cook until medium golden brown on the other side.

Transfer to a paper towel lined plate and allow to drain for a minute. Serve hot.

Yield: 6-8 salmon cakes (3-4 Servings)

Tuesday, December 4, 2007

Happy Housewarming, Peabody!


You've seen me mention it several times before, but one of my very favorite food blogs is Culinary Concoctions by Peabody. Well, she recently moved into a beautiful new home and will be hosting a virtual housewarming party on Saturday. The details about the event are here; it's not too late to whip something up if you're interested, the deadline is not until Thursday night so you have two more evenings!

So I thought long and hard about what I should bring to this housewarming. If you browse through Peabody's blog, you will see a plethora of amazing baked goods. I know from experience now that I will not be disappointed with anything I make from her blog! :) So that made it even more difficult for me to decide on an appropriate dish because I wanted to bring something that had at least a little bit of complexity to it. I thought long and hard about baking some type of impressive dessert, but in the end I decided to bring a main dish instead.

I decided to bring a chicken pot pie. I came across this recipe on the reading 'riting and recipes blog a few weeks ago; when I started to peruse through my "must try" list of recipes, I thought it would be perfect for Peabody's housewarming. The first reason I chose this recipe was because I wanted to make something that was a personal challenge. I have never made my own pastry crust before, and have been meaning to try my hand at one for a while now. This chicken pot pie recipe entails making everything from scratch, including the pastry crust. The second reason I chose this recipe was because it is from one of Peabody's favorite cooks, Rebecca Rather (The Pastry Queen).


I was so happy with the outcome of this recipe! While it was a bit more time consuming than most of the recipes I make, it was well worth the effort. The cream cheese in the pastry crust makes this one of the best crusts I have ever had! :) Not bad for my first pastry crust, if I do say so myself ;) I adapted the recipe, based on the ingredients that I had on hand. Part of what I love about this recipe is that you can easily adapt it to suit your tastes based on the types of veggies you like. I've never put bell peppers in my pot pie before, but thought they were a nice addition to the filling. I particularly enjoyed the addition of crushed red pepper flakes, which gave the pot pie a subtle kick. So, I want to thank Peabody for inviting me to her housewarming party and allowing me to challenge myself to another 'first.' I cannot wait to see what everyone else brings to this event :)

Chicken Pot Pie
adapted from The Pastry Queen, by Rebecca Rather

Filling
3 tablespoons unsalted butter
1 large russet potato, peeled and diced
1 medium-size yellow onion, chopped
3 cloves garlic, minced
1 red bell pepper, diced
8 ounces button mushrooms, sliced (instead of mushrooms and the next 2 ingredients, I used a 16 oz bag of frozen mixed veggies which included corn, peas, and green beans)
8 ounces fresh green beans, cut into 1-inch pieces
8 ounce package frozen peas
8 oz frozen carrots
1 cup chopped celery
1/2 teaspoon crushed red pepper flakes
Salt and freshly ground black pepper
1 purchased cooked rotisserie chicken or 1 whole stewed chicken, cooled (I use 4 chicken breasts, poached* and shredded with 2 forks)

* To poach your chicken, put the chicken breast halves in a large saucepan and add lightly salted water to cover. Bring to a boil over high heat, reduce the heat to low and simmer for 30 minutes. You can do this with frozen chicken breasts, too.

Cream Sauce
1/2 cup (1 stick) unsalted butter
1 cup all purpose flour
2 1/2 cups chicken stock
1/2 cup heavy cream
Dash of hot pepper sauce, such as Tabasco
Salt and freshly ground white pepper (I used black pepper)

Pie Crust
1 cup (2 sticks) chilled unsalted butter, cut into 16 pieces
3 cups all purpose flour
10 ounces chilled cream cheese, cut into large pieces
1 teaspoon salt
1/4 teaspoon freshly ground white pepper (I used black pepper)
1 large egg

To make the filling:
If you will be cooking the chicken instead of using store bought rotisserie, start the chicken first so it will be ready to shred while the vegetables are sautéing.

Melt the butter in a large sauté pan set over medium heat. Add the onions, carrots, celery, and potatoes and sauté for 5 minutes. Add the garlic, bell pepper, and mushrooms and sauté about 15 minutes, until the vegetables are tender. Stir in the crushed red pepper and add salt and pepper to taste.

While the vegetables are sautéing, skin the chicken, pull the meat off the bones and shred the meat or cut into bite-size pieces. Stir the peas and chicken into the vegetable mixture. Set the filling aside.

To make the cream sauce:
Melt the butter over medium heat in a large saucepan. Add the flour and whisk until smooth. Whisk in the chicken stock and cook the sauce over medium heat until it thickens to the consistency of a cream soup. Add the cream, hot pepper sauce, and salt and white pepper to taste. Pour the cream sauce over the chicken filling and stir to combine. Fill individual 1/4-cup capacity oven-safe bowls three-quarters of the way to the top with the creamed chicken filling.

To make the crust:
Preheat the oven to 375 degrees F. In the bowl of a food processor fitted with a metal blade, pulse the butter and flour until crumbly. Add the cream cheese, salt, and white pepper. Continue pulsing just until the dough forms a ball.

Set the dough on a flat surface dusted with flour. Use a floured rolling pin to roll the dough out to 1/4-inch thickness. Measure the diameter of the pot pie bowls and cut out dough rounds that are 1 1/2 inches larger in diameter. Whisk the egg in a small bowl. Lay the dough rounds on top of the pot pies, making sure the dough hangs evenly over each bowl. Brush the dough lightly with the beaten egg. Bake the pies for 20 to 25 minutes, until golden brown. Serve immediately.

Alternatively, you can bake this in two 9" dishes or a 13x9" inch dish, rolling out the dough to just slightly larger than the dish and topping it with the pastry, and tucking in the sides of the pastry.


Tip: You can double wrap the pot pies in plastic wrap and freeze them. When you're ready to eat them, bake them (frozen) at 350F for about 30 minutes. They will keep in the freezer for 2-3 weeks.

Monday, December 3, 2007

Grocery Store Recipe


I find most of my recipes online, using websites like allrecipes.com, myrecipes.com, and foodieview.com. I like to read all the reviews for a recipe to see how people liked it, and what modifications are generally agreed upon. A good number of the recipes I try now are also from online food blogs.


This is a simple, yet very flavorful way to prepare salmon. I actually came across this recipe at my local grocery store. They were having a special on salmon, and had a guy standing in front of the seafood department handing out samples of the salmon cooked in a tomato sauce. When I told him how much I enjoyed my sample, he asked me if I wanted the recipe. So, that's where I got this recipe - from the guy at Kroger! :)


I've had this recipe for a few months now, but finally got around to making it tonight. Our local Albertson's had fresh Atlantic Salmon fillets on sale for $4.99/lb. My husband does not really like fish, but I'm trying to cook with it more often now that we are trying to eat healthier. After dinner tonight, he asked me if there was more so he could have seconds! :) I was in utter disbelief, and he responded by saying, "What?! It was good!" This is another great weeknight meal, as it all comes together in less than 20 minutes.

Salmon with Italian Tomato Sauce (I like to call this Tomato Basil Salmon)
from the Kroger Guy

4 tbsp olive oil
3 tbsp white wine
2 tbsp butter (optional) (I did not use any)
1 tsp lime juice (I used lemon juice)
2-3 cloves garlic, finely chopped
Italian seasoning, sprinkle generously (I used 1 tbsp)
Lemon pepper, sprinkle lightly (I used 1/8 tsp, might try 1/4 tsp next time)
Cajun seasoning, sprinkle lightly (I used 1/8 tsp)
1/4 cup Italian tomato basil sauce (homemade or store bought) (I used Prego Tomato, Onion & Garlic)
1 tsp Worcestershire sauce
Sprinkle with parsley flakes (I used about 1/4 tsp)
1/4 cup chopped fresh basil
1 lb salmon, skin removed


Combine all of the ingredients except the salmon in a pan at low heat. Cook for approximately 1-2 minutes. Increase the heat and bring the sauce to a gentle boil, and then reduce the heat, add the salmon, and simmer. Cook until fish flakes off with a fork (4-10 minutes).

Yield: 3 servings

Sunday, December 2, 2007

Baked, Not Fried


I found this recipe from Janet is Hungry by way of Beth's blog, Our Sweet Life. I love fried zucchini, and thought the idea of baking it instead was great. It doesn't taste exactly the same as fried zucchini, but it is healthier and I enjoyed it. This is a great appetizer that comes together with very little prep. You can serve this with a variety of dipping sauces, from bleu cheese to ranch dressing to marinara.

Baked Zucchini Coins
from Janet is Hungry


1/2 cup cornmeal (I used Italian bread crumbs)
1/4 cup whole wheat flour (I used regular all-purpose flour)
1 tsp salt
1 tsp dried basil (I omitted this since I used Italian bread crumbs)
freshly ground pepper
1 zucchini
1 egg
olive oil

Preheat oven to 425F.

Mix flour, cornmeal, salt, basil and pepper on a plate.

Beat egg in a small bowl.

Slice zucchini into 1/4" thick coins (you can do sticks, but its easier to brown them more evenly in the over if they are coins because you only have to flip them once). Dip zucchini into egg and then into cornmeal mixture.

Coat a parchment lined cookie sheet with a couple of tablespoons of olive oil (use it generously - if you don't use enough olive oil, the zucchinis won't brown evenly). Arrange zucchini coins on cookie sheet and bake for about 10 minutes per side, until golden brown.

Serve with bottled blue cheese or ranch dressing. (I served this with ranch dressing and marinara sauce.)

Saturday, December 1, 2007

Gingerbread Yule Log


When I was home for Thanksgiving, I took the opportunity to flip through my mother-in-law's extensive cookbook collection. I could spend days looking at cookbooks, but I only had the chance to look through a few. This was one of the recipes that caught my eye. It looked tasty, but not too complicated... it looked like a pumpkin roll, but with a twist -- gingerbread cake rolled up in and surrounded by a spiced whipped cream.


Like most gingerbread recipes, this one calls for molasses. Molasses is a thick syrup produced from processed sugar cane. When sugarcane juice is boiled, part of it crystallizes, giving us white sugar. What does not crystallize is a thick syrup called molasses. There are three different types of molasses: light, dark, and blackstrap. Light molasses has only been boiled once - it is very thin and sweet. Dark molasses has been boiled twice, making it darker, thicker, and less sweet. Blackstrap molasses has been boiled at least three times and is very thick and actually bitter. You can substitute light and dark molasses for each other in any recipe, depending on whether you want a light or deep molasses flavor imparted to the dish. A few interesting tidbits:

* You can place a rusty object in 1 part molasses and 9 parts water and after 2 weeks it will lose its rust because the molasses chelates (binds) the rust.
* Blackstrap molasses is not normally eaten, but is used in cattle feed instead.
* Brown sugar is just white sugar mixed with molasses.
* There are various substitutions for molasses (but the flavor will be affected):
  • Substitute 1 cup honey, dark corn syrup or maple syrup for 1 cup molasses.
  • Substitute 3/4 cup light or dark brown sugar with 1 tsp cream of tartar for 1 cup molasses.
  • Substitute 3/4 cup light or dark brown sugar dissolved in 1/4 cup hot water (or liquid in recipe) for 1 cup molasses.

The nice thing about this log is that you can slice off a piece, taste it, and then re-frost it and no one will know the difference ;) To be honest, I wasn't too impressed with the recipe. The spiced whipped cream was delicious, but I thought that the cake wasn't very moist. It was actually a little tough... I'm not sure if that was because I beat the eggs too long? My husband thought it was good but not great... but thought it was good enough to take to work with him. I'm not sure if his friends have less discerning palates, or if the cake soaks up some of the moisture from the whipped topping overnight, but everyone who tried it enjoyed it and even came back for seconds. So, I'm not sure if I will be making this recipe again, but decided to blog about it since everyone who tried it told my husband that it was 'blog-worthy' ...so here it is :)

Gingerbread Yule Log
from Bernadette Colvin, Taste of Home's Holiday Get-Togethers 2006

3 eggs, separated
1/2 cup molasses
1 tbsp butter, melted
1/4 cup sugar
1 cup all purpose flour
3/4 tsp each baking powder and baking soda
1/2 tsp each ground cinnamon, ginger and cloves
1/8 tsp salt

Spiced Cream Filling:
1-1/2 cups heavy whipping cream
1/3 cup confectioner's sugar
1 tsp ground cinnamon
1 tsp vanilla extract
1/4 tsp ground cloves

Additional ground cinnamon, optional


In a mixing bowl, beat yolks on high until thickened, about 3 minutes. Beat in molasses and butter. In another bowl, beat whites until foamy; gradually add sugar, beating until soft peaks form. Fold into yolk mixture. Combine dry ingredients; gently fold into egg mixture until well mixed. Spread in a greased and floured waxed paper-lined 15x10x1" baking pan. Bake at 375F for 9-12 minutes or until cake springs back when lightly touched.

Turn onto a linen towel dusted with confectioner's sugar. Peel off paper and roll cake up in towel, starting with a short side. Cool on a wire rack. Meanwhile, beat the first five filling ingredients in a mixing bowl until soft peaks form. Unroll cake; spread with half the filling. Roll up. Place on serving plate. Spread remaining filling over cake. Sprinkle with cinnamon if desired.

Yield: 10 servings.