


This week's Tuesdays with Dorie (TWD) recipe was chosen by Natalie of Burned Bits: the Russian Grandmothers' Apple Pie-Cake. It is technically an apple pie, not a cake, but Dorie calls it an apple pie-cake because the crust is "soft, thick and sweet." I was really excited when I saw that this was the recipe of the week, as I love anything with fruit in it, and I especially love apple pie!
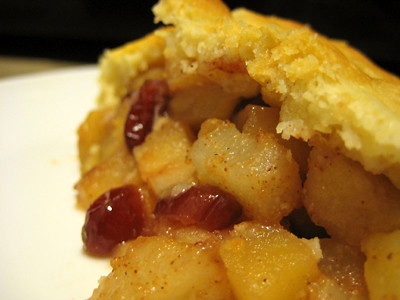
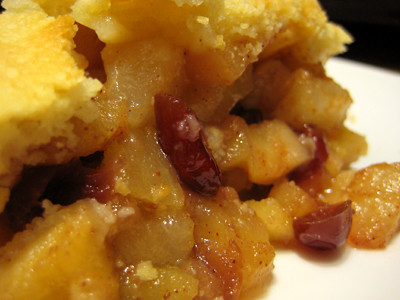
I had originally planned on making turnovers with this recipe. I've made plenty of pies in the past, but never turnovers. So this seemed like the perfect opportunity to do so - plus it would be easier to send to school with my husband - each person could have their own cute little turnover! Leigh and I got to talking and came up with the brilliant idea to play around with the recipe and make it with apples, pears, and cranberries! I would definitely recommend this combination - it's a nice change from the usual apples and raisins.
The recipe says that "when properly combined, the dough should almost clean the sides of the bowl." I felt like I was reading a recipe for a yeast bread. I wasn't sure what Dorie meant by this - does she mean that you should continue to add flour, like when you make bread dough, until it flops around on the dough hook and doesn't stick to the sides of the mixing bowl? Based on some comments I had read from other TWD bakers, I knew that this dough was going to be sticky. But I wasn't sure how much flour to add to avoid this problem. Dorie says that typically, you'll have to add another 1/4 cup of flour to the dough (for a total of 3-1/2 cups) to get it to the proper consistency. Well, I added an extra 1/4 cup beyond that and still ended up with some pretty sticky dough! I was weary of adding too much flour as well, so I proceeded to refrigerate my dough and hope for the best.
I was able to put together one cute little turnover before giving up and switching to Plan B (the regular pie). The dough was just too sticky to work with, even after ample refrigeration. Even then, after rolling out the dough into a rectangle, I found it hard to transfer it to the baking pan in one piece and had to patch it together to cover the entire pan. I think part of the problem lies within the fact that Dorie simply calls for "the juice of one lemon" instead of specifying an exact measurement. Lemons come in many sizes, and depending on how thoroughly you squeeze them, the amount of juice you can get from "one lemon" can vary greatly. I'm sure that this affects the amount of flour required to make the dough just right. I wish Dorie would have been more specific here, as it would have made the recipe a little more fool proof. So, here you have it: my little turnover, in all its glory :)

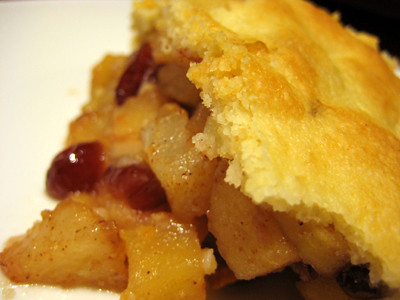
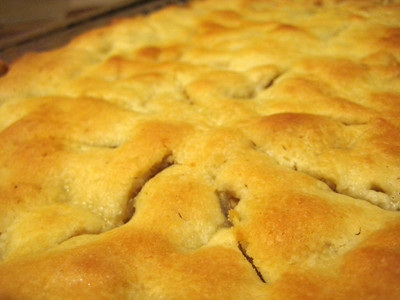
I also found that my crust started to brown very quickly and a bit unevenly. Normally, I use a pie crust shield to keep the edges of my apple pies from burning, but seeing as this was baked in a rectangular baking pan, I had to go the low tech route and make my own shield with foil. As the edges started to brown, I covered the entire pie with foil. Towards the end of the baking time, I cut a hole in the middle of my foil so that I could keep the edges covered and let the center of the crust brown. This seemed to work well.

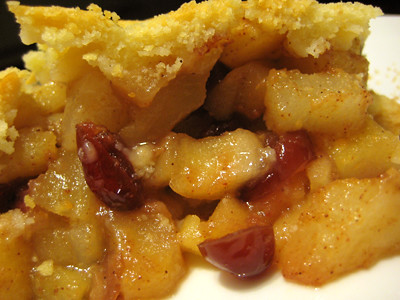
My fruit filling ended up being a little overcooked. I like mine to still have a little bit of a crunch to it after it has been baked. I think this was due to the fact that I chopped my fruit up into itty bitty chunks with the intent of making turnovers... I'm guessing that if I had sliced them like Dorie recommended for the pie, they would have turned out better.
The dough/crust for this pie is certainly different and very delicious. When it was fresh out of the oven and still barely warm, the crust tastes almost like a cross between your traditional pie crust and a shortbread cookie! The next day it softens up quite a bit and tastes more cakey like Dorie says it's supposed to. I think I prefer the slight crunch it has when it is fresh out of the oven.
Overall, I thought this recipe was good. I'm not sure if I will be making it again, though, because I just haven't been able to find anything better than my mother-in-law's apple crumb pie (I hope to be able to blog about that one soon). I always prefer a sugary streusel topping over a traditional pie crust. If you're the kind of person who can't get enough pie crust, though, you need to give this recipe a try! :)
Thanks Natalie, for picking this week's recipe. I love apple pie and this was my first time ever making my own pie crust! (And my first time making a turnover!) Make sure you check out the blog roll on the Tuesdays with Dorie blog to see what everyone else thought of this "pie-cake."
Russian Grandmothers' Apple Pie-Cake
from Baking: From My Home to Yours, by Dorie Greenspan
For The Dough
2 sticks (8 ounces) unsalted butter, at room temperature
1 cup sugar
2 large eggs
1 tablespoon baking powder
1/2 teaspoon salt
Juice of 1 lemon
3 1/4 - 3 1/2 cups all-purpose flour (I used 3-3/4 cups)
For The Apples
10 medium apples, all one kind or a mix (Dorie likes to use Fuji , Golden Delicious and Ida Reds; her grandmother probably used dry baking apples like Cordland and Rome) (I used 5 Golden Delicious Apples and 5 Anjou Pears)
Squirt of fresh lemon juice
1 cup moist, plump raisins (dark or golden) (I used dried cranberries)
1/4 cup sugar
1 1/4 teaspoons ground cinnamon
Sugar, preferably decorating (coarse) sugar, for dusting
To Make The Dough:
Working with a stand mixer, preferably fitted with a paddle attachment, or with a hand mixer in a large bowl, beat the butter and sugar together on medium speed until smooth, about 2 minutes. Add the eggs and continue to beat until the mixture is light and fluffy, about 3 minutes more. Reduce the mixer speed to low, add the baking powder and salt and mix just to combine. Add the lemon juice - the dough will probably curdle, but don't worry about it. Still working on low speed, slowly but steadily add 3 1/4 cups of the flour, mixing to incorporate it and scraping down the bowl as needed. The dough is meant to be soft, but if you think it looks more like a batter than a dough at this point, add the extra 1/4 cup flour. (The dough usually needs the extra flour.) When properly combined, the dough should almost clean the sides of the bowl.
Turn the dough out onto a work surface, gather it into a ball and divide it in half. Shape each half into a rectangle. Wrap the dough in plastic wrap and refrigerate for at least 2 hours, or for up to 3 days. (The dough can be wrapped airtight and frozen for up to 2 months; defrost overnight in the refrigerator.)
To Make The Apples:
Peel and core the apples and cut into slices about 1/4 inch thick; cut the slices in half crosswise if you want. Toss the slices in a bowl with a little lemon juice - even with the juice, the apples may turn brown, but that's fine - and add the raisins. Mix the sugar and cinnamon together, sprinkle over the apples and stir to coat evenly. Taste an apple and add more sugar, cinnamon, and/or lemon juice if you like.
Getting Ready to Bake:
Center a rack in the oven and preheat the oven to 375 degrees F. Generously butter a 9x12-inch baking pan (Pyrex is good) and place it on a baking sheet lined with parchment or a silicone mat (I used a 9x13-inch pan).
Remove the dough from the fridge. If it is too hard to roll and it cracks, either let it sit at room temperature for about 15 minutes or give it a few bashes with your rolling pin to get it moving. Once it's a little more malleable, you've got a few choices. You can roll it on a well-floured work surface or roll it between sheets of plastic wrap or wax paper. You can even press or roll out pieces of the dough and patch them together in the pan - because of the baking powder in the dough, it will puff and self-heal under the oven's heat. Roll the dough out until it is just a little larger all around than your pan and about 1/4 inch thick - you don't want the dough to be too thin, because you really want to taste it. Transfer the dough to the pan. If the dough comes up the sides of the pan, that's fine; if it doesn't that's fine too.
Give the apples another toss in the bowl, then turn them into the pan and, using your hands, spread them evenly across the bottom.
Roll out the second piece of dough and position it over the apples. Cut the dough so you've got a 1/4 to 1/2 inch overhang and tuck the excess into the sides of the pan, as though you were making a bed. (If you don't have that much overhang, just press what you've got against the sides of the pan.)
Brush the top of the dough lightly with water and sprinkle sugar over the dough. Using a small sharp knife, cut 6 to 8 evenly spaced slits in the dough.
Bake for 65 to 80 minutes, or until the dough is a nice golden brown and the juices from the apples are bubbling up through the slits. Transfer the baking pan to a cooling rack and cool to just warm or to room temperature. You'll be tempted to taste it sooner, but I think the dough needs a little time to rest.
Apple Turnovers
Roll out the dough until it is a little thinner than 1/4 inch and cut it into circles 4-1/2 to 5 inches in diameter. Fill each one with 1 to 2 tablespoons of the apple filling (I chop the apples when I'm using them in a small turnover) or substitute another fruit filling, apple butter and apple chunks or some great preserves. Brush the edges of each dough circle with a little water, fold over the dough to make a half circle pocket and use the tines of a fork to seal the edges. Transfer to a baking sheet lined with parchment or a silicone mat and cut a steam slit in the top of each turnover. Bake in a 375-degree-F oven for about 20 minutes, or until the dough is golden brown and you can smell the sweet filling. Cool to room temperature before serving.


The turnover was a great idea!
ReplyDeleteI ran into the same problems with the dough, sticky and hard to work with. Learned a couple of things from your post though, like the crust protector, never seen anything like that here!
ReplyDeleteGreat pictures by the way!!
I'm glad I ditched my idea of the turnovers after I saw how sticky the dough was, but yours turned out so cute!
ReplyDeleteYour turnover is so cute! I've never made one before, but might when I make this recipe again.
ReplyDeleteIt looks fantastic! and I love the turnover in all its glory!
ReplyDeleteWow, this looks incredible!!!
ReplyDeleteWow looks so delicious
ReplyDeleteYour pictures are enough to make a girl half starve. That first one has me trying to lick the screen, it ain't even right!
ReplyDeleteIt looks wonderful..love the little turnover! Great idea to use pears & apples...sounds yummy!
ReplyDeleteHiya Jaime, your pie looks great! I considered making turnovers too, but I'm so glad that I didn't, as I too had a bit of a drama with the dough. Rolling it out on floured work surface worked out best, and the less it was handled the better. Do you think that the pears made the filling juicier and stewed the fruit, lending to a softer filling? Just a thought.
ReplyDeleteI love how you played around with the recipe! and your turnover is darling! The cranberry idea sounds pretty delicious! You've done yummy work!
ReplyDeleteDelicious looking photos and the turnover! What a fab idea!!!
ReplyDeleteMevrouw Cupcake - thanks! i do think that part of it, besides cutting the pieces smaller, was the fact that i used pears in addition to the apples!
ReplyDeleteToo cute! I love the fruit combos too. Great idea. Fabulous job Jaime!
ReplyDeleteTurnover, now I knew what this means. Well done!
ReplyDeleteUlrike from Küchenlatein
GMTA! I made the recipe with the intention of doing the turnovers so I chopped my apples into little bits but I had so much dough leftover I went for pie-cake too. Your turnover is quite adorable! Great job!
ReplyDelete-Clara
http://iheartfood4thought.wordpress.com
Your turnovers look great! I want to do turnovers next time. I love your idea of using apples, pears, and cranberries.
ReplyDeleteGreat job on the turnover! And I love that you added pears - I thought about it but I've never baked with them before and was nervous about using them in this recipe.
ReplyDeleteYour crust almost looks to be a bit like cornmeal crust. Now, I bet that would be tasty! I love the turnover idea also! I am totally with you on the unspecific measurements. Those were a bit too vague for me this time.
ReplyDeleteYour crust looks wonderful!
ReplyDeleteYour filling looks wonderful, must be the pears! Nice work!
ReplyDeleteWow!!!! This seems soooo yummy! I'm bookmarking this one!
ReplyDeleteBaked apply goodness...mmm... I like cranberries with baked apples. The apple turnover is a great idea.
ReplyDeleteCranberries sound great!
ReplyDeleteThe pears and cranberries were such a great idea! I'm going to have to try that one day.
ReplyDeleteYour pie-cake looks great. As does the turnover!
Pears and cranberries - what a great idea! Your turnover looks so cute!
ReplyDeleteI rolled my dough out between waxed paper and I thought about putting them in the fridge for a few minutes after rolling it out. But I didn't have the patience - maybe next time!
Ohh I love the flavor combo Jamie. They look fab!
ReplyDeleteThe cake looks great. I found your blog through the blog roll and just wanted to say i like it a lot.
ReplyDeleteLooks great! And I love your little turnover. :) I should've done that too.
ReplyDeletecran-apple-pear filling sound delicious! and what a cute baby turnover!
ReplyDeleteI just made this on my blog. It was such a great and very unique treat! I would love if you'd come take a look :) http://piesandplots.net/apple-pie-cake/
ReplyDelete