Saturday, October 13, 2007

Chicken Tikka Masala with Garlic Naan

This is my absolute favorite Indian dish. It is a grilled chicken in a tomato cream sauce. I've made this recipe several times, with various modifications... until I finally perfected it! :) All of my modifications have been noted below. The major changes I made include doubling the sauce, and adding garam masala to the list of spices. If you are trying to cut back on calories, you can substitute all of the cream for fat free evaporated milk and you can't really tell the difference :) Be warned that this is a very spicy dish, and if you don't tolerate spicy food very well, you may want to omit or decrease the amount of cayenne/jalapeno.

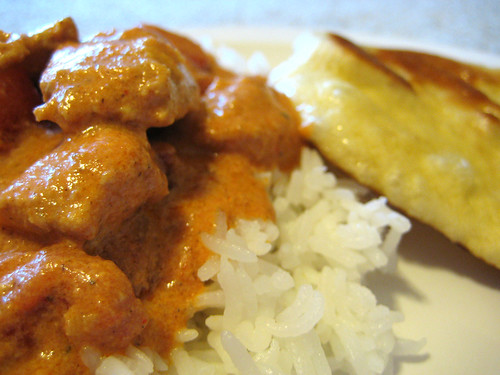
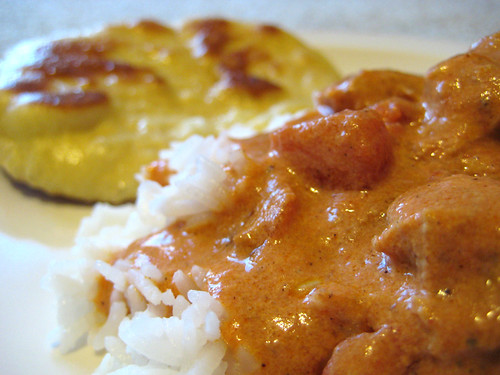
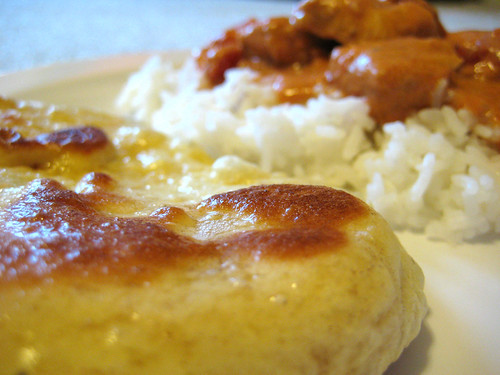
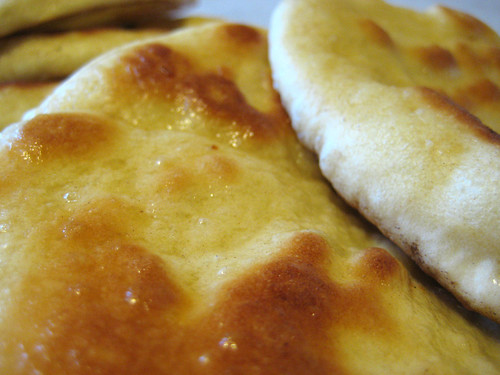
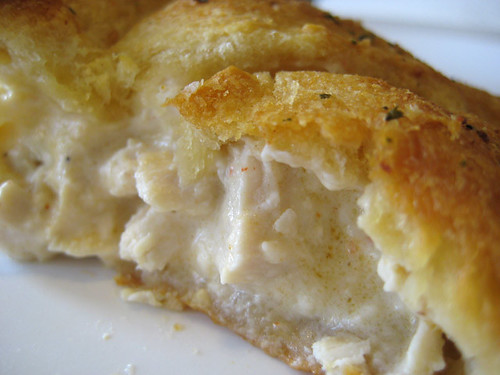
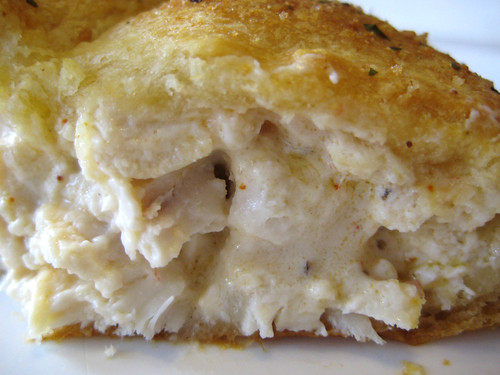
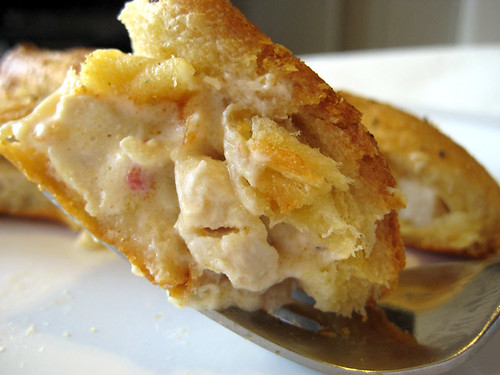
My second favorite thing at an Indian restaurant is the naan. Naan is a round flatbread that is great for scooping up your food, and I love to use it to soak up all the yummy sauce from the dish :) Having recently overcome my fear of working with yeast, I did not let this naan recipe scare me off! It was a decent amount of work, but so worth it! I saw several reviewers indicate that they halved the recipe but I did not for two reasons: (1) it's hard to halve an egg! and (2) I figured I could do all the work just once, and then freeze the leftovers.

We do not have a grill, so I made my naan on the stove with my sauté pan. Based on some of the reviews, I also added 1/2 tsp of baking soda to the dry ingredients. I also did not add the garlic to the dough, but rather sautéed it in the melted butter. The garlic flavor gets infused into the butter and gives the naan a nice garlic flavor, but it isn't as garlicky as some of the garlic naan I have had in restaurants.

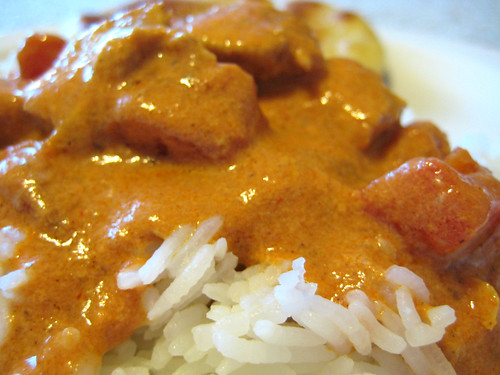
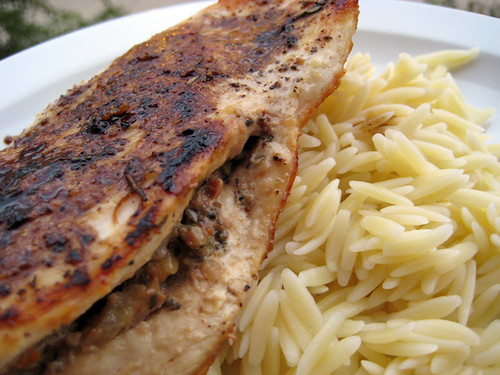
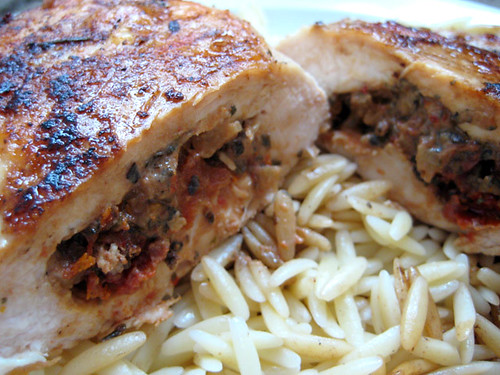
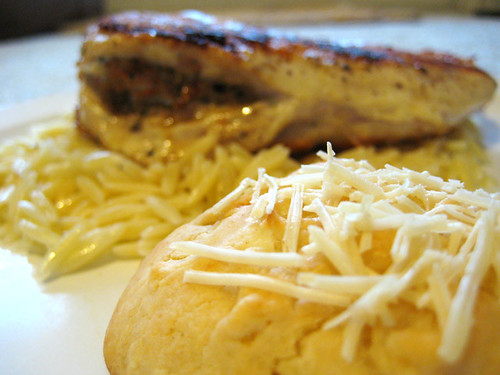
This is typically served with basmati rice, but since we didn't have any on hand, I just served it with jasmine rice. Now that I have learned how to make the naan, I love that we no longer have to go out in order for me to have my favorite Indian meal! :)

Chicken Tikka Masala
from Allrecipes.com


Marinade:
1 cup yogurt (I used plain vanilla yogurt)
1 tablespoon lemon juice
2 teaspoons ground cumin
1 teaspoon ground cinnamon
2 teaspoons cayenne pepper (decrease this if you don't have a high tolerance for spicy food)
2 teaspoons freshly ground black pepper
1 tablespoon minced fresh ginger
4 teaspoons salt, or to taste (1 tsp is plenty)
1 teaspon garam masala
3 boneless skinless chicken breasts, cut into bite-size pieces
4 long skewers

Sauce:
1 tablespoon butter (I use 2 tbsp)
1 clove garlic, minced (I use 4 cloves garlic)
1 jalapeno pepper, finely chopped (I use 1 tbsp garlic chili paste)
2 teaspoons ground cumin
2 teaspoons paprika
2 teaspoons garam masala
3 teaspoons salt, or to taste (I use 1 tsp)
1 (8 ounce) can tomato sauce (I use 2 cans)
1 cup heavy cream (I use a 12oz can fat free evaporated milk + 1/4 cup cream; or 2 cups fat free evaporated milk)
1 tomato, chopped, or 1 can diced tomatoes (do not drain)
1/4 cup chopped fresh cilantro


In a large bowl, combine marinade ingredients: yogurt, lemon juice, cumin, cinnamon, cayenne, black pepper, ginger, and salt (I also add garam masala). Stir in chicken, cover, and refrigerate for 1 hour. (I normally allow it to marinate at least a few hours, or overnight.)

Preheat a grill for high heat. Lightly oil the grill grate. Thread chicken onto skewers, and discard marinade. Grill until juices run clear, about 5 minutes on each side. (Instead of skewers, I simply grill the chicken on my George Foreman grill.)

Melt butter in a large heavy skillet over medium heat. Saute garlic and jalapeno for 1 minute. Season with cumin, paprika, garam masala and salt. Stir in tomato sauce and cream (I also add the chopped/diced tomatoes here). Simmer on low heat until sauce thickens, about 20 minutes. Add grilled chicken, and simmer for 10 minutes. Transfer to a serving platter, and garnish with fresh cilantro.
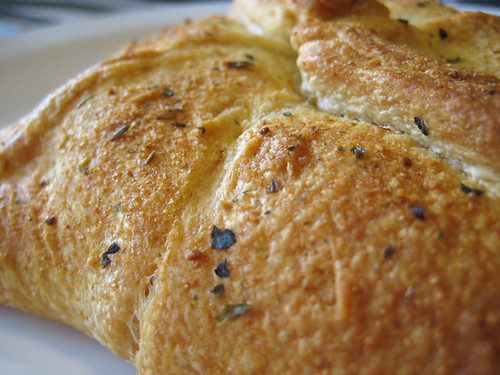
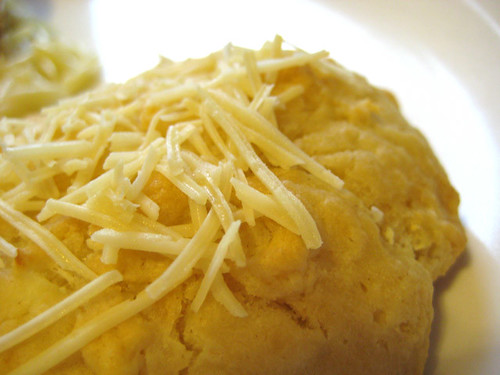
Garlic Naan
from Allrecipes.com


1 (.25 ounce) package active dry yeast
1 cup warm water
1/4 cup white sugar
3 tablespoons milk (for more authentic flavor, use 3 tbsp vanilla yogurt instead)
1 egg, beaten
2 teaspoons salt
1/2 tsp baking soda
4 1/2 cups bread flour
2 teaspoons minced garlic (optional)
1/4 cup butter, melted


In a large bowl, dissolve yeast in warm water (I also added a pinch of sugar). Let stand about 10 minutes, until frothy. Stir in sugar, milk, egg, salt, baking soda, and enough flour to make a soft dough. Knead for 6 to 8 minutes on a lightly floured surface, or until smooth. (I added the listed ingredients and 2-1/2 cups flour into my KitchenAid mixer, mixed on medium speed using the flat beater, then switched to the dough hook and added 1/2 cup of flour until the dough was smooth and did not stick to the edges of the bowl any longer. Today, that happened to be a total of 4-1/2 cups as directed by the recipe.) Place dough in a well oiled bowl, cover with a damp cloth, and set aside to rise. Let it rise 1 hour, until the dough has doubled in volume. (I heated my oven to 150F, turned it off, and then let the dough rise in the warmed oven.)
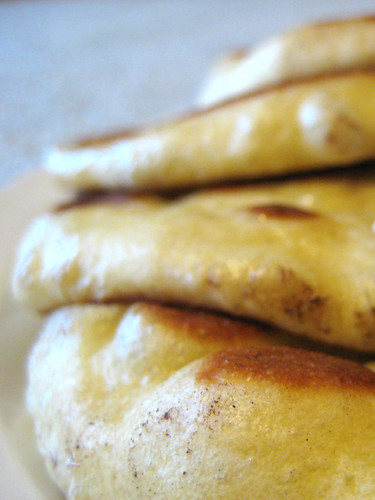
Punch down dough, and knead in garlic. (I did not add the garlic here) Pinch off small handfuls of dough about the size of a golf ball. Roll into balls, and place on a tray. Cover with a towel, and allow to rise until doubled in size, about 30 minutes.
During the second rising, preheat grill to high heat.


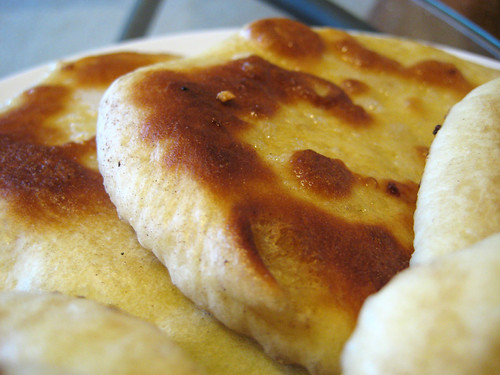
At grill side, roll one ball of dough out into a thin circle. Lightly oil grill. Place dough on grill, and cook for 2 to 3 minutes, or until puffy and lightly browned. Brush uncooked side with butter, and turn over. Brush cooked side with butter, and cook until browned, another 2 to 4 minutes. Remove from grill, and continue the process until all the naan has been prepared.
For one less piece of cookware to wash in the end, melt butter in the sauté pan you will be cooking the naan in. Sauté garlic over medium heat until golden. Strain the garlic and save the garlic infused butter to brush over the naan. (If you do not strain the garlic, it will burn on the naan while cooking.)
Alternate method: Heat a sauté pan over medium-low heat (it should still be lightly buttered from the garlic sauté). I did not watch the time during this process but found that by the time I had rolled one of the balls out into a thin circle and added it to the pan, it was time to flip the first piece. So here's what I basically did: roll out dough ball #1, place in pan and close lid. Roll out dough ball #2; open lid, brush #1 with butter and flip; add #2 to the pan, and replace the lid. (No need to brush the cooked side of #1 with butter after flipping as the recipe indicates.) Roll out dough ball #3; open lid, remove #1 onto your serving dish; brush #2 with butter and flip; add #3 to the pan and close lid. Repeat this process until done.


Thursday, October 11, 2007

Toffee-Topped Pineapple Upside-Down Cake


I love pineapple upside-down cake. I also love anything that has caramel or toffee in it. So when I saw this recipe, I knew I had to try it :) The toffee topping adds great flavor to this traditional cake.

I don't have the 2-cup baking dishes, so I just make one big cake instead, using a 9x9" pan. Sometimes I will just omit the maraschino cherries (but still use the pineapple rings), other times I just use a can of crushed pineapple instead.


What I love about this cake is that it always comes out super moist. The rum adds a nice subtle flavor to it as well.

Toffee-Topped Pineapple Upside-Down Cake
from Hershey's Favorite Brand Name Recipes


1/4 cup light corn syrup
1/4 cup (1/2 stick) butter or margarine, melted
1 cup Heath Bits 'o Brickle or Skor English Toffee Bits
4 pineapple rings (I used one 20 oz can of crushed pineapple)
4 maraschino cherries (I omitted these)
1/4 cup (1/2 stick) butter or margarine, softened
2/3 cup sugar
1 tbsp rum or 1 tsp rum extract (I recommend Appleton Estate Jamaica Rum)
1 egg
1-1/3 cups all-purpose flour
2 tsp baking powder
2/3 cup milk


Heat oven to 350F. Lightly coat inside of 4 individual 2-cup baking dishes with vegetable oil spray.

Stir together 1 tbsp corn syrup and 1 tbsp melted butter in each of 4 baking dishes. Sprinkle each with 1 tbsp toffee. Center pineapple rings on toffee and place cherries in centers.


Beat softened butter and sugar in small bowl until blended. Add rum and egg, beating well. Stir together flour and baking powder; add alternately with milk to rum mixture, beating until smooth. Spoon about 3/4 cup batter into each prepared dish.


Bake 25 to 30 minutes or until wooden pick inserted into center comes out clean. Immediately invert onto serving dish. Refrigerate leftovers.


Wednesday, October 10, 2007

Savory Crescent Chicken Squares


I discovered this Pillsbury recipe quite some time ago, and it has become one of our favorites. It's a very simple recipe, and makes for a great weeknight meal :) It really reminds me of the "chicken bake" you can get at Costco. Though I've never tried it, I think these would be fabulous with some bacon crumbles added to the mix. It really is a great base recipe, and you can modify it to suit your tastes, like I did.

Savory Crescent Chicken Squares
from Doris Castle on Pillsbury.com


3 oz. cream cheese, softened
1 tbsp butter or margarine, softened
2 cups cubed cooked chicken (this is 2-3 chicken breasts, depending on the size)
1 tbsp chopped fresh chives or onion (I often omit this, as we rarely have any on hand)
1/4 tsp salt
1/8 tsp pepper
2 tbsp milk
1 tbsp chopped pimientos, if desired (I omit this, but add 1/2 tsp Sambal Oelek chili paste since we like everything spicy!)
2 tbsp ranch dressing
1 (8 oz) can Pillsbury Refrigerated Crescent Dinner Rolls
1 tbsp butter or margarine, melted (I only use 1/2 tbsp)
3/4 cup seasoned croutons, crushed (I sprinkle with Johnny's Great Caesar Garlic Spread and Seasoning instead)

Heat oven to 350°F. In medium bowl, combine cream cheese and 1 tablespoon softened margarine; beat until smooth. Add chicken, chives, salt, pepper, milk and pimientos; mix well.

Separate dough into 4 rectangles. Firmly press perforations to seal. Spoon 1/2 cup chicken mixture onto center of each rectangle. Pull 4 corners of dough to center of chicken mixture; twist firmly. Pinch edges to seal. Place on ungreased cookie sheet. Brush tops of sandwiches with 1 tablespoon melted margarine; sprinkle with crushed croutons.


Bake at 350°F. for 25 to 30 minutes or until golden brown.

Sunday, October 7, 2007

I finally overcame my fear...

...of working with yeast! Last year, I tried making some bread for Thanksgiving and failed miserably... my dough did not rise and I ended up with what seemed like a small piece of concrete! So needless to say, I have been weary and have not made any attempts since then to work with yeast.

This weekend I finally overcame my fear and made a second attempt. When I saw this recipe for brown sugar raisin bread on Annie's Eats, I knew I wanted to try it. I was so worried the whole time I was making this, and kept second guessing my techniques. When I got to the step that says Knead on medium-low speed, adding flour 1 Tbsp at a time if the dough sticks, until smooth and elastic, about 4 minutes I was really concerned. I wish they had specified how much flour to add, but of course they can't because it can vary based on the humidity of your kitchen. I did not know how much flour to add, and did not want to add too much and end up with a brick. It definitely took me longer than 4 minutes to get the dough to where it needed to be, more like 10-15 minutes with my KitchenAid set at speed 2 (KitchenAid says not to use the dough hook at higher speeds). It seemed like I kept adding more and more flour and nothing was happening to the dough. I must have done it right, though, because in the end, I had two soft and moist, yummy loaves of bread :)


To measure the temperature of the water and milk, I used my digital meat thermometer! I love this little gadget. I first learned about it on Alton Brown's Good Eats, and now I use it for everything. It has a heat proof cord so you can stick it in your meat, close the oven door, and leave it in while cooking. Not only do I use it for meat, but I also use it as a candy thermometer... and now I've also used it for making bread! I would high recommend this thermometer for anyone who doesn't have one already :)

When adding the fill to the loaves, I eyeballed it instead of measuring the filling out and splitting it exactly in half. Well, turns out I added more filling to one loaf than the other... and I love how the one with more filling turned out. So I think next time I make this, I will add more filling to each loaf, and those changes have been indicated below.

Now that I have successfully created something with yeast, next on my list is cinnamon rolls! So stay tuned...

Brown Sugar-Raisin Bread
from Williams-Sonoma

1 Tbs. active dry yeast
3 Tbs. granulated sugar
1 1/4 cups warm water (105° to 115°F)
1 cup warm milk (105° to 115°F)
3 Tbs. unsalted butter, melted
1 Tbs. salt
1 egg, lightly beaten
6 to 6 1/4 cups bread flour, plus more as needed
3/4 cup golden raisins (I didn't have any, so I just used a total of 1-1/2 cups dark raisins. **After making this a second time, I suggest using 1-3/4 cups)
3/4 cup dark raisins

For the filling:
2/3 cup firmly packed light brown sugar mixed with 4 1/2 tsp. ground cinnamon (** This is even better with 1 cup brown sugar and 2 tbsp + 3/4 tsp cinnamon)

In a bowl, sprinkle the yeast and a pinch of the granulated sugar over 1⁄2 cup of the water and stir to dissolve. Let stand until foamy, about 10 minutes. (add about 1/2 tbsp of sugar - otherwise it only slightly foams.)

In the bowl of an electric mixer fitted with the flat beater, combine the remaining 3/4 cup water, the milk, butter, the remaining granulated sugar, salt, egg and 2 cups of the flour. Beat on medium speed until creamy, about 1 minute. Add the yeast mixture and 1⁄2 cup of the flour and beat for 1 minute. Add the raisins, then beat in the remaining flour, 1⁄2 cup at a time, until the dough pulls away from the sides of the bowl.

Switch to the dough hook. Knead on medium-low speed (speed 2 on your KitchenAid), adding flour 1 Tbsp at a time if the dough sticks, until smooth and elastic, about 4 minutes. (As you add the flour, the dough will become less sticky, until eventually the dough will not stick to the sides of the bowl at all and the dough hook will carry the dough around the bowl with it.) Transfer the dough to a greased deep bowl and turn to coat it. Cover loosely with plastic wrap and let rise at room temperature until doubled in bulk, 1 to 1 1⁄2 hours. (Since my husband keeps the apartment fairly cool, I heated my oven to 175°F, turned it off, left the door open for a few minutes to let some of the heat out, and then put the dough inside the oven to rise.)

Lightly grease two 9-by-5-inch loaf pans.

Turn the dough out onto a lightly floured board. Divide the dough in half and roll or pat each half into an 8-by-12-inch rectangle. Lightly sprinkle each rectangle with half of the filling, leaving a 1-inch border on all sides. Beginning at a narrow end, tightly roll up each rectangle into a compact log. Pinch the ends and the long seam to seal in the filling. Place each log, seam side down, in a prepared pan. Cover loosely with plastic wrap and let rise at room temperature until the dough is about 1 inch above the rim of each pan, 1 to 1 1⁄2 hours.

Preheat an oven to 350°F. Bake until the loaves are golden brown and pull away from the sides of the pan, 35 to 40 minutes. Turn the loaves out onto wire racks and let cool completely. Makes two 9-by-5-inch loaves.

Saturday, October 6, 2007

Try some goat cheese!


I had never had goat cheese until about a month ago. In general, I do not like the more pungent cheeses like gorgonzola and bleu cheese... so I am very reluctant to try new and different cheeses. However, after hearing so many cooks on the What's Cooking? Board rave about how wonderful goat cheese is, I finally decided to try it. I love it, and wish I had tried it sooner :) It is a very creamy cheese, and is slightly tart. Since trying it, I have been looking for various ways to cook with it.

I love anything with sun dried tomatoes, so when I saw this recipe for Chicken Breasts Stuffed with Goat Cheese and Sun-Dried Tomatoes on MyRecipes.com, I knew I would like it. The balsamic glaze is a great compliment to the dish too.

This was my first time making a stuffed chicken dish, and to my surprise, it was very simple. After I cut the 'pockets' into my chicken breasts, however, I realized that I was doing it wrong. I started out thinking it was supposed to be like a chicken breast cut almost completely in half but left with a sort of 'hinge' that would sandwich the filling.... and then realized it's just supposed to be a small hole on one end of the breast. Oops! At least it didn't change the taste... next time I'll make it look prettier :)

I served this chicken with orzo and Goat Cheese Drop Biscuits. When I saw these biscuits featured on Oprah, I knew I had to try them. They were good, but I have to admit that the Cheesy Garlic Biscuits I made recently are easier and taste better :) Still, they were a great compliment to the stuffed chicken.

I should add that shortly after I discovered my love for goat cheese, my husband told me that he does not like it! Determined to show him how good it is, I did not tell him that there was goat cheese in this dish until he had finished his plate ;) Needless to say, we'll be adding this dish to our rotation and I will be looking for other ways to use goat cheese in our meals now :)

Chicken Breasts Stuffed with Goat Cheese and Sun-Dried Tomatoes
from CookingLight


1 cup boiling water
1/3
cup sun-dried tomatoes, packed without oil
2
teaspoons olive oil, divided
1/2
cup chopped shallots, divided (I didn't have any on hand, so these were omitted)
1 1/2
teaspoons sugar
3
garlic cloves, minced
2 1/2
tablespoons balsamic vinegar, divided
1/2
cup (2 ounces) crumbled goat cheese
2
tablespoons chopped fresh basil (I didn't have any fresh basil on hand, so I used 2 tsp dried)
3/4
teaspoon salt, divided
4
(6-ounce) skinless, boneless chicken breast halves
1/8
teaspoon freshly ground black pepper
3/4
cup fat-free, less-sodium chicken broth
1/4
teaspoon dried thyme
2
teaspoons cornstarch
2
teaspoons water
Combine boiling water and tomatoes in a bowl; cover and let stand 30 minutes or until soft. Drain and finely chop. (I had the kind that are packed in oil so I simply drained the oil and omitted the boiling step.)

Heat 1 teaspoon oil in a large nonstick skillet over medium heat. Add 1/3 cup shallots, sugar, and garlic; cook 4 minutes or until lightly browned, stirring frequently. Spoon into a bowl; stir in 1 1/2 teaspoons vinegar.

Combine chopped tomatoes, shallot mixture, cheese, basil, and 1/4 teaspoon salt, stirring well.

Cut a horizontal slit through thickest portion of each chicken breast half to form a pocket. Stuff about 2 tablespoons cheese mixture into each pocket. Sprinkle chicken evenly with 1/2 teaspoon salt and black pepper.

Heat 1 teaspoon oil in pan over medium-high heat. Add chicken; cook 6 minutes on each side or until done. Remove chicken from pan; cover and keep warm. Add broth, remaining shallots, 2 tablespoons vinegar, and thyme; bring to a boil. Combine cornstarch and water, stirring with a whisk. Add cornstarch mixture to pan; bring to a boil. Cook 1 minute or until sauce is slightly thick, stirring constantly. Serve sauce over chicken. (Approximately 2 tbsp per chicken breast.)


Goat Cheese Drop Biscuits
from Art Smith


2 cups self-rising flour (if you do not have any, use 2 cups all purpose flour + 3 tsp baking powder + 1 tsp salt)
2 tsp. baking powder
1/2 tsp. baking soda
1 tsp. salt
4 Tbsp. (2 ounces) cold butter
4 Tbsp. (2 ounces) goat cheese
1 cup (8 ounces) buttermilk
Extra butter to grease pan and top biscuits
1/4 cup grated parmesan cheese
Preheat your oven to 425°. Place one 10-inch cast iron pan into the oven while it is preheating. (I do not have a cast iron pan/skillet but found that my All-Clad pans are oven safe up to 500°.) Place flour, salt, baking soda and baking powder into a medium-sized bowl. Cut in the butter and goat cheese. Make a well in the middle of the ingredients and pour in the milk. Stir until the mix is moistened, adding an extra tablespoon of milk if needed.

Remove the hot skillet from the oven and place a tablespoon of butter into it. When the butter has melted, drop 1/4 cupfuls of batter into the pan, (use a muffin scoop to drop the batter if you have one). Brush the tops of the biscuits with melted butter. Bake from 14–16 minutes until browned on the top and bottom. Remove from the oven and sprinkle with the grated cheese. Enjoy warm!

Thursday, October 4, 2007

Is it really fall already?


It seemed like fall would never come and yet, here we are and it's October already. Here in Dallas, it doesn't quite feel like fall yet, with temperatures still in the 90's! Though of course that doesn't mean it's too early to start making some of those pumpkin recipes :)

I've never had or made a pumpkin roll before, or any other kind of roll for that matter. I was originally going to make the traditional pumpkin roll but then I found a recipe that combined the flavors of pumpkin and orange and it intrigued me. So I decided to make both :) I was honestly a little intimidated by the idea making my own roll, but it really wasn't that difficult.

The Pumpkin Orange Cake Roll is a very light and airy cake, and its pumpkin/orange flavors are complimentary but understated. It was good, but I'm not sure its flavors and texture are for everyone. Personally, I would rate it 3 stars and I'm not sure if I will make it again. That said, if you read the reviews on the website, there are tons of people who gave it 5 stars. So, maybe give it a whirl and see if it's something you like. The more traditional combination of pumpkin and cream cheese, however, is sure to be a crowd pleaser.

Traditional Pumpkin Roll
from VeryBestBaking.com


Cake:
1/4 cup powdered sugar (to sprinkle on towel)
3/4 cup all-purpose flour
1/2 teaspoon baking powder
1/2 teaspoon baking soda
1/2 teaspoon ground cinnamon (next time I'd like to add 1 tsp)
1/2 teaspoon ground cloves
(I think the addition of 1/4 tsp ground ginger would be good too so I'm going to try that next time)
1/4 teaspoon salt
3 large eggs
1 cup granulated sugar
2/3 cup LIBBY'S® 100% Pure Pumpkin
1 cup walnuts, chopped (optional))

Filling:
1 pkg. (8 oz.) cream cheese, at room temperature
1 cup powdered sugar, sifted
6 tablespoons butter or margarine, softened (I'd use just 4 tbsp next time)
1 teaspoon vanilla extract
Powdered sugar (optional for decoration)


PREHEAT oven to 375° F. Grease 15 x 10-inch jelly-roll pan; line with wax paper. (I don't have this type of pan but used this 13x18" baking sheet from WS instead.) Grease and flour paper. Sprinkle a thin, cotton kitchen towel with powdered sugar.

COMBINE flour, baking powder, baking soda, cinnamon, cloves and salt in small bowl. Beat eggs and granulated sugar in large mixer bowl until thick. Beat in pumpkin. Stir in flour mixture. Spread evenly into prepared pan. Sprinkle with nuts.

BAKE for 13 to 15 minutes or until top of cake springs back when touched. (If using a dark-colored pan, begin checking for doneness at 11 minutes. Immediately loosen and turn cake onto prepared towel. Carefully peel off paper. Roll up cake and towel together, starting with narrow end. Cool on wire rack.

FOR FILLING:
BEAT cream cheese, 1 cup powdered sugar, butter and vanilla extract in small mixer bowl until smooth. Carefully unroll cake. Spread cream cheese mixture over cake. Reroll cake. Wrap in plastic wrap and refrigerate at least one hour. Sprinkle with powdered sugar before serving, if desired. (I found that these taste best at room temperature.)


COOKING TIP:
Be sure to put enough powdered sugar on the towel when rolling up the cake so it will not stick.


Pumpkin Orange Cake Roll
from VeryBestBaking.com


1 package (16 oz.) angel food cake mix
2 1/2 teaspoons grated orange peel, divided
1 1/4 cups LIBBY'S® 100% Pure Pumpkin
1/2 cup sugar
1 teaspoon ground cinnamon
1 teaspoon vanilla extract
1/4 cup powdered sugar, plus extra for sprinkling
2 tablespoons Red Currant Jelly, optional

PREHEAT oven to 350°F. Line a 15x10-inch jelly-roll pan with foil. (I don't have this type of pan but used this 13x18" baking sheet from WS instead.) Foil should extend 1 inch above edge of pan. Sprinkle a clean towel with 1/4 cup powdered sugar.

PREPARE cake mix according to package direction, adding 1 ½ teaspoons orange peel at end of mixing time. Spread into prepared pan.


BAKE for 30 minutes or until top of cake springs back when touched. Immediately turn cake onto prepared towel. Carefully peel off foil. Roll up cake and towel together, starting with narrow end. Cool on wire rack.

COMBINE pumpkin, sugar, cinnamon, vanilla extract and remaining orange peel in a medium bowl. Carefully unroll cake; spread pumpkin mixture over cake. Re-roll cake. Sprinkle with powdered sugar. Spoon jelly into small, heavy-duty plastic bag. Cut off corner of bag; squeeze to drizzle jelly over cake. Refrigerate until ready to serve. (I found that these taste best at room temperature.)

Tuesday, October 2, 2007

Key Lime Pie


So, after making the Key Lime Coconut Blondies and the Key Lime Cookies, I still had leftover key lime juice... so I decided to make some Key Lime Pie :) In case you missed my previous posts, and were wondering how many limes you'd need to buy in order to get 1/2 cup juice, I was able to get approximately 1-1/8 cup juice out of a 1 lb. bag of key limes.

When I was making the Key Lime Cookies, I went ahead and juiced all of the limes for future use. So of course by now I had long thrown out the key lime rinds, so I just used the zest of regular Persian limes that I had on hand. I was able to get approximately 1 teaspoon of zest per lime. It would definitely be very time consuming to try to get 1 tablespoon of zest from tiny key limes!


This recipe also includes a basic graham cracker crust that is so good! I have used it for many recipes and don't ever see the need to use a store bought graham cracker crust again :)

Funny story -- one of my co-workers has the cutest little 4 month old kitten. Every time I see the little kitten, I threaten to take her home with me because she's so adorable/playful. Well, after having a slice of this key lime pie today, he told me that I could have his kitten if I would give him the rest of this pie! :) Of course he was just joking, but I thought it was a nice compliment!

Key Lime Pie
from Martha Stewart


1-1/2 cups graham-cracker crumbs
6 tablespoons unsalted butter, melted and cooled (I used 5 tbsp)
3 tablespoons sugar (I used 1/4 cup)
1 can (14 ounces) can sweetened condensed milk (I used fat free and could not notice a difference)
4 large egg yolks
1/2 cup freshly squeezed key-lime juice
1 tablespoon grated key-lime zest, plus more for garnish
1 1/2 cups heavy cream, chilled (I used 1 cup and it was plenty)
2 tablespoons sugar

Heat oven to 375 degrees. Combine graham-cracker crumbs, butter, and 3 tablespoons sugar in a medium bowl; mix well. Press into a 9-inch pie plate, and bake until lightly browned, about 12 minutes. Remove from oven, and transfer to a wire rack until completely cooled.

Lower oven to 325 degrees. In a medium bowl, gently whisk together condensed milk, egg yolks, key-lime juice, and zest. Pour into the prepared, cooled crust.


Return pie to oven, and bake until the center is set but still quivers when the pan is nudged, 15 to 17 minutes. Let cool completely on a wire rack.

Shortly before serving, combine cream and remaining 2 tablespoons sugar in the bowl of an electric mixer fitted with a whisk attachment. Whisk on medium speed until soft peaks form, 2 to 3 minutes. Spoon over cooled pie; garnish with zest. Serve immediately.