Thursday, June 28, 2012

Battenberg Cake (DB)


For the June Daring Bakers' challenge, Mandy of What The Fruitcake?! came to our rescue last minute to present us with the Battenberg Cake challenge! She highlighted Mary Berry’s techniques and recipes to allow us to create this unique little cake with ease.

This cake has far grander beginnings than tea with teddy. It was actually created as a wedding cake for royalty.  The first Battenberg cake was made to celebrate the marriage of Queen Victoria’s granddaughter, Princess Victoria, to husband Prince Louis of Battenberg.

It’s traditionally flavored with almond and has the signature Battenberg markings, that is, the yellow and pink squares (said to represent the four princes of Battenberg). The strips of sponge are glued together using jam (normally apricot) and the whole cake is covered in marzipan. Sometimes the edges are crimped and the top is patterned with a knife.

Although there are specialized Battenberg cake tins available, you don’t need one. This cake can be baked in a square baking tin and a divide made with foil to separate the two batters. This recipe really is all about simplicity.

I found the cake to be very simple to make.  The almond flavor was nice and the crumb was moist and perfect.  Instead of marzipan, I attempted to make some chocolate plastique (plastic chocolate).  I was not so successful with this.  Despite kneading my chocolate for quite some time, I just could not get it to come together.  It simply crumbled as soon as I tried to roll it out.  I'm not sure what I did wrong, but this prevented me from wrapping my cake beautifully as others have done.  Instead, I'm going to attempt a marshmallow fondant (for the first time).  That also means that I haven't finished it yet, so pics for this post will come later...


Thanks Mandy, for hosting this month's challenge.  You'll find the recipe below.  Also be sure to check out the Daring Bakers' Blogroll to see what everyone else thought of these beautiful and impressive cakes!

Traditional Battenberg:

Recipe Source: Traditional Battenberg adapted from Mary Berry’s “Baking Bible”

Servings: approx. 8

Ingredients
¾ cup (1½ sticks) 175gm / 6 oz Unsalted Butter, softened & cut in cubes
¾ cup / 175gm / 6 oz Caster Sugar
1¼ cups / 175gm / 6 oz Self-Raising Flour (*To make your own self raising flour: 1 cup Self Raising Flour = 1 cup / 115g All Purpose Flour + 1 ½ tsp Baking Powder + ¼ tsp Salt (omit salt if there is salt in the recipe) sifted together)
3 Large Eggs, room temp
½ cup / 65gm/ 2 1/3 oz Ground Almonds (Can be substituted with ground rice)
3/4 tsp / 3½ gm Baking Powder
½ tsp / 2½ ml Vanilla Extract
1/4 tsp (1¼ ml) Almond Extract
Red Food Colouring, paste, liquid or gel

To Finish
1/3 cup (80 ml) 100gm /3 ½ oz Apricot Jam
1 cup / 225gm / 8 oz Marzipan, natural or yellow


Directions:
1. Preheat oven to moderate 350°F/180°C/160°C Fan Assisted/Gas Mark 4
2. Grease an 8”/20cm square baking tin with butter
3. Line the tin with parchment paper, creating a divide in the middle with the parchment (or foil)
4. OR Prepare Battenberg tin by brushing the tin with melted butter and flouring
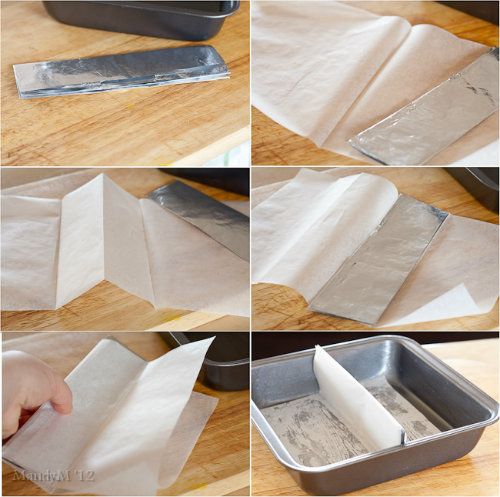

Making the pan divider with parchment paper and foil.

I folded over a sheet of foil several times to help reinforce the divide.
Fold the parchment in half and put the foil into the crease.
Butter the bottom of the cake pan, this will help "glue" the parchment to it.
Make sure the divide is in the middle of the pan and stick the excess parchment onto the bottom.

5. Whisk together the dry ingredients then combine with the wet ingredients in a large bowl and beat together just until the ingredients are combined and the batter is smooth
6. Spoon half the mixture into the one side of the prepared baking tin
7. Add a few drops of red food liquid/gel/paste to the remaining batter, stir until the colour is thoroughly distributed, add more colour if needed
8. Spoon the pink batter into the other half of the prepared baking tin
9. Smooth the surface of the batter with a spatula, making sure batter is in each corner
10. Bake for 25-30mins until the cake is well risen, springs back when lightly touched and a toothpick comes out clean (it should shrink away from the sides of the pan)
11. Leave to cool in the tin for a few minutes before turning out to cool thoroughly on a wire rack
12. Once completely cool, trim the edges of the cake with a long serrated knife
13. Cut each coloured sponge in half lengthways so that you are left with four long strips of sponge
14. Neaten the strips and trim as necessary so that your checkered pattern is as neat and even as possible
15. Gently heat the apricot jam and pass through a small sieve
16. Brush warmed jam onto the strips of cake to stick the cake together in a checkered pattern (one yellow next to one pink. On top of that, one pink next to one yellow)
17. Dust a large flat surface with icing sugar then roll the marzipan in an oblong shape that is wide enough to cover the length of the cake and long enough to completely wrap the cake
18. Brush the top of the cake with apricot jam
19. Place the cake on the marzipan, jam side down
- Tip: Either in the middle or to the one side of the marzipan
20. Brush the remaining three sides with jam
21. Press the marzipan around the cake, making sure the join is either neatly in the one corner, or will be underneath the cake once turned over
- Tip: If you put the sponge to the one side of the marzipan, I found it easiest to "roll" the sponge over and over onto the marzipan instead of lifting the marzipan up onto the sponge
22. Carefully flip the cake over so that the seam is under the cake and score the top of the cake with a knife, you can also crimp the top corners with your fingers to decorate
23. Neaten the ends of the cake and remove excess marzipan by trimming off a small bit of cake on both ends to reveal the pattern

Coffee and Walnut Battenberg:

Servings: Approx. 8
Ingredients
¾ cup (1½ sticks) 175gm / 6 oz Unsalted Butter, softened & cut in cubes
¾ cup / 175gm / 6 oz Caster Sugar
1¼ cups / 175gm / 6 oz Self-Raising Flour (***see end of doc on how to make your own)
3 Large Eggs, room temp
½ cup / 65gm / 2 1/3 oz Ground Almonds (Can be substituted with ground rice)
3/4 tsp / 3½ gm Baking Powder
3 tsp (15 ml) Milk
½ tsp (2½ ml) Vanilla Extract
1½ tsp (7½ ml) 7 gm Instant Coffee Powder or Granules
3 Tbsp / 25gm / 1 oz Walnuts, roughly chopped

To Finish
½ cup (1 stick) 115gm /4 oz Unsalted Butter
2 cups / 225gm /8 oz Powdered (Icing/Confectioners') Sugar
½ tsp / 2 gm Instant Coffee
1½ tsp (7½ ml) Milk or Cream
1 cup / 225gm /8 oz Marzipan, natural or yellow

Directions:
1. Preheat oven to moderate 350°F/180°C/160°C Fan Assisted/Gas Mark 4
2. Grease an 8”/20cm square baking tin with butter
3. Line the tin with parchment paper, creating a divide in the middle with the parchment (or foil)
- Tip: See photos or watch video above for detailed instructions
4. OR Prepare Battenberg tin by brushing the tin with melted butter and flouring
5. Whisk together dry ingredients (except walnuts and coffee) and combine with the wet ingredients in a large bowl (except vanilla and milk) and beat together just until the ingredients are combined and the batter is smooth
6. Spoon half the mixture into a separate bowl and stir in the vanilla, 1½ teaspoons milk and chopped walnuts
7. Spoon the walnut mixture into the one side of the prepared baking tin
8. Dissolve the coffee in the remaining 1½ teaspoon milk and add to the remaining batter, stir until just combined
9. Spoon the coffee batter into the other half of the prepared baking tin
10. Smooth the surface of the batter with a spatula, making sure batter is in each corner
11. Bake for 25-30mins until the cake is well risen, springs back when lightly touched and a
toothpick comes out clean (it should shrink away from the sides of the pan)
12. Leave to cool in the tin for a few minutes before turning out to cool thoroughly on a wire rack
13. Once completely cool, trim the edges of the cake with a long serrated knife
14. Cut each sponge in half lengthways so that you are left with four long strips of sponge
15. Neaten the strips and trim as necessary so that your checkered pattern is as neat and even as possible
16. Combine the buttercream ingredients together and mix until combined
17. Spread a thin layer of buttercream onto the strips of cake to stick the cake together in a checkered pattern (one yellow next to one pink. On top of that, one pink next to one yellow)
- Tip: See photos for detailed instructions
18. Dust a large flat surface with icing sugar then roll the marzipan in an oblong shape that is wide enough to cover the length of the cake and long enough to completely wrap the cake
19. Spread the top of the cake with a thin layer of buttercream
20. Place the cake on the marzipan, buttercream side down
21. Spread buttercream onto the remaining three sides
22. Press the marzipan around the cake, making sure the join is either neatly in the one corner, or will be underneath the cake once turned over
23. Carefully flip the cake over so that the seam is under the cake and score the top of the cake with a knife, you can also crimp the top corners with your fingers to decorate
24. Neaten the ends of the cake and remove excess marzipan by trimming off a small bit of cake on both ends to reveal the pattern

Chocolate Plastique / Modelling Chocolate:

Servings: Approx. 8
Dark Chocolate Plastique
200gm /7 oz Good Quality Dark Chocolate (70% Cocoa content)
¼ cup / 60ml /2 oz Light Corn Syrup / Glucose Syrup / Golden Syrup
Milk Chocolate Plastique
200gm /7 oz Good Quality Milk Chocolate (+-50% Cocoa content)
3 Tbsp / 45ml /1½ oz Light Corn Syrup / Glucose Syrup / Golden Syrup
White Chocolate Plastique
200gm /7 oz Good Quality White Chocolate
2 Tbsp / 30ml /1 oz Light Corn Syrup / Glucose Syrup / Golden Syrup

Directions:
1. Melt the chocolate in a double boiler or in a heatproof bowl over a pot of simmering water, stir occasionally
2. Once completely melted, remove from heat and allow to cool a bit
3. Stir in corn syrup / glucose syrup / golden syrup, it will seize up almost immediately, just keep stirring until mixed and it comes away from the side of the bowl
4. Transfer chocolate into a sealable bag, spread the chocolate out then seal the bag
5. Leave overnight or refrigerate for about 2 hours until completely firm
6. Turn out from the bag and knead on a surface dusted with powdered sugar, at first it will just break , but as you knead, it will warm up and start to become pliable
7. Knead until it's pliable enough to roll out or mould, 5 - 10mins
Storage Instructions/Tips:
- Battenberg will keep for 3-4 days stored at room temperature in an airtight container
- Keep chocolate plastique in an airtight container at room temperature, it will keep for as long as the
expiry date on the chocolate wrapper

Tuesday, June 19, 2012

French Strawberry Cake (TWD)


This week's Tuesdays with Dorie: Baking with Julia recipe was hosted by Sophia of Sophia's Sweets and Allison of Sleep Love Think Dine: French Strawberry Cake.  It's a genoise, or Italian sponge cake, made without any chemical leavening agents.  Instead, the sponge is made by whipping air into the batter and the dry ingredients are folded in.  The batter is extremely delicate, and over mixing will cause it to deflate.  The cake is then split into three layers, and then strawberries and cream are layered into between each cake layer.


I had a few small issues with this cake.  First, I was traveling and did not have an 8-inch cake pan.  I had to use a larger pan, and the resulting cake was too thin to cut into three layers.  So, I ended up baking a second cake and splitting both cakes into two layers instead - resulting a 4-layer cake instead of a 3-layer cake.  Even though I whipped up a full 2 cups of heavy cream (instead of the indicated 1-1/4), I did not have enough cream to pipe around the cake.  Instead, I decided to just decorate my cake with more fresh strawberries.


Thanks to Sophia and Allison for hosting; you can find the recipe on their blogs here and here.  Make sure you check here, too, to see what everyone else thought of wonderful summer treat.

* Recipe notes:
- Be very very careful folding your ingredients together, especially the butter.  If you're not careful all is lost and you shouldn't even bother baking up the deflated batter.
- I'd recommend using at least 2 cups of heavy whipping cream to frost the cake.

Monday, May 28, 2012

Honey White Challah and Cinnamon & Sugar Challah (DB)


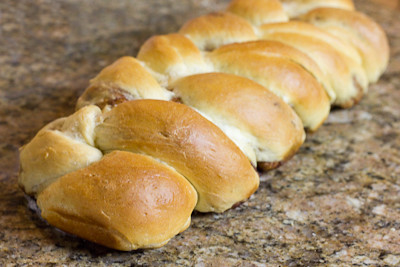
May’s Daring Bakers' was pretty twisted – Ruth from The Crafts of Mommyhood challenged us to make challah! Using recipes from all over, and tips from “A Taste of Challah,” by Tamar Ansh, she encouraged us to bake beautifully braided breads.

I was eager to try this recipe, and made one honey white loaf and one cinnamon & sugar loaf.  The honey white was good, but the cinnamon & sugar loaf was to die for! The recipe was easy to follow, though I had to add about 1 extra cup of flour before the dough wasn't too sticky to work with.  I was rather concerned as I was adding so much extra flour, but in the end I still had fluffy loaves with a nice crumb.

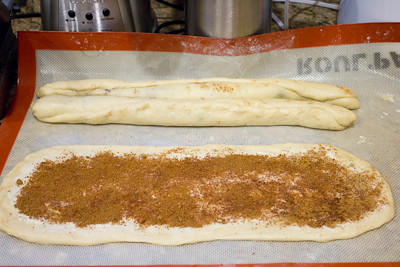
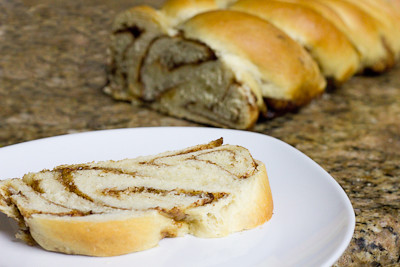
To create the cinnamon and sugar filling, I used 2/3 cup brown sugar (packed) mixed with 1 tablespoon ground cinnamon.  After separating the dough into three equal pieces, I simply rolled each piece into a rectangle and then spread 1.5 tablespoons of softened butter on to each rectangle.  I then spread one-third of the cinnamon and sugar mixture on to each one and then rolled the rectangles up lengthwise. Then I simply braided the three rolls like I did with the regular honey white loaf.

The result was a bread that basically tasted like a delicious cinnamon roll, sans icing.  I realized as I was getting ready to put the bread in the oven that I was out of eggs, so my loaves were without egg washes, but I brushed them with a little bit of milk to add just a little more color to them.  The cinnamon & sugar loaf didn't last very long in our household, and I will definitely be making it again.

Thanks, Ruth, for hosting this month.  If you'd like the recipe, you'll find it posted below, and on Ruth's blog.

Honey White Challah
from Tammy's Recipes

Ingredients
1 ½ cups (360 ml) warm water, separated
1 Tbsp. (15 ml) (15 gm/½ oz sugar
2 Tbsp. (2-2/3 packets) (30 ml) (18 gm) (2/3 oz) dry active yeast
½ cup (120 ml) honey
1 Tbsp. (15 ml) oil (light colored vegetable oil, or olive oil if you prefer)
4 large eggs
1 ½ tsp. 7½ ml) (9 gm) (1/3 oz) salt
5 cups (1200 ml) (700 gm/25 oz) all-purpose (plain) flour, plus more as needed (up to 8 or 9 cups total)
1 egg beaten with 1 tsp. water
Directions:
  1. In mixer bowl/large mixing bowl combine ½ cup warm water, 1 Tbsp. sugar and 2 Tbsp. yeast.  Allow to proof approximately 5 minutes until foamy.
  2. To the yeast mixture add the remaining water, honey, oil, eggs, salt and 5 cups of flour. Knead (by hand or with your mixer’s dough hook) until smooth, adding flour as needed.  Knead for approximately 10 minutes.
  3. Transfer dough to a clean, oiled bowl, turn to coat or add a bit more oil on top.  Cover bowl with a kitchen/tea towel.  Leave to rise in a warm place until doubled, about 1 ½ hours. 
  4. Punch down the dough, divide it into two sections.  Use one half to make each loaf (shaped or braided as desired).
  5. Place loaves on parchment lined or greased baking sheets, cover with a towel, allow to rise 30 minutes.
  6. Preheat oven to 325 degrees.
  7. Brush tops loaves with egg wash.  (Sprinkle with seeds or toppings here if wanted.)
  8. Bake loaves 30-40 minutes until done.
  9. Cool on wire racks.

Wednesday, May 2, 2012

Hungarian Shortbread (TWD)


I'm a day late posting, but this week's Tuesdays with Dorie: Baking with Julia recipe was hosted by Lynette of 1smallkitchen and Cher of The not so exciting adventures of a dabbler…: Hungarian Shortbread.  This shortbread recipe is very similar to most traditional shortbreads - made with flour, sugar, and a lot of butter.  However, instead of rolling out the dough, half of it is grated into the pan and then topped with fruit preserves, and then topped with more grated dough.

The dough recipe was simple, and the results quite delicious.  However, I think I spent a good 30 minutes grating all of the dough! It kept getting too soft to grate so I'd have to put it back in the fridge to chill while I grated the other ball of dough. So, while these were buttery, crumbly, and delicious, I'm afraid I won't be making them again simply because I cannot put myself through another 30 minutes straight of grating again!

Thanks to Lynette and Cher for hosting; you can find the recipe on their blogs here and here.  Make sure you check here, too, to see what everyone else thought of these sweet, buttery treats.

* Recipe notes:
- I used a 13 x 9 inch pyrex pan to bake my shortbread.
- Instead of 8 oz of fruit preserves, I used 16 oz.  This seemed to be a good amount.  I think 8 oz would result in a layer of fruit preserves that was too thin.  I would recommend using at least 12 oz.
- I had to bake my shortbread for an extra 15 minutes before it was golden brown on top.  Some bakers noted that the bottom layer seemed undercooked but I did not have this problem since I baked mine longer.

Sunday, April 29, 2012

Armenian Nutmeg Cake (DB)


The Daring Bakers' April 2012 challenge, hosted by Jason at Daily Candor, were two Armenian standards: nazook and nutmeg cake. Nazook is a layered yeasted dough pastry with a sweet filling, and nutmeg cake is a fragrant, nutty coffee-style cake.  We were given the choice to make either dessert, or both if we were really up for a challenge.

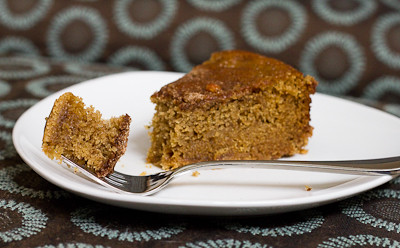
I opted to try the Armenian Nutmeg Cake and while it seems deceivingly simple and plain, it is such a delicious cake.  The brown sugar in the cake gives it the most wonderful caramel flavor and the "crust" that is created at the bottom of the cake with a layer of flour, sugar, and butter gives it an unexpected crunch.  The cake vaguely reminded me of the British dessert sticky toffee pudding, just without the sauce.

I stuck to the recipe as written, except I used 1 teaspoon of cinnamon and 1 teaspoon of nutmeg instead of 1.5 teaspoons of nutmeg.  I think the cake lasted a total of about 24 hours in our household, it was that good!

Thanks Jason, for hosting this month's challenge.  I just love it when I find a recipe that is amazing that requires minimal effort! I'll definitely be making this cake again and again. You'll find the recipe below.  Also be sure to check out the Daring Bakers' Blogroll to see what everyone else thought of these Armenian desserts.

Armenian Nutmeg Cake

Makes one 9”/23cm cake which yields 12 servings
Video Instructions by Jason

Ingredients
  • 1 cup (240 ml) milk (I use whole, but nonfat or lowfat should be fine; non-dairy might work just fine, as well)
  • 1 teaspoon (5 ml) (5 gm) baking soda
  • 2 cups (480 ml) (280 gm/10 oz) all-purpose (plain) flour (I suspect pastry flour or another low-gluten flour might even work better to achieve a light, fluffy crumb)
  • 2 teaspoons (10 ml) (10 gm) (⅓ oz) baking powder (I used single-acting, because it's aluminum-free, and it turned out fantastic)
  • 2 cups (480 ml) (400 gm/14 oz) brown sugar, firmly packed
  • 3/4 cup (1½ sticks) (180 ml) (170 gm/6 oz) butter, preferably unsalted, cubed
  • 1/2 cup (120 ml) (55 gm/2 oz) walnut pieces, may need a little more
  • 1 to 1-1/2 teaspoons (5 to 7 ½ ml) (5 to 8 gm) ground nutmeg (try to grate it fresh yourself; the aroma is enchanting)
  • 1 egg
Directions:
Directions - the Traditional Way (The Fast, Easy Way further down)
1. Preheat your oven to moderate 350°F/175°C/gas mark 4.
2. Mix the baking soda (not baking powder; that's for the next step) into the milk. Set it aside.
3. Sift together the flour and the baking powder into a large bowl. One sift is fine
4. Add the brown sugar. Go ahead and mix the flour and brown sugar together. Or not.
5. Toss in the cubed butter.
6. Mash the butter with a fork into the dry ingredients (you can also use your fingers if you want). You'll want to achieve a more-or-less uniform, tan-colored crumbly mixture.
7. Take HALF of this resulting crumbly mixture into your springform (9”/23cm) pan. Press a crust out of it using your fingers and knuckles. It will be easy.
8. Crack an egg into a mixer or bowl.
9. Toss the nutmeg in with the egg.
10. Start mixing slowly with a whisk attachment and then increase to medium speed, or mix with a hand whisk if you're doing it manually. Once it's mixed well and frothy (about 1 minute using a standing mixer, or about 2-3 minutes of vigorous beating with a whisk), pour in the milk and baking soda mixture. Continue to mix until uniform.
11. Pour in the rest of the crumbly mixture. Mix that well, with either a paddle attachment, or a spatula. Or continue to use the whisk; it won't make much of a difference, since the resulting batter is very liquidy.
12. Pour the batter over the base in the springform pan.
13. Gently sprinkle the walnut pieces over the batter.
14. Bake in a preheated moderate oven for about 30-40 minutes. You'll know it's done when the top is a golden brown, and an inserted toothpick comes out clean.
15. Allow to cool in the pan, and then release. Enjoy!


An Even Easier Way...if you have a Food Processor
1. Preheat your oven to moderate 350°F/175°C/gas mark 4 .
2. Mix the baking soda (not baking powder) into the milk. Set aside.
3. Put the flour, baking powder, and the brown sugar into your food processor. Pulse until uniformly mixed.
4. Toss in the cubed butter. Pulse until uniformly mixed into tan-colored crumbs.
5. Pour HALF of the crumbs into your springform (9”/23cm) pan. Press out a crust using your fingers and knuckles.
6. Crack the egg into the food processor with the rest of the crumbs still in it.
7. Grate 1 to 1-1/2 teaspoon of nutmeg. Toss that into the food processor, too. Pulse until well-incorporated.
8. Pour in the milk and baking soda mixture. Continue to mix until a slightly lumpy tan batter is formed.
9. Pour the batter over the crust in the springform pan.
10. Gently sprinkle the walnut pieces over the batter.
11. Bake in a preheated moderate oven for 30-40 minutes. It's ready when the top is golden brown, and when it passes the toothpick test (comes out clean).
12. Cool the cake in the pan, and then dig in. Yum yum!

Freezing/Storage Instructions/Tips: Armenian nutmeg cake will keep (covered) at room temperature for 2-3 days. It tastes even better still warm from the oven.

Allow to cool completely before attempting to freeze. Armenian Nutmeg Cake will freeze fairly well if completely sealed. It can be frozen for up to 3 months.

Thursday, April 26, 2012

$5 Starbucks eGift Card for $1.80

If you're a Starbucks addict, you'll want to head on over here to get a $5 Starbucks eGift Card for just $1.80

It's the daily deal today (check under Charlotte if you don't see it) for $2 and code moviebuff3 (case sensitive) will take 10% off and make it only $1.80!

Act fast, as I am sure that these will sell out quickly! (Also note that the site is extremely slow right now due to increased traffic, but the pages do eventually load)

Monday, April 23, 2012

$10 Off and Free Shipping on Orders over $25 at Vitacost.com

*** Update - it also looks like through 4/24 only, you can get free shipping on all orders over $24, or $2.24 shipping on orders under $24.  Several of the Clif Organic Zbars are just $3.45 for a 6 pack.  This means you can get three 6 packs for $12.59 including shipping, or just $2.59 after your $10 off code! Be sure to look around for some other great deals ***

If you previously signed up for the Vitacost.com $10 off promo but didn't get to use it before the deal expired, here's another one! Through 5/1, Vitacost is offering FREE shipping on your entire order when you purchase $25 or more in Vitacost brand products.  This means you can purchase something like the 54 oz Vitacost Extra Virgin Coconut Oil ($20.99) and the Vitacost Vitamin D3 (200 capsules) ($4.99) and pay only $15.98 for both after the $10 code.  Plus several Vitacost brand items are buy one get one half off right now, too (with code VBOGOE)!

Here's how:
1) Use this link to sign up and get a $10 promo code sent to your email.  After you register for an account with Vitacost.com (to get the code you must go through a referral link like the one provided) you will receive an email with the subject line "Here's your $10 coupon for Vitacost.com" (this may take an hour)

2) Then add  $25 or more in Vitacost brand products to qualify for free shipping.

3) Enter your $10 off code (should arrive in your email) at checkout.

Also, don't forget to add 2 free samples to your cart before checking out (they've got a few different teas and other samples available).  Happy shopping!